‘What’s an SEO?’ Simple Strategies to Drive More Traffic – and Customers – to Your Moving Website

Author:

Publish Date:

Last Modified Date:

Category: Business Basics

Tags: Tags: , , , , , , , , , , , , , , , , , , , ,

Rare is the person who has never heard of “SEO”, or Search Engine Optimization. Or at least someone who doesn’t know that someone out there is paid a lot to know how it all works.

SEO is critical for driving more traffic – and more potential customers – to a website. But how do we movers “do” SEO? How do we convince those internet search engines to point more people to us?

There are actually tons of ways. Some are easy to implement, while others … not so much. Today we offer up three easy strategies you can put to use right away (plus a tip for holding onto those potential customers who come to your virtual door).

Keywords are everything.

Keywords are what bring your customers and you together – provided you are using the right ones! So what are those magic words? Just think: What would people type into that little search box on Google if they want to find a moving company in, say, Boston? That’s right: “Boston moving company”. But how many moving companies are there in Boston? You’ll want to set yourself apart somehow so those search engines will pay you some attention.

How? People moving in to or from Boston aren’t usually just looking for a moving company. Really, they’re searching for “Boston movers that can assemble furniture,” or, “insured Boston movers.” What specific services or features do you offer? When you’re writing your webpage, build one that cleanly and clearly explains each feature you offer, so that as Bostonians search for “Boston area pet-friendly movers”, they’ll find your animal-lovin’ crew at the top of their search results.

7 Embarrassing Lessons I Learned While Moving People

7 Embarrassing Lessons I Learned While Moving People

Lessons I, Kevin The Mover, learned during my earliest days on the job through the mistakes of others (and my own).

There’s a website for that.

As good as your plain guesses might be on what people are searching, go one step further with these free SEO keyword tools that help unearth even more magical keywords:

Moving Company SEO Tips

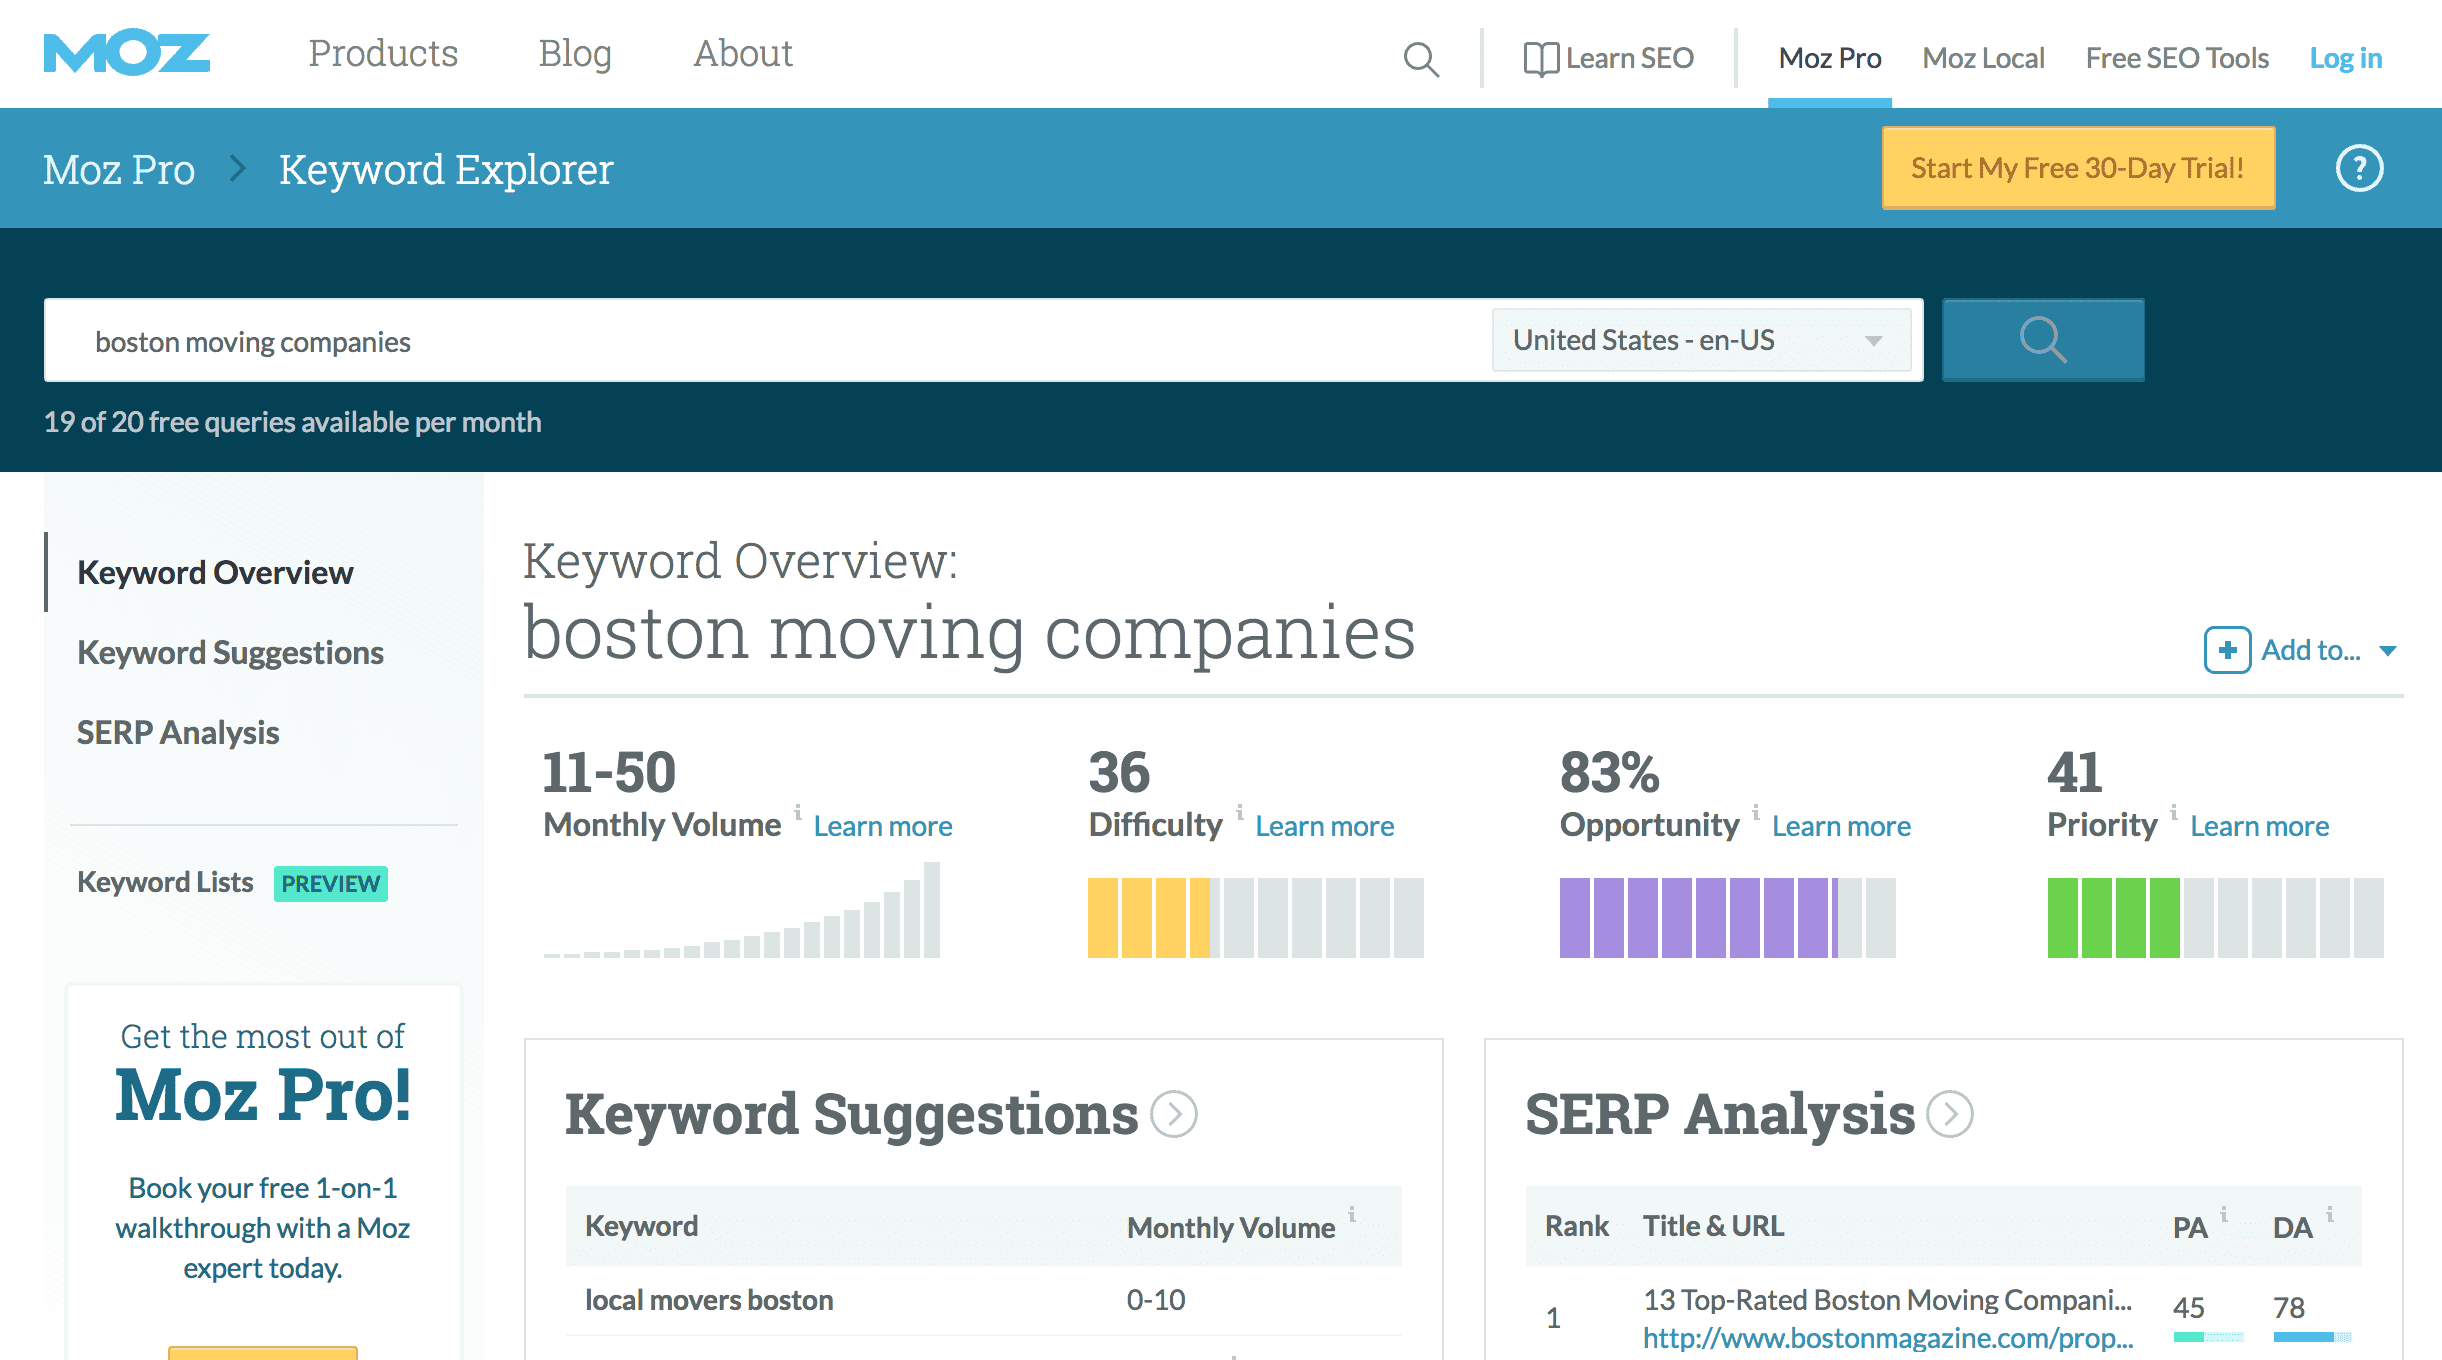
With Moz’s Keyword Explorer, you can do 20 free searches per month. Plugin your best guess at a search phrase and Moz reveals data for that phrase, including how many times that phrase gets searched, its ranking difficulty, along with a list of additional keyword ideas.

Google Keyword Tool

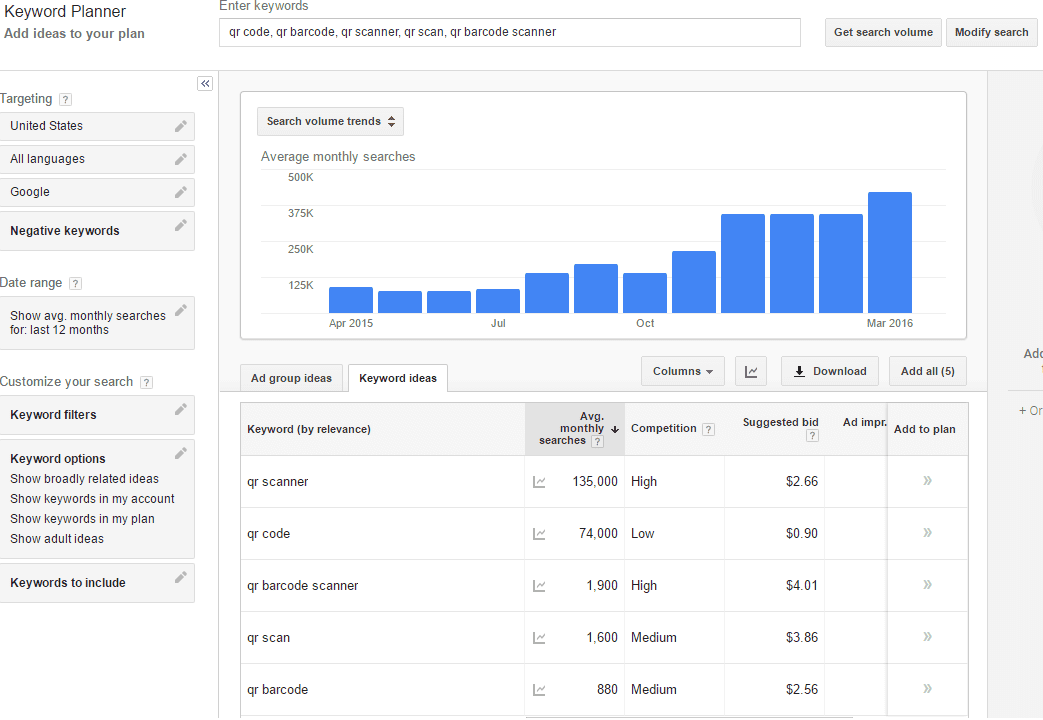
Google’s Keyword Tool is also a great tool. It’s powerful, offering long lists of related keyword suggestions alongside search volumes for each phrase. It’s true that you have to log in to use it, but anyone can sign up for a free Google account. (You might benefit from using Google’s advertising tool, Adwords – but that’s a post for another day!) Keep in mind – Google purposefully does not show all the keyword suggestions they have in their secret vault. They also only report an estimate of the search volume (the times a keyword phrase is searched). That means if you’re seeing phrases estimated at 10-50 searches per month … it could actually be double or triple that.

There are about a million other keyword suggestion tools out there – Übersuggest, SEO Book’s keyword tool (requires a free account like Google), and others each offer their own spin and data on keyword search ideas.

What do you do with these words?

Now that you’ve got your master list of keywords, the question arises: Where do we put them?

Answer: all over your website! This piece on keyword placement suggests several places to put them, from the obvious (the title of your website) to the semi-technical (your META description) to the biggest, broadest aspect of your entire website: your content. 

This does not mean you cram a keyword phrase into every corner of a page. Using a phrase 100 times on a page to try and rank for it in searches will actually get you “in trouble” with the search engines (you won’t rank). Use the phrase normally as you would on any page talking about that topic. A page talking about pet-friendly movers will naturally mention being “pet-friendly” a decent amount of times.

What does “content” mean, exactly?

This is the meat of your website – It’s about writing high quality, authoritative content around topics you’re already an expert on.

Search engines have gotten surprisingly good at doing more than scanning your content for the right keywords like they did in 2000. Now, search engines basically read your content and separate which content is high quality versus keyword fluff. That means if you’ve spent the last 10 years training your crews in the intricacies of moving pets (and have had a website that whole time), Google will detect if you write content that’s from your expertise… or just “words words words keywords words keywords”.

Don’t get me wrong, the keyword phrases on your list need to appear in the content at least a few times. In fact, after you’re done writing, it’s important to search your content for that keyword phrase to make sure it’s in there. But like I said before, don’t cram the keyword into every line. Your content should sound natural and informative to any reader. Just like you would want to read.

Protip: Search engines tend to pay more attention to websites that are updated regularly. This means it is advantageous to add content to your site once in a while. The most common, and perhaps most relevant way to do this as a moving company, is to maintain a blog! It can have tips for packing, guidelines for moving or even stories about your company. Just make it clear, quick and fun. And yes, find a place for those keywords!

Keeping a blog takes time, but it can be time well spent when those blog posts start bringing in interested customers.

Putting links to other people is essential.

The “World Wide Web” is exactly that: a web. And in this massive, intertwined virtual community, where would you rather be? Off by yourself hanging out in a remote corner? Or in the middle of thousands of people?

“Backlinks” are a specific type of links, which in themselves are just electronic threads that connect your website with other websites. From a technical standpoint, backlinks are links on other websites that transport people to your website. The best (not the quickest or easiest, but the best) way to create these backlinks is by creating content for other websites – content that either contains or ends with a link or links that will bring people from that website to yours.

That means giving other websites reasons to link to you!

The important point to note here is that with backlinks, you aren’t solely attracting the people who read those guest articles you write for other websites. It turns out that when other sites link to your site, search engine starts thinking you must be something special and will bump you up higher toward the top when someone does a search using the keywords you’ve embedded in your site.

It’s all coming together!

To score a couple of backlinks, you might start out by writing moving-related articles for your local paper or an organization like your Chamber of Commerce. Or go big and shoot for a place like the Huffington Post that draws millions of readers every month. Not everyone will read what you’ve written, but the mere fact that you now have a backlink from a site as heavily-trafficked as the HuffPost means search engines will really think you are something special.

One last thing protip!

Speed. Let’s face it. People are impatient. Once upon a time, we would be excited if the postcards we sent from our tropical vacation got home to our friends before we did. Now we get frustrated if we can’t upload our selfies right there on the beach.

Same with using the net. People don’t want to wait. So if your site doesn’t appear within no more than a few seconds, your potential customer will start hitting that back button to move on to someone with a faster homepage. 47% of consumers expect a web page to load in 2 seconds or less, according to Kissmetrics. This is particularly relevant with the mobile version of your site – Google itself reports that 53% of mobile site visits are abandoned if pages take longer than 3 seconds to load. And what takes the most time to load? Images!

There is a myriad of ways to minimize the time a potential customer has to spend waiting for your site to load. Many of them require a bit of technical know-how. But reducing the size and thus the load speed of your images is simple. Want to know how? Try tinypng.com to compress your images – as they get smaller without losing quality, you’ll see how much faster your site moves!

Taking over your block.

So will this SEO advice really work for you, the small moving company with big ambitions? We think so. For a real-live example of how a moving company figured out how to boost its SEO situation, check out this story on SLC Moving of Salt Lake City.

Go the extra mile to map out a strategy for increasing your traffic, your customer base, and your bottom line. That’s what the big moving companies are doing.

What You Should Bring, Could Bring and DON’T Bring When Moving Into a Dorm

Author:

Publish Date:

Last Modified Date:

Category: College Moves

Tags: Tags: , , , , , , , , , , , , , , , , ,

‘Tis the season for college dorm room shopping! If you’ve been to any of the big box stores lately, we’re confident you have seen all the colorful storage things just screaming “take me to college!”.

Some college students are eager to start prepping for their new “home away from home”, while others aren’t too interested in putting in much extra time. Whichever you are, we aren’t judging. We’re just here to make sure everyone is prepared for the excitement!

With that in mind, here’s an in depth synopsis about what you should bring, what you could bring, and what you don’t bring to college come fall. Be independent and avoid having mom and dad come visit (with the essentials you forgot) less than a week after moving into your new digs.

What You Should Bring

Towel, Toiletries and Laundry Detergent

Whether your dorm is equipped with private bathrooms or community bathrooms, this is the number one must: multiple towels, toiletries and shower shoes. Most college students opt for a shower caddy, which is a handy way to corral all of their shower essentials when traveling to and from the shower. Be sure to choose a shower caddy that can drain any water from the shower, because you don’t want it to become moldy from sitting water.

Unfortunately, college life also comes with learning to do your own laundry, and usually, the laundry facilities aren’t anything to get excited about. Stock up on plenty of laundry detergent, softener and dryer sheets to keep your clothing looking its best (and your parents at bay) all semester long.

A Microwave and Mini Fridge with Snacks

Photo by Good House Keeping

Tried and true for a reason: make sure you pack a microwave with some snacks! Healthy or unhealthy, we’re definitely not judging, just reminding you that having your own stash of food is important. You don’t want to find yourself starving and the cafeteria is closed, nor do you want to pay cafeteria prices. You probably don’t want to buy food in bulk because you won’t have a ton of places to store it, but having some snacks stashed away to hold you over until the cafe opens is essential.

Speaking of snacks, most dorms also allow you to bring your own microwave and mini fridge. You can always cut down on the costs of these items by arranging with your roommate to each bring one of the two, that way you only have to invest in one, not both.

Plenty of Power Strips and Extension Cords

Laptop, printer, phone charger, microwave, mini fridge, blow dryer, iron, string lights, coffee maker…. all these things hog outlets. Dorms only have a few outlets though, and you’ll likely be sharing them with your roomie on top of it. What can we say, the struggle is real! Along with all of these everyday essentials, be sure to pack at least one power strip and possible extension cord so you never get caught with a dead cell phone or no coffee! That could be bad.

A Secure Box for Very Important Papers

Focusing on the basic must-have stuff makes it easy to forget about this essential. Make sure you bring your driver’s license, insurance card, social security number (or card as long as you can keep it safe), emergency contact and medical info, paperwork for refillable prescriptions, and any other documents you may need while you’re away. We hope you never have to use some of these, but having them with you just in case is necessary.

What You Could Bring

Carpet Squares or a Cool Rug

Some dorm rooms come with commercial grade carpets, but most of these carpets have seen high traffic for several years (at least!). Packing an additional rug or carpet squares to add to your dorm will not only make your room look a lot cuter, but it will make the whole space feel a lot more warm and cozy. Consider a cool rug because this tiny upgrade will make such a difference… and may even keep your room a bit warmer in the winter if it experiences any kind of drafts like our dorms rooms did.

A Bunch of Cleaning Supplies

No matter your lifestyle, living in these cramped quarters all day every day means that your dorm room is bound to get a little messy! And since mom or dad isn’t tagging along to clean up after you, it’s important to pack some cleaning supplies so you can keep the place clean… especially during flu season.

Here’s a list of some basic items you should consider buying a few or all of, especially if you have a closet space:

  • Vaccum
  • Disinfectant
  • Duster
  • Swiffer mop
  • Windex
  • Bleach wipes
  • Dish soap

A Printer

Before going out and splurging on a new printer or lugging your large printer into your dorm room, be sure you actually need this piece.

Although having a personal printer is a huge perk when it comes time to last second papers, most schools offer a free printing lab that can do the same job. Plus printers are large and take up some valuable space in your room. Not to mention they can be costly with ink refills and necessary repairs, so be sure it’s a definite must (or a fancy luxury) before you add it to your shopping list!

What You Don’t Bring

Twin Bed Sheets

Although it may appear as though you will have a twin bed in your dorm room, most dorms actually have XL twins instead of the traditional twin sized bed. So packing twin-sized bedding will be a big mistake since you’ll find out pretty quickly that these new sheets won’t fit on your new bed! We speak from experience. If you want to double check, try social media to get some inside intel.

An Office Chair

Almost every dorm these days provides their own chairs. Coupled with how much space these things take up in a car, you absolutely do not want to make the mistake of doubling up. And if you’re really attached to your chair at home? Considering how big dorm rooms are, now’s the perfect time to start learning to love other seats!

Your Pet

Do we even have to say this? Apparently, we do. We know, we know… it’s hard to leave home, and even harder to leave home when you’re leaving your beloved pet at home. But unfortunately, dorm rooms do not allow pets of any kind. So sadly you can’t sneak in your pooch, kitty or even turtle into the halls of your new home.

Any Luggage at All

We urge you to skip the bulky luggage. Unless you need it for frequent flights back home, luggage is an item that will take up so much valuable space in your tiny new digs. Instead, try packing everything you have in oversized duffle bags (or even trash bags) that can be broken down and stored under your bed or somewhere else less invasive. The duffle bag will still allow you to pack up and travel, yet won’t waste valuable space like large luggage would.

Communicate and Consolidate! Whatever Your Roommate Is Bringing

It’s important to touch base with your roommate before the move-in day so you can coordinate what you are both bringing so you don’t double up! Space is very limited and sometimes so are funds, so splitting these items up will not only ensure your room isn’t overflowing with doubles of everything, but will also help cut down on costs for both of you.

The countdown to college is officially on. Hopefully, now you are fully prepared for what you should bring, could bring, and should NEVER bring to move-in day!

Movehacks: How to Unpack and Organize Before, During and After You Open a Box

Author:

Publish Date:

Last Modified Date:

Category: Organization

Tags: Tags: , , , , , , , , , , , , ,

Some people tell us unpacking is the most enjoyable part of their move. (“It’s like Christmas!” they say.) Others dread unpacking like nothing else in the world. (“It’s worse than a triple root canal!” they cry.)

Either way, unpacking can quickly turn your new home into an ocean of cardboard and newsprint. To make the process more manageable – dare we say more enjoyable? – here are some industry tips for getting your unpack off to a raging start.

What to Do Before the Unpack

Yeah, you gotta clean before you unpack 

You might not want to hear this right off the bat, but be prepared to clean before you begin to unpack. Even if it’s just wiping the shelves and countertops and giving the floors a quick sweep, unpacking in a clean home is infinitely more pleasant than unpacking in a dusty one. These items definitely take priority when it comes to cleaning:

  • Kitchen cabinets
  • Refridgerator
  • Bathtub and bathtub jets
  • Stove
  • Inside the washing machine

For more a more in-depth look at the how and why for house prep, check out this post.

Don’t unpack from down on the ground, clear some counter space

In the kitchen or dining room, do whatever you need to do so you can get your boxes up high. Why? Because you’ll need that counter space to place boxes on before you carry your things around your new place.

Why on a shelf? Because if you unpack from the place you dropped down that heavy box, you’re going to feel it in your lower back the next day. And week. Trust me, unpack up high. Always.

Unpack to shower and sleep first

No one in the history of unpacking has ever unpacked in one day. Unless you think you can be the first, don’t wait to unpack your bedding, set up your bed, hang your shower curtain and dig out what you need to feel clean and refreshed after a long day (or week? or month?) of moving.

Protip: Yes, this involves a little foresight when packing. Mark the boxes that contain the things you want to access first. (This may also include real plates, glasses and utensils to make you feel more at home when you sit down for dinner that first evening.)

What to Do During the Unpack

Unpack the “easy” boxes first to make room 

It takes almost no time to unpack your books and stick them on the shelves of your bookcase. In a matter of minutes, you can transfer your t-shirts and jeans from boxes to dresser drawers. And for goodness sake, get those massive and bulky wardrobe boxes unpacked and out of the house!

Go about halfway with the pictures 

Unpacking large pictures, mirrors and paintings is also quick, and you can then get rid of those bulky mirror cartons. Some folks, however, suggest hanging your pictures up early on to give your new place that homey feel. I say lean them up in a corner somewhere until you get all your furniture in place. Later on, you can do the “a little to the right…a little more…no back left…no not that much…okay there, no, a shade higher…yeah, that’s perfect” thing.

Make a quota of boxes unpacked per day and stick to it

If you are the motivated type, feel free to skip this tip. If you are easily distracted and tend to put things off, you might find it helpful to …. Hey, are you listening? …  set goals for yourself. Commit to unpacking one room per day, six boxes per hour, whatever. And reward yourself for sticking to your plan by going out afterward. Just remember how satisfying it will be when you’re all finished. 

Repack what you don’t actually need for storage

As you empty your boxes, set aside those items you decide you won’t need right away – or for a long time. Keep a few of those now-empty boxes handy and consolidate those items you put aside for quick transfer to the basement, the attic or the back of your closet.

Protip: Just as you did when you first packed, write the contents of each box with a marker as you go through your consolidation.

Don’t unpack the TV

The ultimate distractor. Do unpack the tunes, though. 

Purge. Again

We suggest purging while unpacking. On move after move, it’s common to see people wait for weeks (or months) for the family’s stuff to arrive. Living without most of their stuff, they often realize that so many things were unnecessary. And while packing stuff in a box allows you to forget about it, having to unpack it and find a place for it helps you decide whether you really need it. As with the stuff you’ll be storing in the attic or the basement, set up a box or two for these things you’ve decided to part with.

What to Do After the Unpack

Hide your paper trail

Keep a couple of medium-sized boxes on hand, and use them to stash all the packing paper that would otherwise turn the floors of your new home into a churning sea of crumpled newsprint. Flattening and folding all that paper will save a lot of space – if you have the time and patience – but doing so also helps you find smaller items that can go unnoticed and disappear forever. I can’t count how many times a customer dropped their used moving boxes off at our warehouse with items still buried in the packing paper inside.

Protip: Packing a large box with flattened paper can make it surprisingly heavy. Medium boxes are more manageable in this respect.

Now, about getting rid of all those boxes…

First, get them out of your way. The garage – if you have one and there’s room – is the obvious choice. (Think twice before stashing them in the basement “temporarily”.) If the weather is good and it feels appropriate, start breaking down your empty boxes and putting them out by the curb. Unless your new home is on a cul-de-sac it may not be long before you see passer-by stop and take those boxes off your hands. If this doesn’t work, here are three ideas that don’t require a box-hungry passerby.

  • If you have the time, the storage space and the mental fortitude try passing on your boxes to someone else who is getting ready to move. Facebook groups and Craigslist are two widely-used resources for advertising moving boxes for sale or for free.
  • Some moving companies will be happy to take your boxes and your packing paper off your hands. If none of the smaller local movers will take them, check for national van line agencies in your area (like United, North American, Atlas and Allied). The agencies I worked for never bought used boxes from people, but we were always happy to take them if they were in decent shape. 
  • Recycle if you can’t find someone who will reuse them.

Unpacking can prove a more formidable task than expected. Whether you think it’ll be like Christmas or a root canal, putting these tips into practice will help you feel at home faster.

Then you can sit back and watch the TV.

How to Install a Smart Thermostat in 8 Easy Steps

Author:

Publish Date:

Last Modified Date:

Category: Home Improvement

Tags: Tags: , , , , , , , , , , , , , , , , , , , , , , , , , , , , ,

Adding smart technology into your home is not only a great way to add convenience and value, but it’s also a great way to stay energy-efficient. Take the awesome smart thermostat for example… this gadget can be a high expense up front, but it will end up saving you big money in the long run. Some energy companies are even offering their customers $100+ in refunds if they show proof that they installed a smart thermostat!

Because this technology is a win-win-win in our playbook, we decided to show you how easy it is to make your home smarter with the smart thermostat. And when we say easy, we really mean it!  This entire project can be broken down into eight steps that shouldn’t take you longer than 30 minutes.

We installed the Nest for this tutorial, but there are a lot of awesome smart thermostats on the market. Do your research and find one that works best for you and your home.

What You Need

  • The Nest (or most any smart thermostat device – the product itself provides almost everything you need, including a screwdriver, screws, and a level)
  • Drill (optional)
  • Anchors (optional)
  • Touch-up paint, brush, painter’s tape (optional)

1. Turn off the Power

No matter how experienced you are with DIY projects, we highly recommend turning off the power to this system before moving on to the next steps. This is the safest way to install the smart technology and the only way we advise you to complete this installation. You will also want to make sure you have enough daylight left so you can see the project without the lights on.

2. Open up the Old Thermostat

After the electricity is off, we are ready to get to the fun part! Pop off the face of your current unit, which may require unscrewing a screw, depending on your unit. Ours popped right off, no screwdriver necessary. Above is what most thermostats look like without the cover, though yours may vary slightly. What matters most are the wires.

3. Label the Wires

Before you start removing the labels from your old thermostat, we need to label them so that we are fully prepared for the last few steps of this project. The Nest comes with these convenient stickers (right in the manual!) so you can keep your labels organized. If you don’t have stickers, just use whatever you can to label all of the wires. We only had four wires, but you may have more, so make sure you label everything! You’ll thank yourself later… we promise!

4. Take the Old Thermostat off the Wall

After the wires are clearly labeled, it’s time to unscrew the old thermostat and carefully pluck it off the wall. Use your screwdriver and it should come off fairly easily. Make sure that you’re not taking the wires (or stickers!) with you because you’ll need both of them soon.

5. Hang the New Thermostat

The Nest provides a level within the product (genius!), which makes this process extremely easy.  The level makes it simple to identify when the device is evenly placed on the wall, and that’s when you can make a mark so you later know where to drill. If your smart device has no internal level, don’t worry! It’s a pretty simple process to use an external level to make sure you’re screwing it on the wall correctly.

After you mark the wall, add your trim plate (if necessary – it’s the plastic encasing that goes around a lot of these smart devices) and hang the Nest using the markings you made to guide you. You may need to use an anchor for extra reinforcement into your wall during this step, which does not always come with the kit.

6. Attach the Wires to the New Thermostat

This is when those stickers come in handy. Not only is the technology itself smart, the team that created this kit may be even smarter because these stickers are genius! Simply match each wire’s label to the label on the Nest (or the labels you made yourself), then pop them firmly into place. Make sure the little box the wire goes into pushes down snugly, because that is how you will know it is tight, secure and connected.

7. Turn Electricity Back on 

If the Nest lights up a few moments after you turn the power back on, you have successfully completed the installation. If not, turn the electricity off and recheck the colored wires to make sure they’re both in the right spots and pushed down correctly.

Your little gadget will immediately start prompting you through a series of steps that will guide you to align this new technology with your home.

8. Control Your Heat and A/C from Your Cell Phone

This part is where the “smart” technology really comes in! Once you connect the Nest with your home’s wifi, you can monitor it from anywhere you have a wifi connection. That means you can click on the heat from work, turn on the air before you get back from vacation, or even change the temperature in the house while still laying in bed (that last one is probably our favorite!). If that’s not smart technology, we just don’t know what is.

So do you think you can tackle this project and make your home a little smarter, all while saving money and energy along the way? We’re confident that installing a smart thermostat is so simple that you now have all the steps you need to check this project off of your to-do list… maybe as soon as this weekend.

Movehack: How to Perfectly Wrap an Office Chair in Under 3 Minutes

Author:

Publish Date:

Last Modified Date:

Category: How To Pack, Pro Packing Guides

Tags: Tags: , , , , , , , , , , , , , , , , , , , , , ,

When you move, protecting your furniture is a huge part of the deal. And for most people who move, we’ve noticed the hardest piece of furniture to truly protect is none other than the common chair.

(more…)

A Jumbo Guide to Moving Really Big Stuff

Author:

Publish Date:

Last Modified Date:

Category: Pro Packing Guides

Tags: Tags: , , , , , , , , , , , , , , ,

Do any of you guys have scars that remind you of something? Something crazy you did? Some incredible, life-affirming moment you experienced?

I do. Sort of. I have a scar on my chin that reminds me of a refrigerator, a hand truck and a set of stairs.

When it comes to moving heavy appliances, some things are not so obvious – until of course you get hit in the chin. This month we go over a few things to know before you start wrangling with that big shiny fridge.

(more…)

A License to Make Money: The Basics for Upgrading Your Driver’s License

Author:

Publish Date:

Last Modified Date:

Category: Business Basics

Tags: Tags: , , , , , , , , , , , , , , , , , , , ,

[Synopsis: Before you go for your CDL there are some things you need to know. Psst…here they are!]

As an operations manager, one of the first questions I asked anyone who walked in to apply for work was, “Do you have a CDL?”

That is, a commercial driver’s license, which allows you to operate large or extra heavy vehicles.

A “no” answer was fine. Obviously, having a CDL has nothing to do with one’s ability to be a hard-working mover. But more CDLs on the payroll means less chance of being stuck with a truck no one can drive. (Plus it got them thinking about the value of having one for themselves.)

For all of you who need CDL drivers now – and for all of you who plan to need them eventually – this feature is for you. We’re going to go over the basics to make your road to work as smooth as possible.

(more…)

×

I'm Moving

Moving? Thinking about moving? Whether your move is off in the distance or you already have one foot out the door, you'll learn about everything you should expect through our useful how-to's, cool articles and much more. It's all specially curated for you in our "I'm Moving" section.
Explore
×

I'm a Mover

For rookies or veterans alike, our "I'm a Mover" section is filled with extensive industry news, crucial protips and in-depth guides written by industry professionals. Sharing our decade of moving knowledge is just one way we help keep our professional movers at the top of their game.
Explore