The Important Things to Take Pictures of While Moving (and Why)

Author:

Publish Date:

Last Modified Date:

Category: Pro Packing Guides

Tags: Tags: , , , , , , , , , , , , , , , , , , , ,

Snapping photos when you’re in the middle of a move might be the last thing on your mind when you’re waist-deep in boxes. However, they can make a big difference later on. Documenting your move is a simple step that saves you time, reduces stress, and preserves precious memories. They can also help you keep track of your prized belongings throughout the process.

Damage to belongings and dings on floors and walls are more common than many homeowners realize. Taking pictures helps document their condition before, during, and after transport. They also protect you in case of disputes or insurance claims.

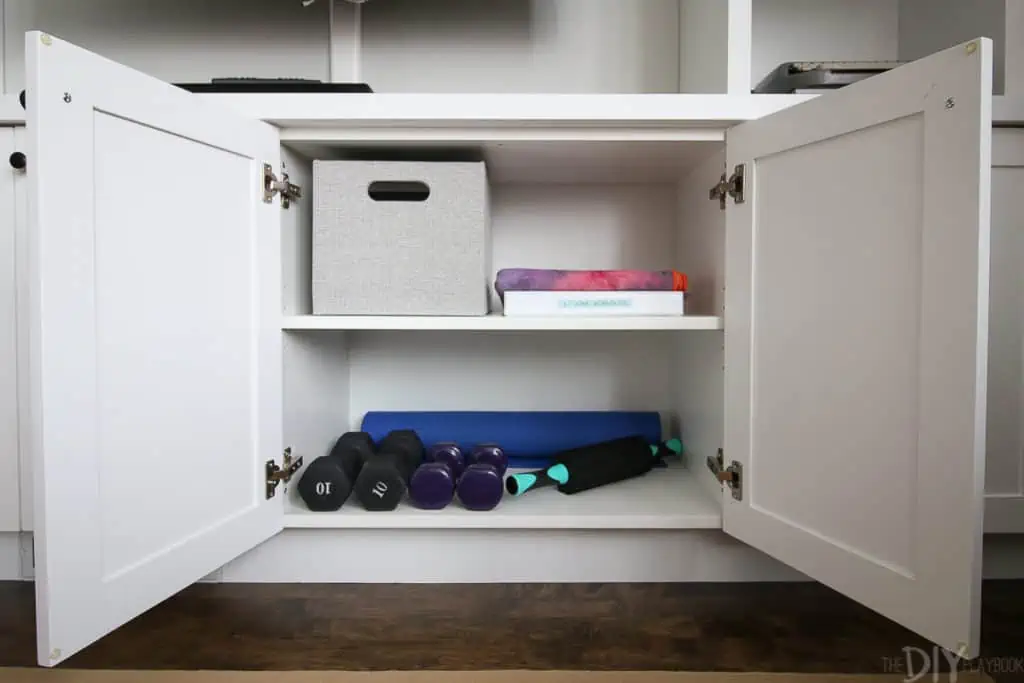
Additionally, photos could help you plan the design of your new space ahead of time, giving you a head start in your new home, in addition to showing how things like entertainment centers are set up. They definitely make unpacking and arranging your home faster and less overwhelming.

Don’t worry if you’re unsure of where to begin. We have you covered! Our tips and tricks on what to photograph and video can help you from start to finish, so you don’t miss a single shot.


Take Pictures of Your Old Home

Unfortunately, many landlords are literally and figuratively banking on their tenants not doing their due diligence. Make sure you’re not one of them!

When a tenant moves out, their landlord can legally keep part or all of their security deposit. However, it’s meant to cover things like damage beyond normal wear and tear, not greed. They usually have to provide a breakdown of charges, and if they refuse or can’t justify the deductions, tenants may be able to get their money back.


“Your phone’s date and time settings have to be accurate before you start taking photos…if your phone’s date and time are incorrect, the info attached to the images will be, too. This won’t help your case if you need to use the evidence in the future.”


So it’s a good idea to prepare just in case. Taking clear photos and videos of the property while moving out can be a game-changer if your landlord withholds your deposit. For example, you can use the images as evidence if you take them to small claims court.

But renters shouldn’t be the only ones taking pictures. Home sellers should do the same. The pictures can protect you if the buyer later tries to claim you caused damage during the move. Having photo evidence of the property’s state when you took your final steps out the door can prove you weren’t in the wrong.

The images can also be sweet mementos. Put pictures of special areas in your home or its exterior into a photo album or frame. They’ll be great for reminiscing in the future.

Take Pictures of Your New Home

An image of an empty living room in a home

Photographing everything in your new home before you start bringing in your belongings is also an important step. These photos show the house’s current state and allow you to document whether items that were supposed to stay as part of the sale are gone. So if a seller snatched up the vintage light fixtures you fell in love with and paid for, the photos will show proof they’re missing if there’s a dispute.

Post-move-out and pre-move-in pictures also show the home’s condition at crucial points. If you notice damage later, you can compare the two sets of images. They help you determine if the movers accidentally damaged the flooring or other components at some point during the process.

Another perk? The photos give you a head start in deciding where all your items will go in your new home, and it’s much easier than making split-second choices during the fast-paced move-in.

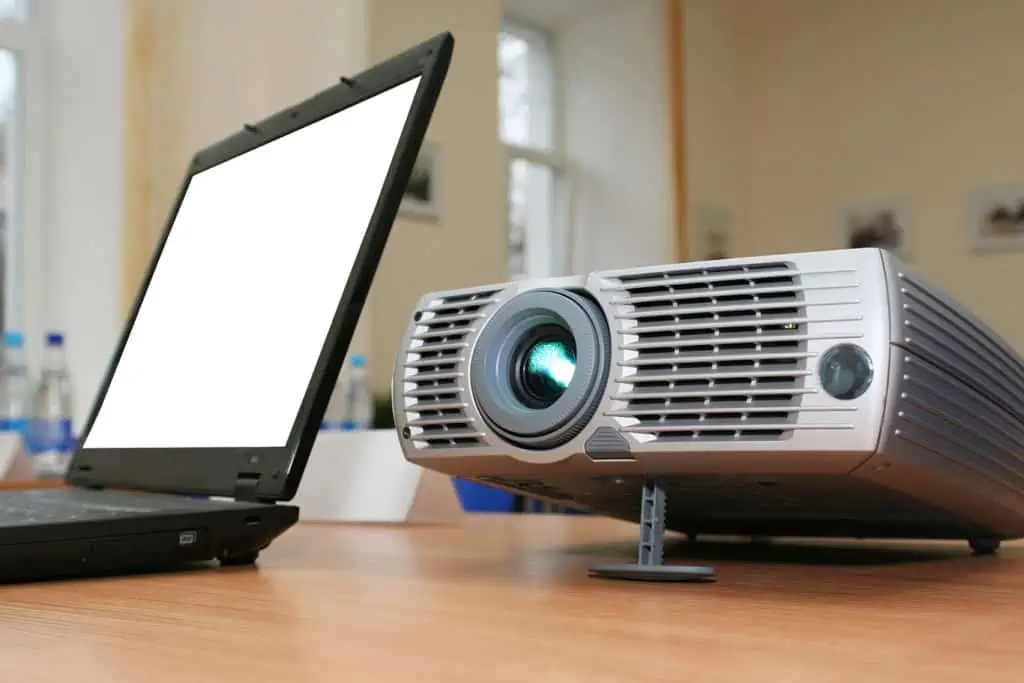
Take Pictures of Your Electronics Setups

An image of a back of a tv

Have you ever temporarily disconnected an elaborate electronics setup only to realize you can’t remember where the wires need to go? If you take pictures before disconnecting them, you don’t have to worry about this happening to you. These photos provide easy references for computers, gaming systems, and other electronic setups, and will save you frustration, time, and probably tears when you set everything back up in your new home.

It also helps to pack all electronics with their matching wires; for example, put the gaming system and its wires in the same box. Attach a tag to each wire indicating what it belongs to so they’re not in a tangled, confusing ball. This saves you headaches later on if you have several of the same cables.

Take a photo of the interior contents of the box, including the items’ serial numbers and the exterior box labeling, so they’re easy to find later. Additionally, if you have multiple boxes of electronics, don’t label them all the same. Write “Electronics 1–Computer Parts,” “Electronics 2–Entertainment Center,” etc. You’ll be happy you did this later if a box accidentally gets misplaced during transit. And, you can show the moving company a photo of exactly what valuables were in each one if a box does end up missing.

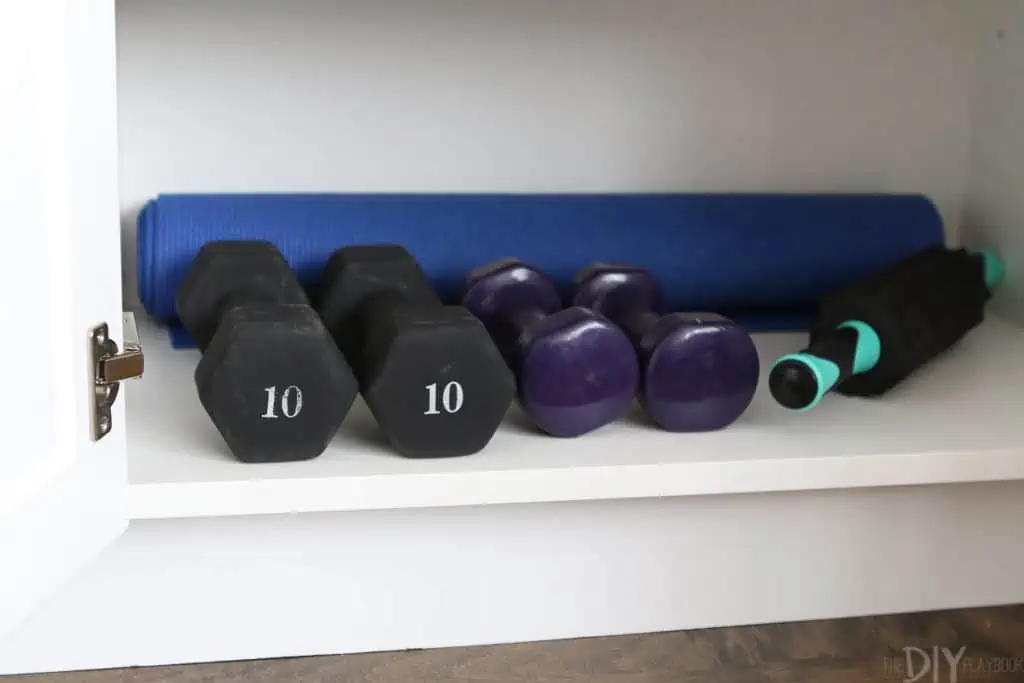
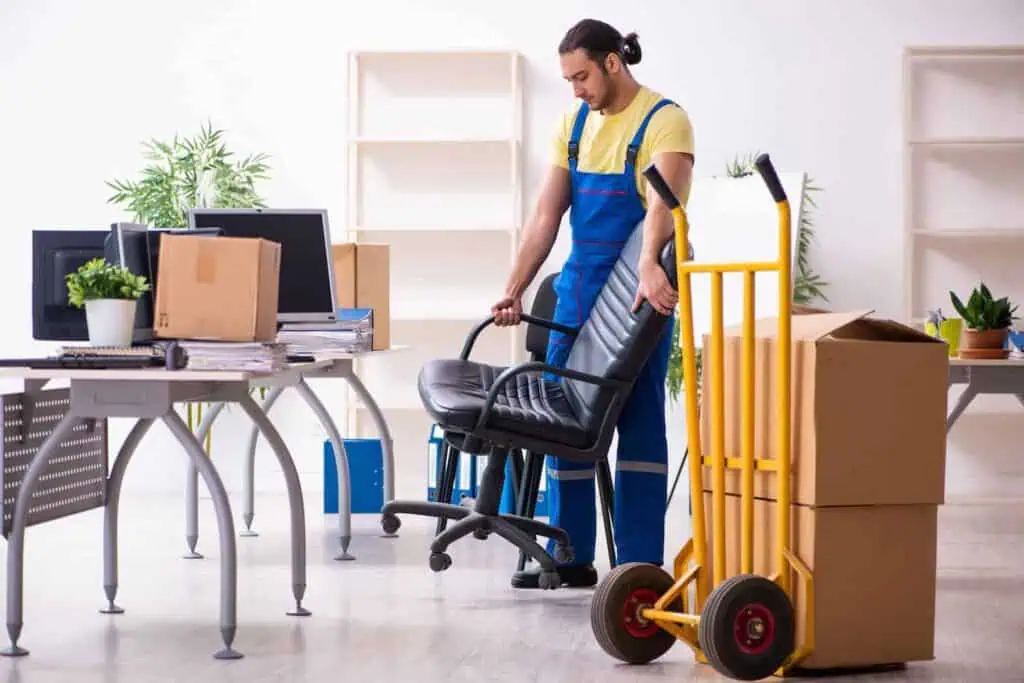
Take Pictures of Your Valuable Items

Taking photos of valuable items like antique furniture and electronics is especially important. If they get damaged in transit, the images show their condition before the moving process began. Additionally, if the items get misplaced, it’s much easier to show the moving company which ones are MIA rather than describing them.


“Post-move-out and pre-move-in pictures also show the home’s condition at crucial points. If you notice damage later, you can compare the two sets of images. They help you determine if the movers accidentally damaged the flooring or other components…”


Your pictures provide extra protection when combined with the inventory sheet and bill of lading. These list all your items being transported during the move, so having both strengthens your case if you need to file a claim with the moving company or your insurance.

Take Pictures of Your Water, Electricity, and Gas Meters

an image of a utility meter on a pole

Homeowners typically remember to hook up the utilities at their new place. Unfortunately, many forget to photograph their water, electricity, and gas meters on the way out of their old one. Taking the pictures gives you a good defense if one or more utility companies send you bills stating you owe more than you actually do.

Utility companies usually estimate usage, or can have a delay in updating their records. This could lead to incorrect charges for usage after you moved out, meaning you might get stuck paying for the new tenant’s utilities. Your photos provide clear, time-stamped proof of your final meter readings on the day you left, and they can back up your word if you need to dispute inaccurate costs.

It’s also a good idea to take photos of the meters at your new property as soon as you arrive. They document your starting usage. The time-stamped images provide proof of the initial readings, so you won’t have to pay for usage from the previous occupants.

Take Videos of Your Functional Electronics and Equipment

a laptop and a projector sit on a table

It’s smart to take photos of your belongings to document their condition. However, taking videos is also beneficial for anything motorized or that you turn on and off. They show the objects in their operational state, and that they worked before the move. You’ll need proof if items like your stereo system stop working because the movers accidentally dropped them or knocked them in the wrong way.

Taking videos adds extra time to the packing and moving processes, but it’s worth it. They increase your chances of getting reimbursed for nonworking items later on. You should also take videos of working items remaining at the home. For example, record the garage door doing a full cycle and appliances in use. Much like photos of the home condition do, the videos protect you against false claims from new homeowners saying that certain home components aren’t working.


Bonus Tip: Always Time Stamp Your Photos

It’s not enough to take the photos; they should also be time-stamped. This data is important when documenting things like utility meter readings and the home’s condition while moving out. It’s clear-as-day evidence of when the photos were taken. Time-stamping is especially crucial for billing disputes and insurance claims.

Your phone’s date and time settings have to be accurate before you start taking photos, and the time stamp on the pictures coincides with your phone’s internal clock. If your phone’s date and time are incorrect, the info attached to the images will be, too. This won’t help your case if you need to use the evidence in the future. Set your phone to update the date and time automatically so you won’t have to do it manually.

Smartphones automatically time-stamp photos and videos. Take a test image to make sure it’s accurate before you begin. After taking the picture, find it in your photos app — the day and time should be at the top. Verify that it matches the current date and time, and if it does, you’re all set to document the journey.

Don’t forget to send all the photos and videos to your email or other storage device throughout the day. You’ll have the evidence you need if your phone breaks or gets lost and the videos and images aren’t backed up to an online storage space.

How To Pack an Office Chair for Moving

Author:

Publish Date:

Last Modified Date:

Category: How To Pack, Pro Packing Guides

Tags: Tags: , , , , , , , , , , , , , , , , , , , , , ,

It’s easy to underestimate the awkwardness of packing an office chair. That is, until you try balancing one in a moving truck without it tipping, toppling, tearing, or scratching something you care about. With protruding arms, rolling casters, and sometimes delicate upholstery, office chairs are among the most commonly damaged items during a move.

Below, we’ll show you how to pack an office chair for moving, using techniques real movers use every day.


Moving Supplies You’ll Need to Wrap an Office Chair for Transport

an image of an office being packed up, as well as several office chairs

Here’s what to have ready to protect your office chair for a move:

  • Moving blankets or furniture pads: This is used to cushion sharp edges and keep finishes safe.
  • Packing tape: It’s best to secure padding tightly without sticking directly to the chair’s surface.
  • Stretch wrap: Will add another layer of stability and protect against dirt, dust, and moisture.
  • Bubble wrap or packing paper: Used to wrap around protruding parts like armrests, knobs, or levers to prevent impact damage.
  • Screwdriver or Allen wrench: A necessary tool for removing parts like the backrest or arm supports.
  • Plastic zip bag: These are to keep screws, washers, or wheels together so nothing gets lost mid-move.
  • Labels and a permanent marker: You’ll need these to help you match parts quickly when it’s time to reassemble.

Tip: Lay down a soft surface like a rug or towel before you start. It makes packing easier and prevents accidental scuffs on floors or your chair.

Step-by-Step Instructions: How to Pack an Office Chair for a Move


A mover picks up an office chair to prepare it for wrapping and packing

If you’ve ever tried wrapping a chair in a moving blanket only to have it come undone in the back of a truck, the problem likely wasn’t the blanket—it was the size. Most office chairs aren’t built to sit still, so unless you’ve got a blanket big enough to fully wrap and secure it, things tend to shift (or worse, tip over).

Kevin the Mover, a longtime HireAHelper expert, shares a simple method used by professionals:

“The key to wrapping a chair properly is having a big enough pad. From there, the rest is as easy as 1-2-3-4.”

1. Clean the Chair

Dirt can grind into finishes during transit, and wrapped-up dust tends to reappear in your new place. Give the chair a quick clean before you pack:

  • Wipe plastic or metal frames with a damp cloth.
  • Vacuum mesh backs and seat cushions to remove crumbs and debris.
  • Use a leather-safe cleaner for leather chairs, and allow them to fully dry before wrapping.

Cleaning only takes a few minutes, and it’s the easiest way to avoid unpacking a dirty, scuffed chair later.

2. Lay It Down

Spread your moving blanket on the floor and place the chair on its back, off-center toward the top corner of the blanket. That extra room gives you enough fabric to wrap around the base and legs without bunching or gaps.


“If your chair is heavy or hard to maneuver, taking it apart makes it easier to carry — and safer to pack.”


If you’ve already taken the chair apart, start with the seat or backrest (whichever is largest) and lay the other components nearby.

3. Wrap It

This is the step where a lot of people go wrong. Just tossing a blanket over the chair and hoping for the best can easily result in a torn armrest or exposed caster.

Instead, do this:

  • Fold the blanket’s sides over the chair first, snugly wrapping the arms and seat.
  • Pull the top corner down over the backrest.
  • Lift the bottom portion of the blanket over the chair’s base, tucking the excess between the legs.

If your chair has sharp angles or fragile adjustments — like a lumbar knob or headset mount — add a layer of bubble wrap before covering with the blanket.

an image of an office chair being wrapped, as instructed, with a moving blanket

4. Pull Up the Corner

Now comes the detail that separates a loosely wrapped chair from one that holds together all the way to your new place. Take the bottom corner of the blanket (now near the floor, between the chair’s legs) and pull it up over the seat.

Tucking this piece in tightly helps anchor the wrap and covers the underside — an often overlooked area that’s vulnerable to scrapes and pressure points during a move.

An image of an office chair wrapped in a moving blanket with one corner remaining, just as the instructions say

5. Secure It in Place

Once your chair is swaddled, it’s time to lock that cushioning and protection in. Use packing tape or stretch wrap to hold everything tight.

  • Packing tape: Wrap it fully around the bundle so it sticks to itself, not to any fabric, plastic, or leather.
  • Stretch wrap: Start at the base, work your way up, and overlap as you go. Stretch wrap also adds some waterproofing if you’re moving during bad weather.

As Kevin advises, “Tape doesn’t stick well to pads — remember to let the tape stick to itself, not the chair.”

Double-check that no parts are exposed. The most common place people miss? The wheelbase.


Common Mistakes to Avoid

It’s easy to cut corners when juggling boxes, furniture, and a ticking timeline, but overlooking small details with your chair can lead to big regrets. Here’s what not to do:

  • Taping directly to leather, mesh, plastic, or wood. Adhesive residue can stain finishes or peel surfaces and may not stick properly to certain plastics. Always wrap first, then tape over the wrap.
  • Skipping bubble wrap on sensitive parts. Armrests, tilt levers, and adjustable knobs are easy to snap if they’re not cushioned.
  • Using undersized blankets. A half-covered chair is an exposed chair. If needed, overlap two pads or blankets to get full coverage.
  • Ignoring office chair disassembly. If your chair is heavy or hard to maneuver, taking it apart makes it easier to carry — and safer to pack.
  • Not removing the gas cylinder. Leaving it attached — especially during long-distance moves — can put strain on the cylinder or seat base if the chair is jostled.

If you’re dealing with ergonomic chairs, mesh chairs, gaming chairs, or leather upholstery, take the time to wrap each part individually. A few extra minutes here could help you avoid expensive repairs.


Additional Moving Tips for Office Equipment

An image of a home office packed up into boxes, along with a monitor wrapped in plastic and an office chair

Office chairs are usually just one piece of a bigger setup. Desks, monitors, drawers, and all the tangled cords in between. Each part of your home office deserves just as much attention if you want everything to arrive in one piece. These items are just as prone to dents, scratches, and stress damage if they’re packed carelessly.

Once your chair’s ready to go, here’s how to handle the rest of your office essentials with the same level of care.

Tip Why It Helps
Label all parts and cables Makes reassembly of desks or electronics faster
Group small office items into bins Keeps everything together — think monitors, mouse pads, and cords
Wrap electronics separately Original packaging or plenty of cushioning in boxes protects equipment
Empty or remove drawers Lifting empty desks or filing cabinets is safer and easier
Call for help when moving heavy desks A second set of hands can help prevent injury

Frequently Asked Questions

Do I have to disassemble my office chair for moving?

No, most office chairs can be moved without disassembly. If it fits through doorways and isn’t too heavy, wrapping it whole works well. However, if the chair is oversized or fragile, it’s smart to disassemble bulky parts like the backrest or wheels so it can fit in the truck and be moved up and down stairs.

Should I remove the wheels?

Removing the wheels is optional but recommended. Detached wheels mean your office chair won’t roll around in the truck, and the base can be wrapped more securely. Most pop out with a firm tug. If you do leave them on, make sure to wrap the wheelbase well and secure the chair so it can’t move.

Can I stack office chairs in a moving truck?

No, most office chairs aren’t made to stack, and doing so can damage upholstery or frames.

5 Expenses I Didn’t Expect After Graduating

Author:

Publish Date:

Last Modified Date:

Category: College Moves

Tags: Tags: , , , , , , , , , , , , , , , , ,

Graduating is even harder than it looks.

I am one of the lucky ones who found my first job right out of school. But that secretly meant my living expenses suddenly skyrocketed after I had to buy a used car, move away from home and find and furnish an apartment.

Don’t get me wrong, I knew those purchases would be way more expensive than the usual trip to the grocery store. But there were so many details I didn’t even realize existed. It was a crash course.

Now I want to make sure that doesn’t happen to you. Here are the random expenses that hit me after graduation, plus how I survived a rocky first few months so that I remained intact before my first adult paychecks could make an impact.

1. Moving Costs More Than You’d Think (But There’s a Hack for That)

Moving101 Container Price Comparison

When I graduated I lived on campus, but I still somehow had a lot to move into my first apartment. The first thing I did was figure out if anyone could help me move. In return for snacks, my friends and family were happy to offer some manual labor. I got lucky!

But when I got a job, it ended up being located out of state. So to save money, I figured out I could rent a truck and tow my car behind it, and only hire movers to do the lifting. Getting your own vehicle and hiring labor separately for either end of your move (Hybrid Moving) costs less than Full Service moving and varies dramatically in price, but the average cost is around $660. It’s an added cost, but plenty of critical time saved, which I needed.

HireAHelper lets you compare the price of movers and customize everything, from how many people help you move to what arrival time window you’ll need. The more options you can compare for a moving process the better, as every move is going to be a little bit different.

See prices for movers by the hour – instantly.

Read real customer reviews.

Easily book your help online.


How can someone so young take on that expense? Well, I barely had enough to cover the move, but here’s another thing I learned — many employers offer reimbursement for moving expenses! Make a note to talk with your new employer and ask if they make a similar offer. It was a lifesaver when my company helped me out so that I could put my money toward the next round of expenses!

2. Crossing State Lines Can Mean More Fees

When you move to a new state, you’re going to have to get a new state license and plate for your car. The steps will be different depending on your move, but you can check out the process for your specific state online to know what prices you’re in for.

I had to fill out paperwork and pay fees for the process of:

  • Getting an updated title for my car
  • Printing a new plate
  • Creating a new license

All of it cost about $200! Plus, there was the time it took to go to the DMV, get my new emissions test and talk with my car insurance company about my new address and license information.

Call the DMV where you’ll be moving to ahead of time for clarification because it really is a lot to deal with when you’ve never done it before. It definitely was for me.

3. Even My Used Car Had a Major Price Tag

An approximation of how getting your first used car looks.

When I was in school, I used my parents’ old car to get around to my part-time jobs and the grocery store. But after college, I knew I had to get my own ride. I’d been saving up for a while and figured I could negotiate the price of the car down to what I had in my savings account, but it turns out there’s so much more to it than that.

The only thing I knew about buying a car before I walked into the first dealership was that you have to negotiate your final price, but fees and taxes can’t be worked down. The dealer had to explain things like document fees and dealer fees, plus the sales tax. (Again, every state will be a bit different, though some fees are the same across the board.)

It’s smart to save up some extra cash to cover these fees since they’re non-negotiable. While you’re getting your down payment together, take steps to research what these expenses will be so you can better plan for the total cost of a car.

Lastly, make sure you can handle the monthly payment. While I saved enough for a hefty down payment, I did have to take out a small loan to cover the rest. I automated my car payments through my bank once my regular paychecks started rolling in so I would never risk jeopardizing my credit score with late payments.

4. My First Student Loan Payment Shocked Me

The amount I had to take out in student loans wasn’t nearly as drastic as what some of my friends had to sign for—proud state school grad here—but there are ways those loans can pull you into paying more than you originally borrowed. For starters, I had no idea what capitalizing interest was. Basically, it’s interest that’s triggered by specific events and causes your monthly payment to not even make a dent in your overall debt. The debt increases while your payments stay the same.

I also began to panic when the loan bills came in. I hadn’t even earned my first paycheck with my new job yet, so how was I supposed to pay $350 a month after already paying for moving and buying a car?

That’s when I started to research how to consolidate my loans, and it really saved me. The Department of Education can consolidate multiple federal loans with one fixed interest rate, which streamlines the process and extends your repayment period. Rather than juggling multiple payments, I just had to worry about one.

You may also consider private refinancing if you’ve landed a steady job and worked to build a credit score of at least 690. This can both consolidate your loans and lower your interest rate — but isn’t necessarily always the best choice for recent grads. Do your research! 

(So I Learned a Budgeting Trick)

Sure, I’d managed my own bills in college, but between forthcoming loan payments and the costs of moving and a higher rent, I saw my expenses skyrocket. 

So I did some research online and began militantly tracking all of my income and expenses with a Google spreadsheet. I vowed to follow the 50/30/20 budget, which stipulates that half of my earnings pay fixed expenses, 20 percent goes to debts and savings, and 30 percent is reserved for variable expenses like groceries and light spending.

50 30 20 rule of thumb TheBudget.com

It’s tempting to have your paychecks come in and put all your extra cash toward one big thing like a savings account or credit card debt, but metering it out will help you tackle everything at once. Building my savings while decreasing my debt has helped me more in the long run than just choosing one over the other.

Now, my healthy savings account means a minor emergency like a car repair doesn’t trigger any anxiety. After upending my meager college savings to move, a steady and dependable tracking system soothed my nerves and helped me navigate this whole new world.

5. Filling Up a New Apartment Drains Your Wallet

The process of finding my apartment was easy since everything is online now. I could map out how far each apartment complex was from my work and not have to worry about it being too far away. Actually getting settled was a whole different story.

I had to buy all my own furniture, and you can bet that I didn’t have the money to do it all at once! For a little bit, my apartment décor consisted of a mattress on the floor and the most basic kitchen supplies. A good list of basic apartment supplies you’ll need will consist of:

  • Plates and bowls
  • At least two or three of each type of silverware
  • A trashcan
  • Dish soap and a sponge
  • Toilet paper
  • Basic cleaning supplies (e.g., broom, cleaning solution)

Don’t panic if your apartment doesn’t feel like home for a little while. Getting more than the basics will take time, but eventually, your new fancy budget will help you get everything on your list, and your apartment will gradually feel more like a home and less like a living space. 

Plus, if you have a roommate, that makes your quest to fill the space of essentials even easier! Me? I bought myself a couch from a killer Amazon Prime Day deal—and I’ve been treating myself with one apartment item a month since.


Some of the above surprise costs were never mentioned to me because I didn’t know to ask about them.

Give your post-college world about six to eight months to settle down. Now, I’m much more financially secure and living in a home that feels cozy and welcoming. I’m finally ready to put some money into my travel fund and I don’t sweat the occasional sushi dinner. For now, you just have to buckle in and prepare for a crazy ride after that diploma lands in your hand.


Holly Welles is a millennial-focused real estate writer and the editor behind The Estate Update. For more home tips and financial advice, subscribe to her blog for even more financial advice.

This Is How I Made My Living Room Into a Cheap, Secret Gym

Author:

Publish Date:

Last Modified Date:

Category: Apartment Life, Home Improvement

Tags: Tags: , , , , , , , , , , , , , ,

Like many people during the month of January, I’m vowing to clean up my diet and add more exercise to my weekly routine. But there are a few challenges I’m already running into when it comes to working out.

First of all, the gym is packed! All of my workout classes are filled to the brim and each cardio machine is taken. Second, the temps have been in the single digits here in Chicago, and the thought of freezing my buns off on my walk to the gym is enough to make me hit the snooze button instead of getting in that a.m. workout.

So, what’s a gal to do? Improvise!

5 Sweet Garage Upgrades That Up Your Home’s Value

Garage additions and upgrades like the five in this list can produce an estimated 65 percent return-on-investment.

Instead, I’m getting my workouts in at home in my “secret gym”. And since we live in a small spot in the city, there’s no buying a huge “Total Gym” machine (sorry, Chuck Norris). How did I manage? I got creative with a few workout items that I can easily store and hide in our condo.

To open my gym, I push my table aside.

Take a look at my family room. Little did you know it doubles as an at-home gym space! I simply move the coffee table and chair … and boom! I’ve got plenty of room to spread out and get sweaty.

“Home gyms” actually take a very small amount of room. Take a look around your home and find a comfortable spot where you have space for an at-home workout. Just give yourself enough space so you don’t break anything or hurt yourself. If you’re looking for a new home right now, it goes without saying: make sure there is accumulative space to make one of these in your home.

I concealed all my workout equipment.

I designated a cabinet in the room for all of my workout equipment. This ensures that I have everything I need right on hand, plus it’s less of an eyesore because it’s hidden. No need for one of those big racks.

I’ve got all of this stuff in one cabinet:

  • Yoga mat
  • Foam roller
  • Weights
  • Resistance bands
  • Printed workout plans

They’re all easily accessible right in here. I used to just throw all of my resistance bands in a random drawer, which actually meant I rarely used them. Now, they’re all organized neatly in the box on the top shelf, so I can grab them and get to work!

You might love our:

Moving Cost Calculator

If the quote from your movers felt expensive …
Make sure it lines up with the costs reported by other Americans.

I suggest maybe also investing in a few baskets or a container to organize your workout gear. Sometimes it makes it easy to just grab the entire basket and have access to everything you need at once.

I printed and organized my favorite routines.

I’ve dabbled in various workout routines over the years. I love changing things up to keep myself motivated. You can find lots of awesome workouts online (they’re seriously everywhere) and can print them right at home. I printed off a few of my favorites and put them into this workout binder.

Now, I simply flip through my $2 binder and find my exercise routine for the day. It’s super easy and I no longer have to dig through drawers to find these crumpled sheets of paper in my desk.

Personally, I’ve also run into a few injuries over the years and have had success with physical therapy. Those trips to the therapist left me with lots of random sheets of paper outlining the exercises I needed to do to keep those injuries at bay. You can bet they’re all organized nicely in my at-home workout binder.

I just use a stepping stool, and it works great.

Some of the full-body workouts I do require a step, to get in some cardio. Since I have absolutely zero space for a workout bench to step up on, I improvise with a step stool. This little guy easily fits into a closet and I bring it out when it’s time for my sweat on. Consider buying one with two steps so you can always make things more challenging as you progress with your workouts.

If you don’t believe you can get a good workout with just a stool, you obviously have never tried it!

A Closer Look at the Supplies

Instead of running to the sporting goods store for tons of crazy equipment, I invested in the essentials.

Smart Dumbbells

Light weights and heavier weights should do the trick for most routines. My husband actually purchased these smart dumbbells that can start at five pounds and go all the way up to 52.5 pounds … all in the same dumbbell. Definitely a space saver!

Inexpensive Yoga Mat

A yoga mat is another must, even if you’re not a yogi. I love using mine to cushion my knees for push-ups and when I lay on the ground. It’s also great to dampen the sound made when you’re working out! I don’t want to disturb my neighbors downstairs when I’m doing jumping jacks or jump lunges, so I always try to do those exercises on my cushioned mat.

Resistance Bands

Resistance bands are incredibly effective, can be used for just about anything, and are super cheap! (Here’s some from Amazon.) What’s not to love about this gym supply? We have a variety of tensions and use them for full-body workouts.

Finally, I watch stuff on Youtube.

To round it off, a TV or computer that can connect to YouTube is a must for at-home workouts! There are so many free exercise videos online, it just takes some searching to find ones that are right for you. This blog post outlines some of our favorites workout programs that you can do from the comfort of your home.


I’m convinced that you don’t need a huge home or tons of supplies to get in a great at-home workout. Until the new gym members lose motivation, you’ll find me getting my exercise in right from my secret gym at home.

7 Things I Learned When Downsizing From a House in California to a Shoebox in NYC

Author:

Publish Date:

Last Modified Date:

Category: Organization

Tags: Tags: , , , , , , , , , , , , ,

Full disclosure: I’m a child of the suburbs. I grew up in sprawling northern California, where trips to used bookstores and the mall are practically pastimes. There wasn’t much spatial constraint when it came to accumulating things. If I picked up a tchotchke, there would definitely be a place for it somewhere in my home.

(more…)

How Much Do You Tip Movers?

Author:

Publish Date:

Last Modified Date:

Category: Money Saving, Moving Day

Tags: Tags: , , , , , , , , , , , , , , , , , , ,

 Are you supposed to tip movers?

We get this question all the time. The answer is “no”. Or, “yes”. It kinda depends, so let us explain.

(more…)

×

I'm Moving

Moving? Thinking about moving? Whether your move is off in the distance or you already have one foot out the door, you'll learn about everything you should expect through our useful how-to's, cool articles and much more. It's all specially curated for you in our "I'm Moving" section.
Explore
×

I'm a Mover

For rookies or veterans alike, our "I'm a Mover" section is filled with extensive industry news, crucial protips and in-depth guides written by industry professionals. Sharing our decade of moving knowledge is just one way we help keep our professional movers at the top of their game.
Explore