There are two types of people in this world: Those that buy pre-packaged Halloween costumes, and those that DIY.
But the DIY route isn’t just for rich and talented designers… especially if you take advantage of free, simple materials like cardboard boxes leftover from a recent move, or Amazon order. (Need free boxes? Check these places.)
But wait… you don’t believe DIY costumes can look that great? Just ask TikTok.
Below are 10 examples of super creative costumes put together by TikTok users using mostly cardboard. Now watch, get inspired, then get crafting before that Halloween party gets here.
If you know a kid between the age of 3-30, you’ve probably heard about Minecraft. Cardboard boxes are perfect for recreating the block-like characters and accessories featured in the game.
If you want to guarantee your kid will win the costume contest at school, we recommend this cardboard box Transformer costume that changes from Bumblebee to a Dodge Challenger. (Instructions not included.)
This cardboard dino costume stands out from the crowd with a long, swinging tail. But with arms like these, parents might need to help out by carrying the candy pail.
For a simple but beautiful Halloween costume, these butterfly wings made from cardboard are a great DIY idea. Bonus: you can throw them over just about any outfit.
For those with some major creative muscles to flex, this Springtrap character costume from the popular video game Five Nights at Freddy’s is both cute and creepy (okay, mostly creepy).
Going for a look that’s more sweet than spooky? Just add sprinkles! You’ll be the belle of the dessert table with this cake slice Halloween costume made from cardboard boxes.
In an ideal world, rain would be respectful enough to stay away on the day of your move, especially when you’ve planned it weeks or months in advance. But until my weather machine is completed, rainy day moves remain an inevitable part of scooting around on this planet, made all the more frustrating by how impossible they can feel to plan around.
They’re so infuriating, in fact, that I’d hoped you’d never need this article at all. But now that you’re here, and likely staring down a long, aggravating day of precipitation, here’s what I’ll tell you: you’ve come to the right place.
Everything is going to be fine. We’ve spoken to movers, collaborated with experts, and collected all the rainy day tips and tricks out there to help you positively ace your bad weather move—whether it’s taking place in a drizzle or a downpour.
What things do I need for a rainy weather move?
Since wet weather can spring up out of nowhere, we wanted to limit the list of necessary supplies to items you’d probably already have on hand:
Sheets of plastic: Think everything from a tarp to queen-sized mattress bags, extra-large garbage bags, or even a vinyl shower curtain
Extra cardboard: If you didn’t use all your boxes, you’re about to put them to good use
Towels: Ideally ones you don’t care about too much
Extra sets of hands: Not absolutely essential, but super helpful if you can rustle them up
And that’s it!
What should I do before I try moving in the rain?
That really depends on the likelihood of rain, its intensity, and how much you’re planning to spend on your move. But across the board, here are the prep steps that will never steer you wrong:
Step 1: Pick out some sturdy footwear (not your old, extra ones)
During a rainy move, there’s a temptation to throw on that old pair of Reeboks with the worn-out soles just because you’d rather not get your Nikes wet, but do your best to resist. Look for shoes with great traction or even waterproof boots, if you have them. Your feet will thank you during those many trips up and down the slippery moving truck ramp.
Step 2: Have a second pair of shoes and a jacket on hand
You’ll likely end up spending ample time both inside and outside during your move, so having outside shoes and inside shoes helps keep your floors clean and dry over the long haul. Meanwhile, having spare outerwear becomes clutch as soon as you notice your first jacket is so soaked that you’re getting things wet just by carrying them.
Step 3: Tape cardboard to the floors inside any entryways
This step is absolutely crucial in order to prevent tracking in water—and to keep from slipping and wiping out under that family heirloom of a dresser you were carrying. It should also be one of the last things you do inside before you start moving so that everything can stay as dry as possible, for as long as possible.
You don’t have to be too precious about it, though, because eventually, the water and the wear will lead to the cardboard’s destruction. Once they start to get soggy, swap in new dry panels, securing your cardboard pathway with an adhesive that won’t cause damage to your flooring. (Which probably means saving the duct tape for your next project.)
Step 4: Assign an “inside crew” and an “outside crew”
Assuming you’re lucky enough to have friends pitching in, divide your team into two designated crews.One stays inside to move everything between the rooms and the staging area—probably the front hall, the garage, or somewhere similar. The other crew, unfortunately, gets the short end of the stick: they work outside and haul everything between the outer door and the truck.
“Please ignore the bizarre advice out there to put down sheets of plastic to protect against water and mud getting tracked in.”
The point of this little assembly line, of course, is to avoid tracking water throughout your home, but if you’re moving out, don’t forget about the floor of the truck, either. Your outside crew is likely to be walking all over it, leaving wet footprints where you’re about to set down all your stuff. If you have the manpower available, consider assigning one person to work solely inside the truck.
What if I don’t have enough people?
If you’re as low on friends with unlimited patience as I am, you can tape some cardboard to the floor of the truck and keep a few old towels or blankets on hand to periodically wipe those floorboards.
Protip: If you don’t want to find your stable of incredibly generous friends dangerously depleted the next time you need to call on them, periodically switch your inside and outside crews, and give yourself the lion’s share of outside duties. Or, if it’s just you and a buddy, work together inside to fill up your staging area, then put on your jackets and move all that stuff out onto the truck. Then head back inside, wipe your feet well and start filling up your staging area again.
How do I protect my stuff on the (rainy) day of my move?
There are a lot of ways, and it sort of depends on what you’re moving. Now that you and your pathways are all prepped, it’s time to leap into action by answering some specific questions that you might have on moving day.
Not really, unfortunately. Moving blankets provide an essential layer of protection when it comes to bumps and thumps, but umbrellas they are not. A wet-moving blanket is just going to soak your stuff, so on a truly rainy day, plastic covers are where it’s at.
Can my wood furniture get wet?
Listen, lots of things can happen, but that doesn’t mean that they should. Wood is porous, so it’s going to take the first opportunity it gets to absorb water. If it succeeds, that will cause expansion and contraction as it wets and dries, which often leads to warping. This means that even if your wooden piece looks the same, doors or drawers might catch or stick permanently.
Additionally, even a small amount of dampness can damage surface paint, varnish, veneer, or glue—plus, it can encourage mold growth. Repairing water-damaged wood is possible, but it’s also an intensive and often expensive process, so try to avoid the whole situation if you can.
No. Take breaks. We encourage them, in fact. The potential for slipping is highest when you rush, so if it starts really coming down, you can always shelter inside while you regroup. If you want to keep things moving, haul as much stuff as possible as close to the door as you can, so you can be that much closer to done by the time the rain lets up.
Or if you’ve done all you can, you can either go crazy with the plastic and get back out there, or kick back and order a pizza while you run a load of damp towels, wet jackets, and drenched socks through the dryer. You’ll be happy you did once it’s time to get back to work.
Things won’t be so bad if it’s just a light drizzle. Especially if it’s a short walk from your door to the truck, you may be able to get away with just wrapping your furniture in furniture pads. And if your furniture is also shrink-wrapped, you should definitely be good to go. For boxes and random individual items like bicycles, toolboxes, guitar cases, and dumbbells, it’s helpful to have a few old (but dry and clean!) towels not being used for the floor to wipe away excess rainwater.
“A wet-moving blanket is just going to soak your stuff, so on a truly rainy day, plastic covers are where it’s at.”
Anything more than a drizzle can soak your furniture pads and cardboard boxes enough to turn everything moldy and musty. Especially if your belongings will be on the truck for any length of time. If you can get from door to truck in a few seconds without rushing, feel free to take your chances. Otherwise, get yourself some extra-large trash bags and slip them over each stack of boxes before you carry them out the door.
Larger items like furniture will likely call for something bigger than trash bags; try to get your hands on a tarp or a couple queen-sized mattress bags, which you can double in size by slicing them open to make a single sheet of plastic.
Please ignore the bizarre advice out there to put down sheets of plastic to protect against water and mud getting tracked in. Plastic is one of the least water-absorbent materials out there, so what you’ve essentially just done is installed a Slip ‘N Slide right inside your entryway, with no guarantee that it will even protect your floors.
If you know you’re moving during a rainy season, for example, or are considering a move to Portland, Oregon, or another city where rain is a safe bet pretty much every day of the year, having movers wrap all your stuff can be a weight off your mind (not to mention your shoulders).
It can also be an added stressor for anyone worried about cost, last-minute changes, or straight-up cancellations, so let’s address some common mover-related questions as well.
Can movers move in the rain?
Yes! That is unless they gauge the situation as too dangerous (which is possible, depending on how much rain we’re talking about here). For the most part though, movers are well equipped to battle the elements.
It’s going to rain tomorrow—can I get last minute movers?
Almost certainly, yes! Sometimes, your best bet is labor-only help plus a truck, but hop on over to HireAHelper at the first sign of storm clouds to see what your options are. You’ll be able to scroll through a list of available companies skilled in the art of solving all manner of ridiculous moving problems—up to and including snagging some last-minute movers who know how to handle a little bit of rain.
Can I postpone my move if I’ve already hired movers?
In most cases, yes, but in this scenario, you would almost certainly want to work with your moving company to decide if it’s your best option. And I will say, if you’re working with HireAHelper, you’re sitting pretty here once again, since the cancellation policies and overall flexibility of a mover marketplace are far greater than the typical van line. (You can’t see me, but I’m sitting over here boastfully batting my lashes, and raising a glass to your dry and successful rainy day move.)
Unpacking should be the best part of the entire moving process. No, really!
You’ve already coordinated all of the logistics of renting a truck andhiring Helpers, you’ve packed everything up, moved, and unloaded your rental truck. Now all that’s left to do is go through all of your boxes and get everything in its place so you can enjoy your new home!
So why do some people still dread unpacking? Well, imagine sitting amongst a mountain of boxes with no clue what’s inside any of them or where everything is going to go. Okay … yeah, that does sound pretty dreadful. But it doesn’t have to be that way! By planning your unpack, you can save time, money and headaches.
How to Make Unpacking Easier Before Moving Day Happens
We all know the quote, “If you fail to plan, you plan to fail.” The most important step to a smooth unpacking experience is proper planning before your move.
Of course, you’ll have some planning to do if you’re booking movers and renting a truck… but you still need to spend some time packing. And no, we’re not talking about randomly throwing items into boxes and calling it a day.
Here are some things you should do before moving day to make unpacking easier.
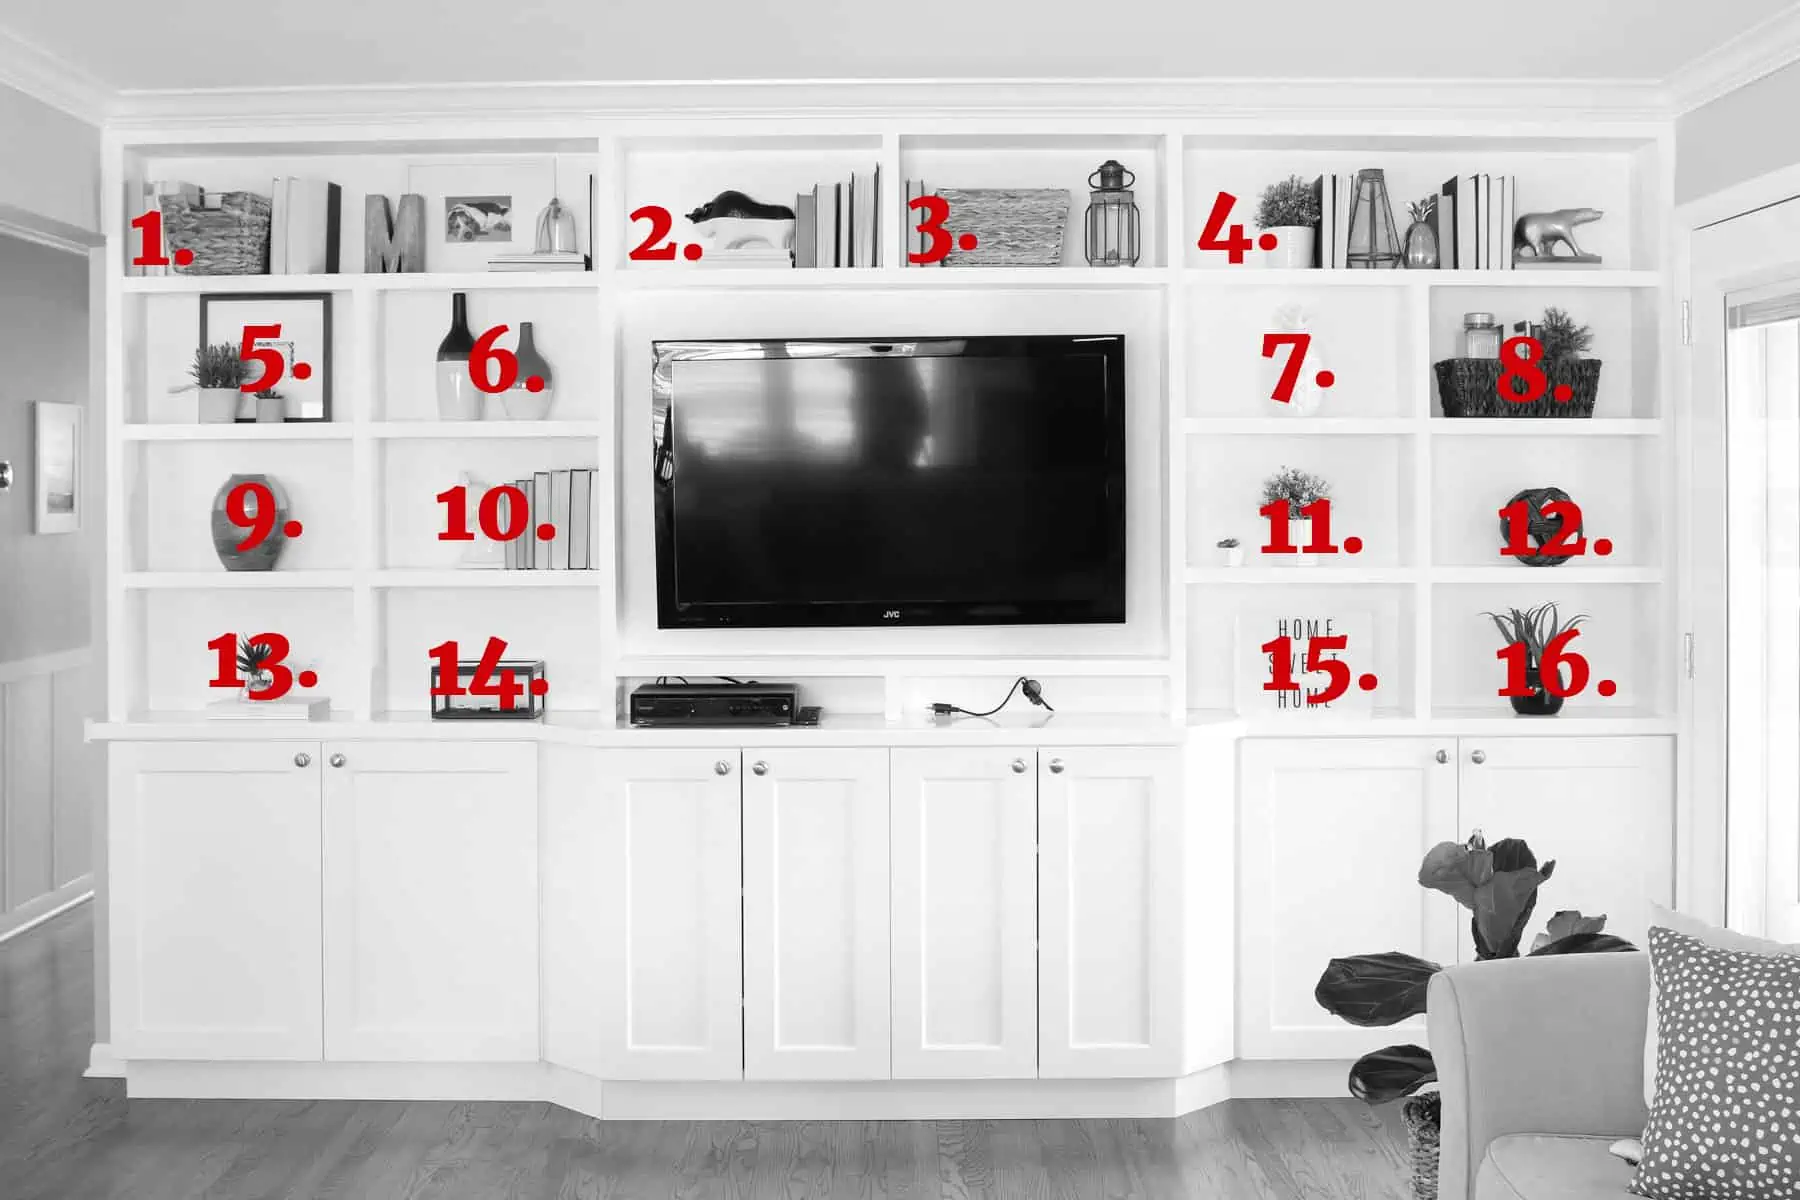
Take Photos Before You Start Packing
Before you touch anything, we want you to take out your phone and have a little home photo shoot.
Here are things you especially need photos of:
Bookshelves
The back of your TV
Kitchen drawers
Desk area
Tool shed
We urge you to snap pics of the areas in your home that you love! We know all too well how long it can take to get a shelfie looking just the way you want it. By snapping some reference pics now, you’ll be able to replicate that new look in your home in no time.
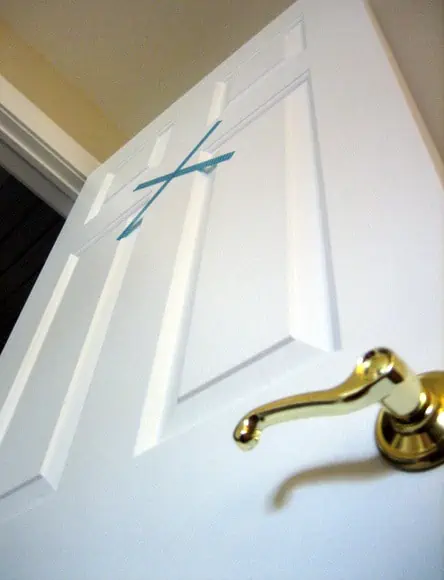
Create a Number and Color-Coded System For Your Boxes
After the photo shoot, gather all of your packing supplies (boxes, paper, tape, scissors, markers … the works!) and start packing boxes like a pro.
Try to only pack up items from one to two rooms inside every box. This will make your life much easier when it’s time to unpack later.
And we can’t forget our favorite tip of all … our color-coded box system. With this technique, you get to use our most beloved crafting tool—washi tape! Get the full instructions from this post, but the short version is that you need to separate your boxes by the room, marked with bright washi tape so your movers know exactly where to deliver them. Genius and oh so colorful!
Make it Much Easier to Unpack Essentials
There are 7 items you’ll want to have on hand for moving day, but we also think you should create a box of moving day essentials. Because imagine the night of moving day when you’re tearing open boxes trying to find pajamas, your toothbrush, and your medication for the night. Sounds like a disaster to us.
This is what should go in your “Moving Day Box” so you don’t have to tear through your moving truck:
A change of clothes
Utensils
Toiletries
Prescriptions
Phone charger
Be sure to label this box and keep it near you!
Get Help Unloading Your Rental Truck
See prices for movers by the hour—instantly.
Read real customer reviews.
Easily book your help online.
Clean The 5 Most Important Things
We know you have approximately 10,000 things to do to get your rental deposit back. But trust us, now is the time to give your new place a thorough cleaning because it’s empty. You simply put items in place rather than cleaning and unpacking at the same time. Want to know the five most essential things to clean?
Kitchen cabinets
The Refrigerator (and refrigerator fan)
Bathtub and any tub jets
Outside (and Inside) the stove
Washing machine
Unpacking Tips
You’ve done the prep work (even the cleaning, you rockstar, you!), and now moving day is here! Even if you hired help for your unload (great call), there are still things you can do to make unpacking time a little easier.
Place Your Boxes in Rooms by Color
It may sound easier to just have your Helpers pile up all of the boxes in one spot of your new place, but unpacking will be a lot easier if you follow your color-coded box system to get each box in the correct room. If you followed our washi tape tips, you should have each door in your new place marked so the Helpers can easily drop the box in the right spot!
Protip: Get your “Moving Day Essentials Box” opened right away so you have everything you need to make it through the next day or two.
Use Washi Tape to Figure out Your Furniture Layout
As long as your movers are there, have them get your furniture in the spot where you want it! We love the idea of using painter’s tape to mark out the layout of furniture right on the floor.
Before you move (or even while your movers are bringing things in and out), go around your place and put tape on the ground to outline your furniture. That way the movers will know exactly which wall to put your bed on and where that long dresser goes. You can always move things later on, but getting items in the correct space will make your life a lot easier in the coming days.
Unpack the Bathrooms and Bedrooms First
Moving day will be exhausting, so if you’re going to unpack anything immediately, make sure it’s your bed and bedding. Once your movers get the mattress into place, find the sheets, comforter and pillow and make your bed. If you have kids, do theirs too. Having a comfy spot to sleep at the end of the long day will feel amazing!
Unpack your bathroom boxes too. That way you’ll have all of the toiletries and medications on hand for the night and morning. A fresh shower after a long day of moving will be heavenly, trust us!
Save the Kitchen for Tomorrow
The kitchen is the most time intensive room to unpack, due to the amount of tiny and heavy items, so don’t unpack it on moving day. Your brain will be tired by the end of moving day, and you’ll want to be refreshed and recharged before you tackle this space. Save the kitchen until morning when you can make a fresh pot of coffee.
How to Stay Organized After Moving Day
You’re into your new home and you’re surrounded by all of your possessions. First, take a deep breath. You’ve made it this far! Now it’s time for the actual fun part … making your house a home.
Avoid Distractions, Don’t Unpack Games or TV
We might suggest making a playlist of music to entertain you, but we don’t think you should get your TV setup and turned on right away. You may find yourself sitting on the couch instead of unpacking if you have a TV show or movie on. So much temptation…
Another distraction? Little ones. You’ll additionally want to make a plan for your pets when you’re moving and unpacking, so they don’t get in the way. The same goes for kids. Have a plan to keep them occupied or if you can, drop them off at grandma’s house so you have uninterrupted time to unpack. It’s all about keeping the distractions to a minimum so you can devote enough hours to get your house in tip-top shape!
Unpack Only One Room at a Time
Instead of hopping from space to space, we suggest making a list of your rooms in order of importance. Then, don’t move onto another space until the one you’re on is done.
The kitchen, bedrooms and kids’ rooms should be up high on the priority list, while the guest room and garage may not need TLC right away. Also, make sure you have furniture and appliances setup before you get too carried away going through boxes. Did you clean your counters first? You’ll want to have spots to put all of the items as you whip them out of the boxes, so having dressers and cabinets ready to go is a must!
Break Down Boxes as You Go, in Real Time
As you unpack boxes, it may be easy to just throw empty ones in a big corner. But trust us, that pile will quickly get out of control and soon you won’t be able to walk around your house without an empty box tumbling down on you. Take one box and make it the designated paper box. As you unpack boxes, crumple up the paper and shove it into that box. Then, be sure to break down boxes as you unpack. You’ll want to have a utility knife on hand so you can do this quickly.
(And Don’t Unpack Everything)
There may be some boxes that don’t actually need to be unpacked. We’re looking at you, Christmas decorations. Make a large pile of items that may be heading to storage or the garage. Then be sure to get those items to that space in the coming days.
What to Do After You’re Unpacked
You’ve made it! You survived moving day and every box in your place is unpacked. You should be feeling pretty darn good about yourself right about now, but the fun isn’t over just yet. There are still a few things you can do to really get your unloading and packing done.
Make Use of Those Moving Boxes
If you will be moving again soon, then you may want to hang onto some of the boxes that are still in good condition. Organize your boxes and find a spot to neatly tuck them away. Are you thinking, “What the heck do I do with all of that cardboard?!” Don’t fret! Instead, try out some of the cardboard hacks.
If getting creative with cardboard isn’t your speed, you can recycle your moving boxes. Check out this searchable database that’ll let you know the closest place to recycle anything (including moving boxes!). Just be sure to set a deadline for yourself to get those moving boxes out of your new place, so they don’t stay piled in the garage forever.
Use These Organization Protips
We’re all guilty of just shoving random items into a cabinet or closet and calling it a day. But to really feel settled in your new home, be intentional with what goes where. Check out this post on how to organize house keys:
Whenever we’re on an organization spree, we go room by room with a notepad and write down areas that need our attention. Then we’ll spend 30 minutes each night giving those spots some TLC. Those short increments of time seem much more doable than an entire day spent organizing an entire home.
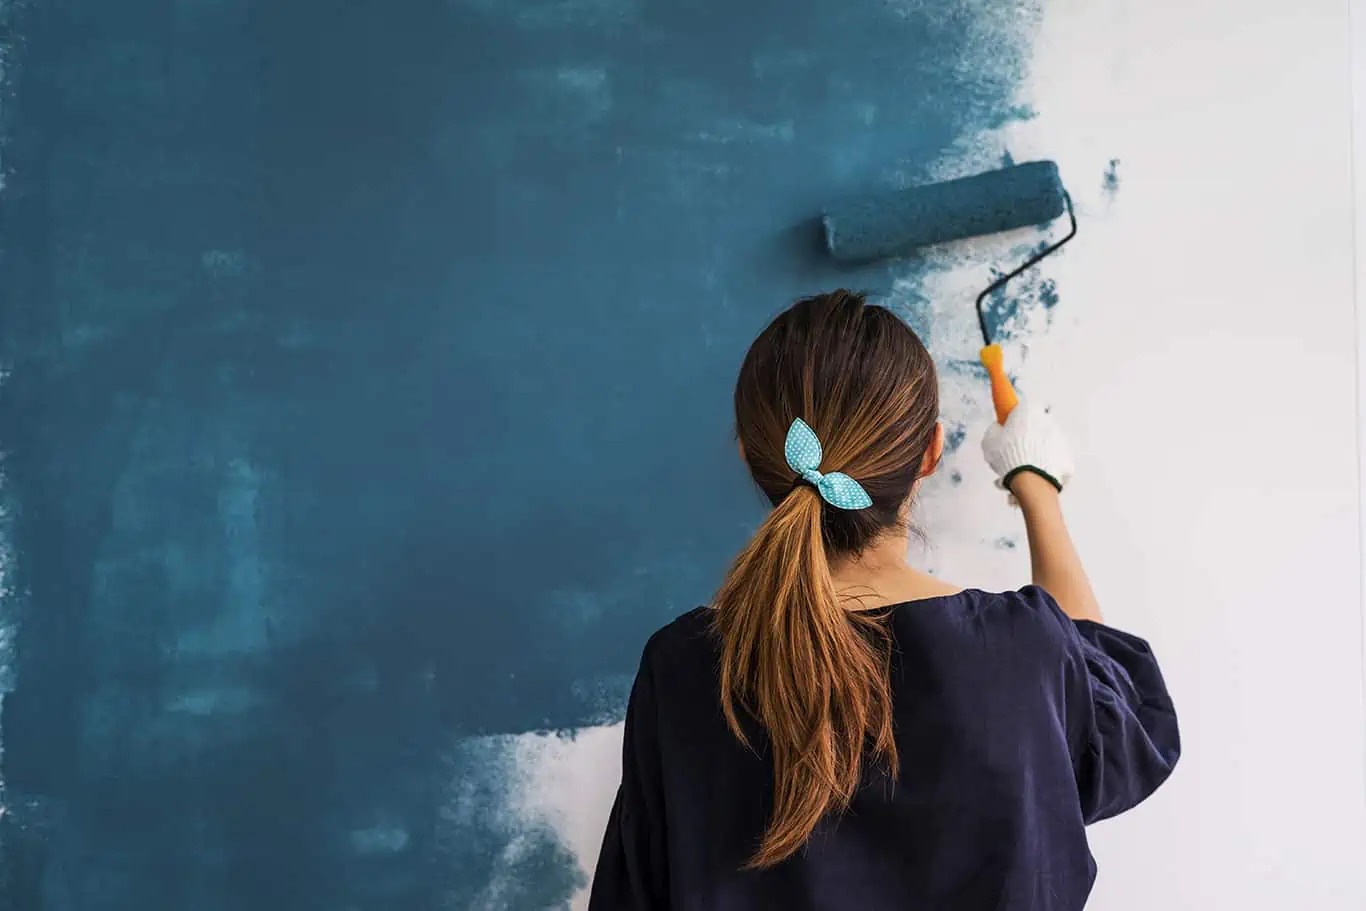
Let the Decorating Begin! (In a Month)
We always say that you need to live in your home for a while in order to decorate it well. So many people quickly buy furniture and accessories for their place without ever giving each room a test run, and they end up with design regret. Yep, don’t paint the walls until you’ve spent a little time in your new place!
We promise that you’ll make much smarter decor decisions after 2-3 months.
Here’s how to get started when it’s time to begin:
It may not seem like it, but unpacking can be the best part of the moving experience! We promise that these tips will make your unpacking experience easier and more efficient.
The sooner you unpack, the sooner you can enjoy your new life!
The 3 Things to Never, Ever Procrastinate on When You Move
Procrastination, as a strategy, is starting to get more and more interest from the scientific community.
For example, Adam Grant points out in his book “Originals: How Non-Conformists Move the World” that Martin Luther King, Abraham Lincoln, Frank Lloyd Wright and Leonardo Da Vinci were all notorious procrastinators. And hey, it worked out pretty well for them, so what’s the big deal? This train of thought has given me plenty of ammunition to justify all the times I’ve procrastinated for a test, a presentation, or heck, a daily shower.
But I know that one of these times this strategy is going to really backfire. Life is going to punch me in the mouth and, if it weren’t for my wife, our recent move would have been a disaster.
So Abraham Lincoln aside, here are a few areas where procrastination is absolutely not the best strategy. Take it from me, I’m an expert.
Finding All Your Moving Boxes
For our move, I don’t think it’s an overstatement to say we used 50 boxes. And I’m talking good sized boxes, like the kind a kid would hop into to pretend they’re an astronaut.
So let’s compare approaches:
Procrastination Chris: “Oh, you know, we’ll figure it out. A couple nights before, we’ll go into a Wal-Mart and ask if they can spare a few extra boxes. That should be easy.”
The reality: Retailers aren’t always on board with giving away their extra boxes. I don’t know what it is, but I think it’s like going into a restaurant at the end of the day and asking for any spare food; On paper, it makes sense since they’re gonna throw it out anyways. But in practice? Places of business don’t want to deal with this every single day.
My wife’s solution: Reaching out to friends who work retail weeks in advance, then getting the boxes in. She began the process weeks before, rather than a few nights before.
Booking the Moving Truck
I feel like anyone who buys a pickup truck automatically puts a bullseye on their back. You really need to start coming up with excuses for why you can’t help everyone in town move well before you put down your first downpayment.
Case and point: I remember being at a buddy’s bachelor party down in South Carolina and everyone that showed up had a pickup truck. Ford F-150, 250, even the 550, which is a monster truck that also fires off a cannon. I looked around and thought, “Man, if you ever have to move, you’ve got a small army here!”
But in most places, a lot of people don’t even own cars, let alone pickup trucks. And no offense to your buddy with a Mini Cooper, but that’s not gonna get the job done.
Procrastination Chris: “Eh, we’ll just get a U-Haul. Easy!”
The reality: Moving trucks aren’t totally simple. For one, they don’t have a normal rearview mirror; They’ve got these big side mirrors that stick out to give you a view when backing up. If you’ve never driven one before, it’s a lot to get used to. And maybe it’s just me, but it’s amazing how accustomed you get to a backup camera once you have one in your car. Without a backup camera and none of the “beep, beep, beep-beep-beep”, I’m surprised anyone before 2007 ever had a scratch-free bumper.
Most importantly, moving trucks get booked ahead oftime. Yeah, that means you’re supposed to coordinate your move date with the date you need the truck, usually well ahead of time – especially during the busy season. Oops.
My “I got lucky” solution:One of my buddies loves helping people move. It’s like having a friend who enjoys doing taxes. He once drove a U-Haul from Chicago to New Orleans, so driving this one a couple block was small potatoes. Phew.
See prices for movers by the hour – instantly.
Read real customer reviews.
Easily book your help online.
Getting Help From Your Friends
In fairness, I sent out a calendar invite at least three weeks, maybe a month in advance to some co-workers and another friend.
I cannot, cannot, cannot stress this enough! Without a minimum of four regular friends helping out, I don’t think any move has ever been possible. And yeah, I know there’s an exception out there: the dude who sleeps on an air mattress and only owns like two outfits. But for the vast majority of us, we actually need help moving all of those boxes.
This is where procrastination can backfire big time. If I would have reached out only the day before – nevermind the morning of – they could have all had other plans and/or they could have quickly come up with an excuse. (“I, uh, gotta walk the dog.”)
This is one you don’t want to leave up to chance. Even if it works, it’s sort of like when a basketball player fires up a terrible shot and the coach screams, “No! No! No!”, but then it goes in anyway and they let out a sigh. Yes, procrastination may work every now and then, but not a great long-term strategy. Especially for moving.
My “hope-they-still-talk-to-me” solution: Very patient, very tired friends.
Make Moving Not Suck
Everyone’s moving situation is different, whether the city, suburbs or small town. I think back to that fleet of pickup trucks in South Carolina; Some people are lucky or they’ve got all their buddies around with the right vehicles for a move. They’re all set.
But for most of us, we’re not so lucky.
Most moves involve someone fresh out of college with their mom and dad, and the dad is getting upset because his kid procrastinated, and now his back hurts, and the mom is upset because the dad is upset, and then someone’s like, “Hey, you can’t park here,” and the mom looks over at the dad before he snaps, “Carol, I know, but I have to go feed the parking meter!” All the while the kid’s younger sibling is on their phone taking a selfie (#MovingDay). And everyone is about one step away from not getting together for Thanksgiving.
It’s not worth having one of the worst days of your life with your friends and family. Find some help. If you’ve got the friend brigade of pickup trucks, awesome. If not, hire it. It’s cheaper than you think.
And whatever you do, just don’t procrastinate on this one. No matter what DaVinci says.
Chris O’Brien is an author writing out of Chicago. His latest release, “Moving Sucks”, captures all the pain of moving day, but with a comedic twist. Watch for its release on Amazon.com this November. For more info, email Chris@mediumraresizzle.com.
Bubble Wrap 101: Protips, What It Doesn’t Work With, and Solid Alternatives
For keeping your most valuable, most expensive stuff protected when you move, it may seem like there’s nothing better than bubble wrap. But we’ll let you in on a little secret.
Not because it doesn’t work. It does. But the pros know, all those little bubbles add up to some bulky and relatively expensive bit of cushioning. Packing paper, used correctly, will serve most any packing purpose and save you both space and money.
Still, you may be more comfortable enveloping your flat screen TV, your electronics, your stemware and your china in bubble wrap. That’s totally understandable. So if you decide to go this route, here are a few things to keep in mind.
Using Bubble Wrap: 5 Quick Tips
Put a layer of packing paper between your TV and that bubble wrap. Plastic can leave marks on your screen, particularly in extreme temperatures. This goes for anything you wrap in bubbles. For items with sharp edges or corners, some extra paper can help keep those sharp areas from poking right through the plastic.
Wrap your items with the bubbles facing inward for better protection against exterior pressure and accidental impact. The flat side is easier to write on (in case you want to be able to identify each item quickly) and will hold the tape in place much more effectively.
Don’t bank on one layer of bubble wrap. Two layers of small bubble sheeting might be enough for a piece of stemware, though this would be in addition to packing them with plenty of packing paper and, for extra peace of mind, individual cells inside your cardboard box. If you are using the stuff with the bigger bubbles for heavier items like a large framed mirror or your CPU, one layer may suffice – but again, only in addition to some crumpled packing paper for extra cushioning on all sides.
Keep that bubble wrap firmly in place by taping not just along the edges, but all the way around the item. You splurged on that bubble wrap, don’t start skimping on the tape!
Have a pair of scissors on hand when you are unpacking. It would be a real bummer to break something – or drop and break something – while trying to tear that bubble wrap off using only your hands.
If the quote from your movers felt expensive …
Make sure it lines up with the costs reported by other Americans.
What to Pack in Bubble Wrap
Valuable items. Fragile items. Heavy and hard-to-replace items. If you’re staring at something and you can’t decide whether to bubble wrap it, err on the side of caution and wrap it.
Specifically, you’ll want to consider bubble wrap for:
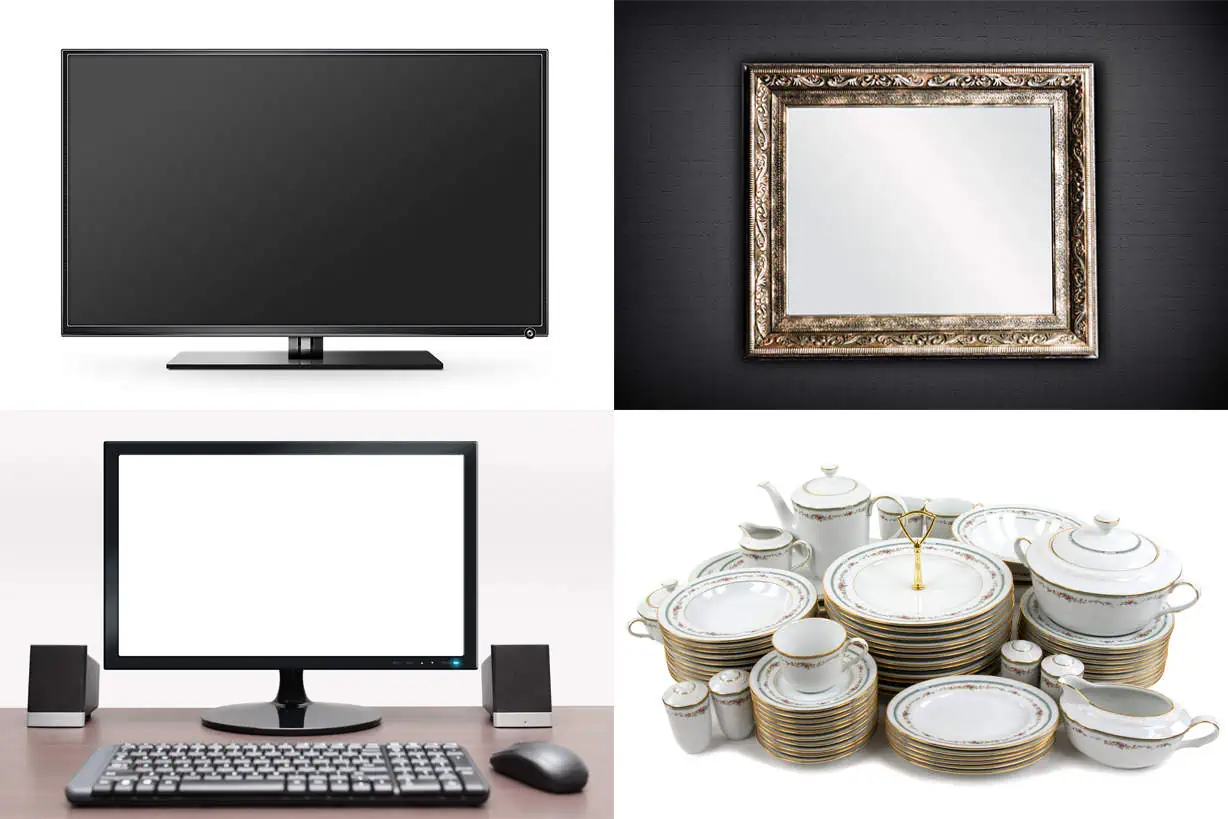
Large picture frames and mirrors
Flat screen TVs
Glass tabletops and shelving
Electronics and computers
Stemware and fine china
Fragile decorative items
Remember, bubble wrap alone will not do the trick. Even surrounded by two or three layers of air pockets, the things on this list will still need to be packed firmly in cardboard cartons with enough crumpled packing paper on all sides to keep them from shifting and bouncing in transit while keeping them safe from exterior impact.
After the bubble wrapping is done, use the right kind of box.
There’s no point in being safe if you use the wrong box for your stuff. Finish the job right by packing each bubble-wrapped item properly, surrounded by plenty of crumpled packing paper. Moving boxes come in specific shapes and sizes for your items, use accordingly.
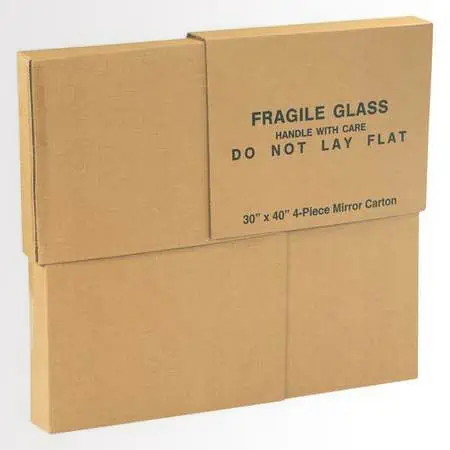
Mirror Cartons
Picture frames, mirrors, glass shelves and flat-screen TVs go in mirror cartons – sets of two, if not four pieces that you can use to form a custom-sized box.
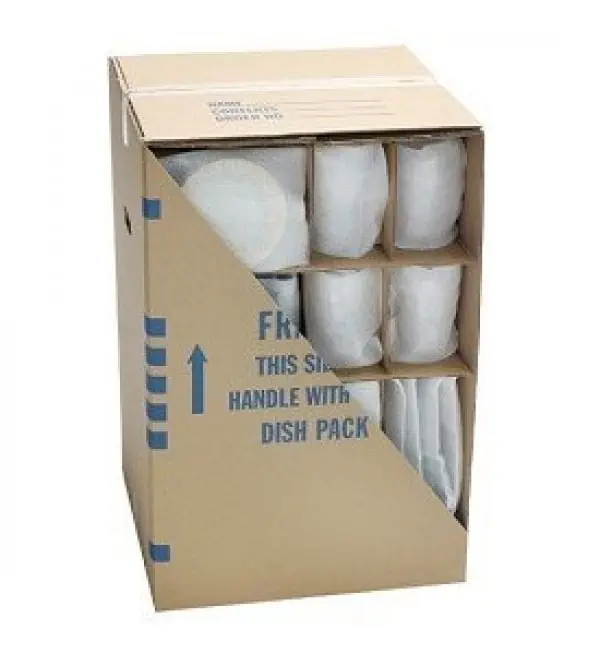
Double-Walled Dish Pack Cartons
containerstore.com
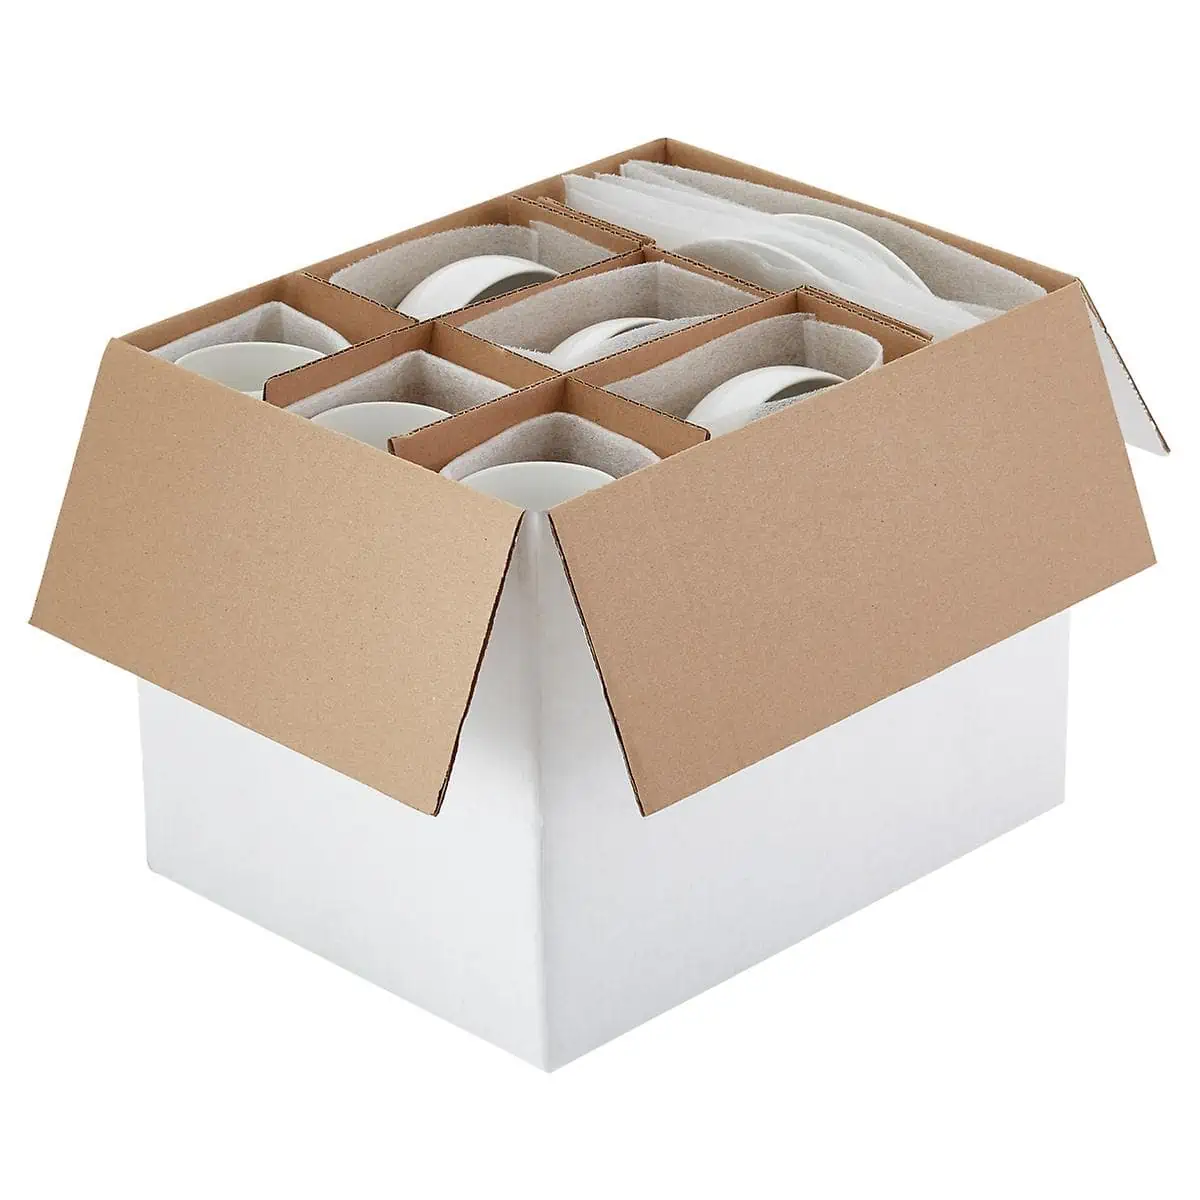
Electronics and computer components are best protected when packed in double-walled dish pack cartons, the same boxes we use for dishes, plates and glasses. And yes! This includes your china and stemware. Fragile decorative items like statuettes and ceramics can still be packed in medium (3 cubic foot) boxes, provided they are cushioned well and the boxes are clearly marked to minimize the chances of someone putting a box of books on top.
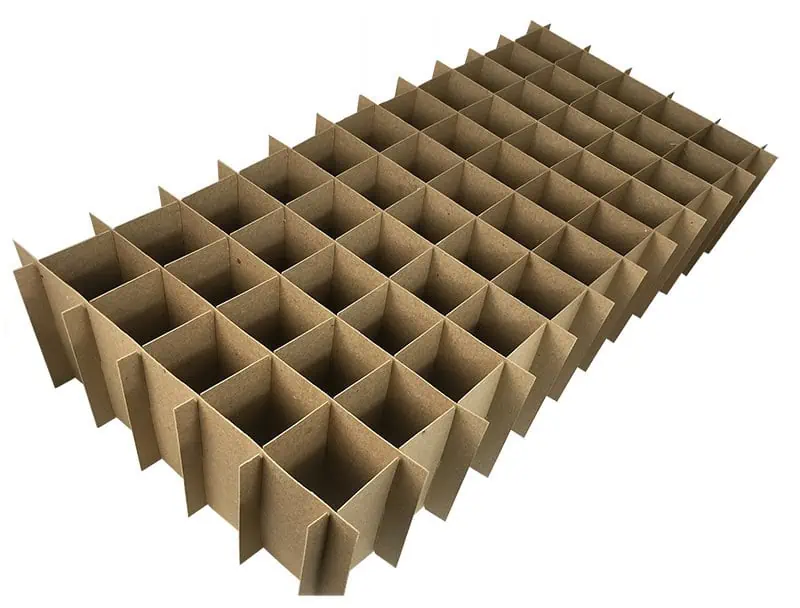
Cardboard Cells
A note about stemware: Nothing gets broken more often than this stuff. Wrapping each piece well is crucial, but so is packing it all correctly into your dish pack as the items on the bottom will have to support the weight of everything else in there.
cactuscontainers.com
The best thing to do is get your hands on some of those cardboard cells, which not only keep your wine glasses from knocking against each other but offer an appreciable amount of vertical support, keeping all the weight of those glasses off the ones at the bottom of the box.
If you can’t find any cardboard cells, don’t despair! A thick layer of crumpled packing paper on the bottom of your dish pack and another layer of crumpled paper on top of each successive tier of firmly-packed stemware is what the pros use to keep everything safe. If you aren’t comfortable with that, line your entire dish pack with bubble wrap and put a couple of sheets in between your tiers of glasses. This isn’t the most cost-efficient way to pack your stemware, but it beats a box full of expensive shards of glass.
Alternatives
If not bubble wrap, then what? As stated earlier, packing paper is the standard. However, towels, crumpled newspaper, or virtually anything form-fitting, sturdy and that’s plenty soft can often do the trick for cheaper. Sound too simple? It really is. As long as you pad your items in a balanced way, it doesn’t need to be as expensive as bubble wrap. Just as long as “this one, extra towel” isn’t the only thing keeping your priceless vase safe. Check the moving supplies section at your local hardware store for bubble wrap alternatives.
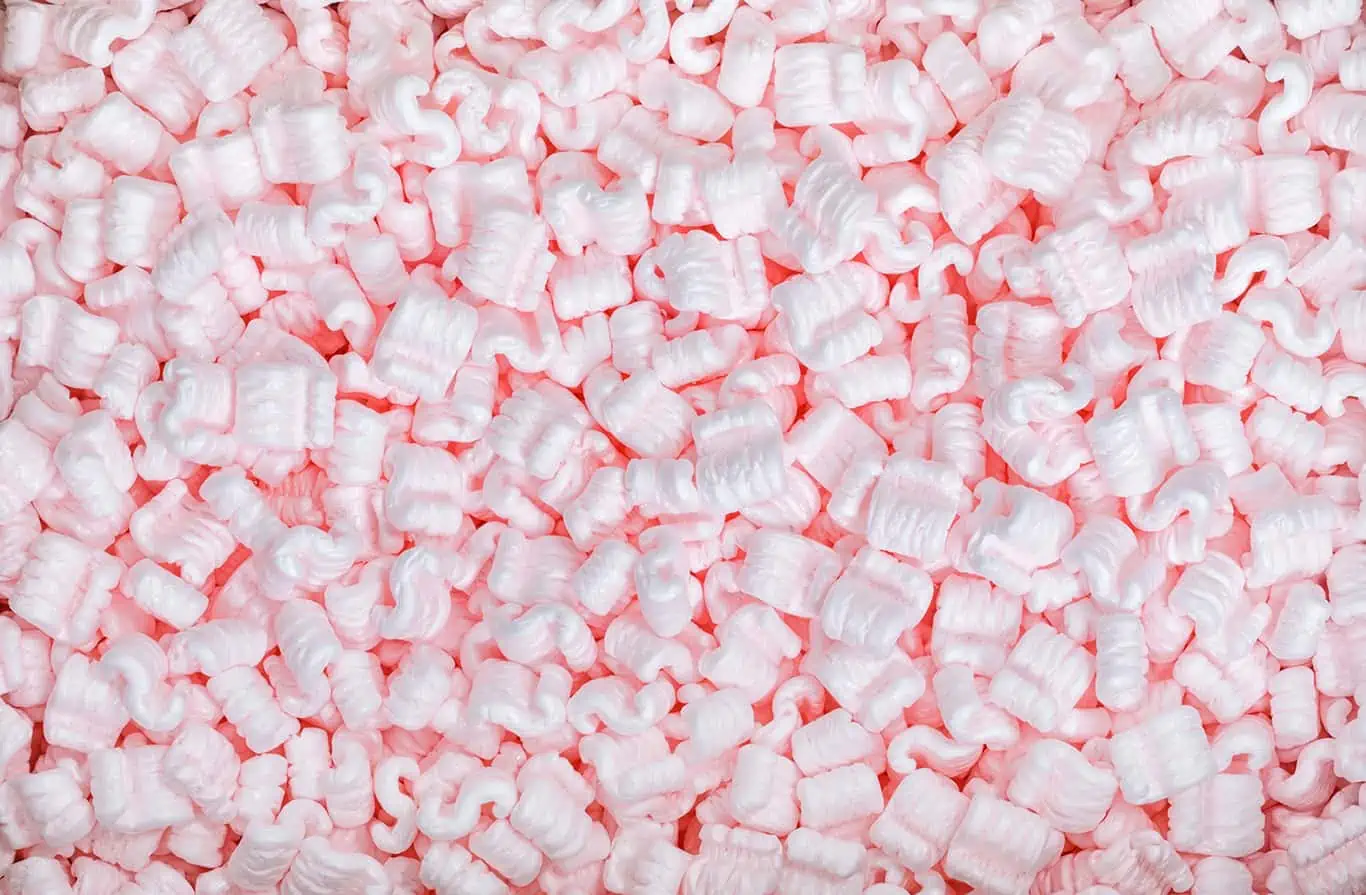
A Note on Packing Peanuts
You may like the idea of those Styrofoam nuggets, but in general, they are bulky, costly, and non-biodegradable. The eco-friendly alternative cornstarch peanuts are even more expensive and don’t make for a very satisfying snack, no matter how hungry you are at the end of your move. Plus, they end up getting scattered all over the floor and clinging to your clothes. In short, use (and eat) them if you like, but I don’t recommend them.
Admit it. It’s hard to resist popping those plastic bubbles once you’re done with that bubble wrap. But think for a moment how easy it is to pop them – and how much all the boxes you are packing must weigh.
Keep this in mind when you are packing up all those valuable, expensive, fragile items. On its own, a sheet of bubble wrap can’t adequately protect your stuff. You’re going to need plenty of packing paper (or towels or clothes) in a pinch. Pack those items firmly in the center of your box, protected on all sides.
And really, save yourself a headache (and maybe the stomachache) and stay away from those peanuts!
How to Pack Stemware Safely, With or Without Dividers
I remember the first time I had to pack a china cabinet full of stemware. Wine glasses. Champagne flutes. Crystal crafted and etched so delicately it might as well have come straight out of a fairytale castle.
My hands shook as I wrapped each piece. My stomach churned as I watched my buddy load that dish pack onto the truck, underneath a stack of other boxes.
20 years later I still have nightmares about it.
I’ve dealt with plenty of stemware since then, and while I wonder now and again whether anything I’ve packed has gotten damaged in transit, I’ve learned enough from people who have been around longer than me to know how to minimize the chances. Below is a summary of what those people taught me.
Packing With Dividers
While dividers can add stability to the carton and protection to the contents, the fundamentals of packing still apply.
Make it tight. Density still matters, even inside those cells.
Create cushions of packing paper between layers.
Be generous when padding the bottom and the top of your dish pack.
In addition, there are things that require extra attention.
Image by: Done Right Moving
No matter what you are putting at the bottom of your dish pack, lining the bottom of the carton with nothing but crumpled paper isn’t the best way to go. Have you ever watched a child jump into one of those massive tubs full of plastic balls? That child doesn’t land on top, they sink down, pushing all those plastic balls to the sides. All that stuff you pack in your dish pack will do the same thing unless you cover that (thick, tight) layer of crumpled up paper with several sheets of crumpled-then-uncrumpled paper. (Imagine laying a tarp across the top of that tub full of plastic balls.)
This goes a long way in keeping those crumpled up paper balls in place under the weight of all that kitchenware. This will also prevent your dividers from sinking and potentially exposing the stemware those dividers are supposed to be protecting.
Be aware that dividers aren’t always the perfect height for the stemware you are packing. If your wine glasses are a bit short, add extra paper beneath and on top to fill out the space in each cell. Are those champagne flutes too tall? Don’t leave them sticking out of the top! Make a double layer of dividers, pad those glasses above and below, and, to use that extra space wisely, fill the remaining space in each cell with smaller glasses (that are also well-protected).
No one in the history of packing has ever had the exact amount of stemware needed to perfectly fill the number of cells in the dividers they are using. Since the customer has requested you use those dividers for all, not most, of their stemware, don’t skimp or cheat at the end and pack those last few crystal wine glasses loose among the coffee mugs and tea cups. Fill that last divider level with those remaining pieces of stemware plus whatever other items will fit in those cells. And if you find you have more dividers than you need? Use the leftover pieces to create a sort of cardboard roof over your top divider level so you can pack and fill the remaining space in your dish pack with confidence.
Packing Without Dividers
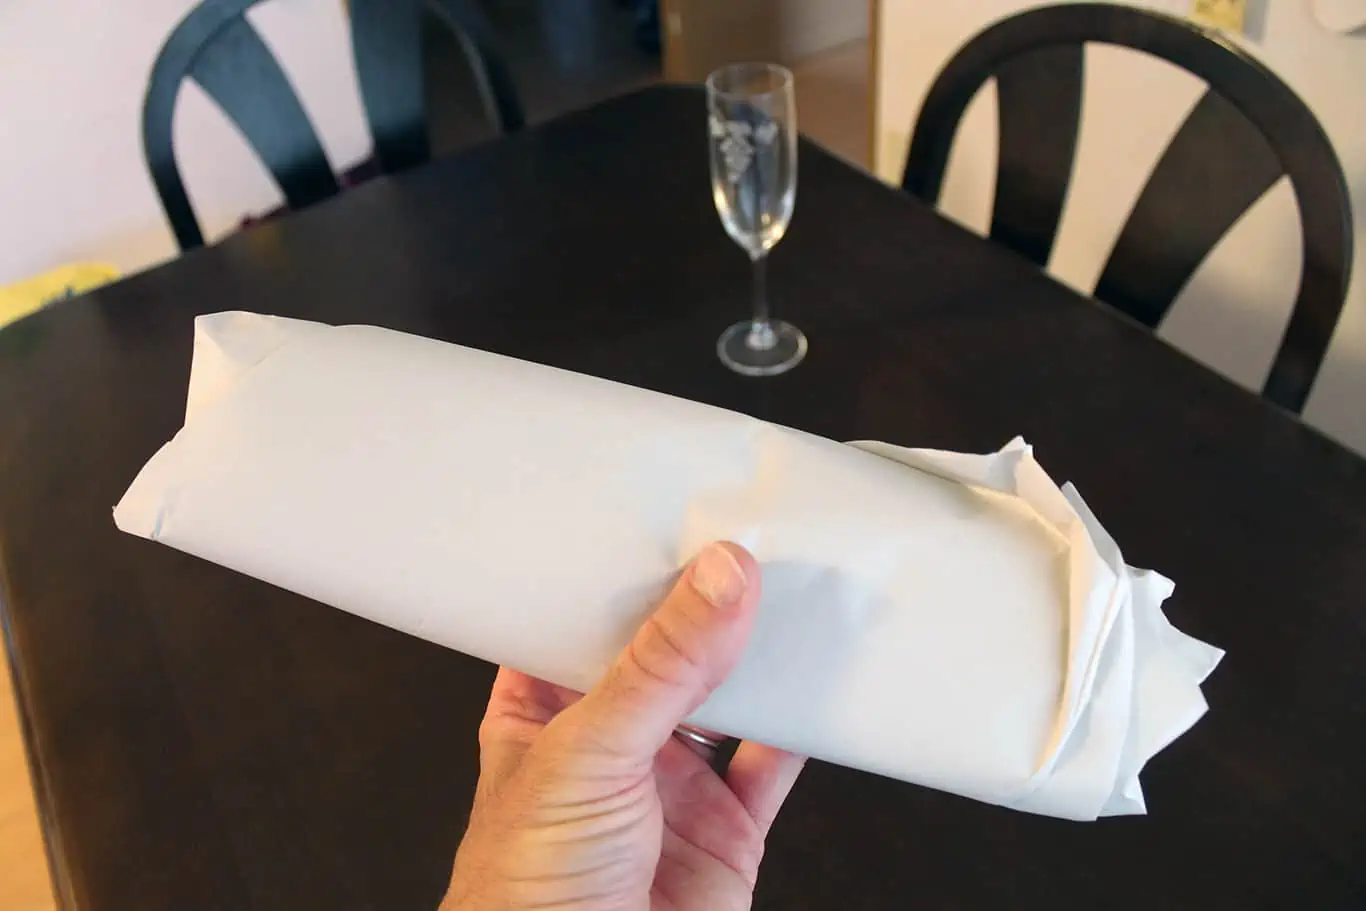
This was the case that first time I had to pack stemware. And while it is absolutely possible to pack a bunch of fine, fragile wine glasses safely without dividers, it takes a lot of care – and plenty of paper!
The biggest concern in wrapping stemware is that most fragile part: the stem. The thing is, all the paper in the world won’t guarantee the survival of that stem if the pressure is too great. Still, that’s the first part we want to protect.
The longer the stem, the more critical it becomes to wrap that stem in paper. We do this mainly to create a more cylindrical item we can then wrap completely. Cylindrical bundles allow for a tighter, denser pack. The more empty space there is around the stems of those wrapped glasses, the greater the chance those glasses will shift and generate uneven pressure inside the carton.
I see and hear all the time how important it is to stuff the inside of your wine glasses with paper. To be honest, I don’t get it. If there’s enough lateral (sideways) pressure being exerted on the outside of a glass to break it, crumpled paper cannot offer nearly enough strength to counter that pressure. What the paper CAN do is add a degree of protection against vertical pressure. As with packing glass lampshades, stuffing each glass with enough paper so that paper extends beyond the rim of the glasses means extra cushioning between layers.
Speaking of layers, as we mentioned earlier, a stable layer of paper at the bottom of the carton is critical for the overall protection of the contents. When packing stemware without dividers, we want to make sure the cushioning on top of and below each layer of wrapped stemware is thick and stable. Lay some wrinkled paper across your layer, add a layer of crumpled paper balls, then cover with more flattened paper before packing your next layer of glasses. Without the strength of those vertical dividers we need to make sure our dish pack is jammed with paper not just between layers but between and around all those glasses – which we should be packing upside down, by the way! And of course, a dense, thick layer of paper on top is a must.
One final point about packing stemware: the use (or not) of bubble wrap. As with stuffing paper inside your wine glasses, I’ve seen plenty of tips involving wrapping stemware with bubble wrap. Personally I’ve never used it on any type of glassware. Ever. Nor have I ever done an unpack and seen it used. Does this mean you can’t use it? Of course not. It just might not be your most practical option. If you do use it, be aware that some people will strongly advise against wrapping a glass in plastic without wrapping it in paper first. One reason is the possibility of the plastic leaving marks that are hard to get rid of. Another is the tendency of plastic to stick to glass, increasing the likelihood of pressure and thus damage.
In simple terms, use it at your own risk.
To sum up, if you use dividers when packing stemware, make sure they are level in the carton and that the cells are filled tightly. And make sure those stems aren’t going to end up sticking out the top. If you aren’t using dividers, use common sense. That is, use plenty of paper! Make your carton super cushioned and super stable.
Ah, St. Patrick’s Day! A time for silly green sweaters and spilling green beer on ourselves!
What’s that? You’re too busy moving to a new apartment to get your Irish on? Well take heart, lads and lassies, you can still celebrate St. Paddy’s! With these five tips for saving some green on your move while being greener along the way, you’ll be drinking in the An t-áadh na n Gaelmore than any of your fellow muckers heading out on the lash for a craic.
Moving? Thinking about moving? Whether your move is off in the distance or you already have one foot out the door, you'll learn about everything you should expect through our useful how-to's, cool articles and much more. It's all specially curated for you in our "I'm Moving" section.
For rookies or veterans alike, our "I'm a Mover" section is filled with extensive industry news, crucial protips and in-depth guides written by industry professionals. Sharing our decade of moving knowledge is just one way we help keep our professional movers at the top of their game.
 After the photo shoot, gather all of your packing supplies (boxes, paper, tape, scissors, markers … the works!) and start
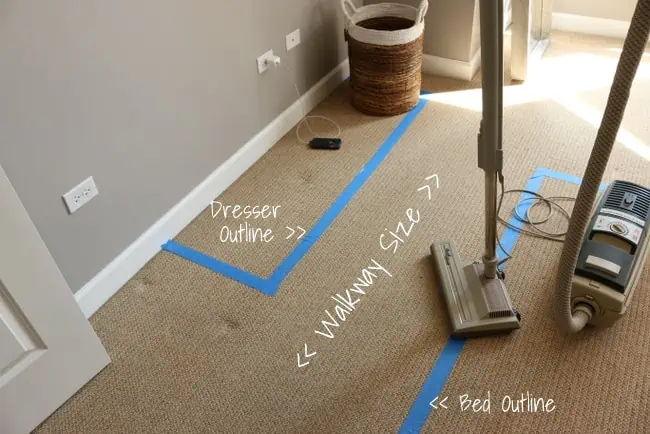
 It may sound easier to just have your Helpers pile up all of the boxes in one spot of your new place, but unpacking will be a lot easier if you follow your

 You may like the idea of those Styrofoam nuggets, but in general, they are bulky, costly, and non-biodegradable. The eco-friendly alternative cornstarch peanuts are even more expensive and don’t make for a very satisfying snack, no matter how hungry you are at the end of your move. Plus, they end up getting scattered all over the floor and clinging to your clothes. In short, use (and eat) them if you like, but I don’t recommend them.