Lots of people put off unpacking after a move, but transforming your space into a place you can rest and relax instead of staring at all those boxes and furniture is an important final step. Learning how to unpack like a pro can turn this into one of the most rewarding parts of your move by transforming your space into somewhere you can rest.
In this guide, you’ll learn how to plan your unpacking, tackle each room in order, beat that overwhelming feeling, set realistic timelines, and decide when to consider unpacking help.
Plan Before You Start Unpacking
Unpacking like a pro begins with a plan. Hopefully, you packed well, but even if you didn’t, it doesn’t pay to simply attack the box nearest to you and hope it contains your PJs and toothbrush so you can get to bed. Instead, put in a little time and elbow grease to support overall unpacking success.
Prep your home for unpacking by following this 3-step checklist:
- Clean
- Place furniture
- Stage boxes

Step 1. Clean the Space
A deep clean is usually needed to prep a house for sale or to get your rental deposit back. But don’t neglect an initial cleaning of your new home before you set it up.
It’s a good idea to give some attention to 5 critical areas:
- Kitchen cabinets: Wipe down the kitchen cabinets to remove any potential residue.
- Fridge: Clean out anything left in the fridge and wash the shelving and bins.
- Bathrooms: Clean bathtubs, showerheads, and sinks, including any jets and other appliances.
- Stove: Clean the outside and inside of the stove to ensure you don’t end up cooking on anyone else’s old food bits.
- Washing machine: Run a cleaning agent through the washing machine if it came with the home.
Step 2. Place Your Furniture
Set yourself up for unpacking success by taking photos of your favorite spots in your current home before you pack. Capture the ideal placement of living room furniture and the bookshelf you finally decorated to your satisfaction, twinkle lights and all. Use those pictures for inspiration as you stage your new place.
“Try the 45/15 method [for efficient unpacking]. Set a timer for 45 minutes of focused unpacking, and follow that with a 15-minute break to recharge.”
Set up each room or corner before you tackle your boxes. Furniture, like tables and couches, gives you a place to set boxes as you unpack them. When boxes are higher up, you’re not bending or stooping as much.
Having shelves, desks, and hutches in place also helps you take items from boxes and put them exactly where they go. This is when those reference photos really pay off.
Step 3. Stage and Organize Your Boxes
Stay organized while packing. When possible, ensure boxes only hold items from a specific room — avoid putting bedroom stuff in with the kitchen dishes, for example.
A color code helps you pack more efficiently and find items you might need right away in your new home. Bold colors on boxes and doors also let moving help know which rooms to put boxes in when unloading. It’s easier to unpack like a pro if all the boxes are in the right rooms from the start.
Is There a Right Way to Unpack a Moving Box?
There is, actually, a right way to unpack a box. First, be careful when using scissors or a knife to cut away tape. Pushing the blade too deeply could put your belongings at risk.
Unless you know 100% what’s in a box, don’t dump it out. Instead, reach in and remove each item separately to reduce the risk of breaking fragile belongings.
If you come across a box with many small items at the bottom — and you’ve removed everything else — you can pour the items carefully into a bin or bowl. You can sort through them better that way and avoid losing pins, tacks, screws, or other bits on the floor.
Finally, after you empty a box, break it down. It takes less room and is easier to store or recycle when flat.
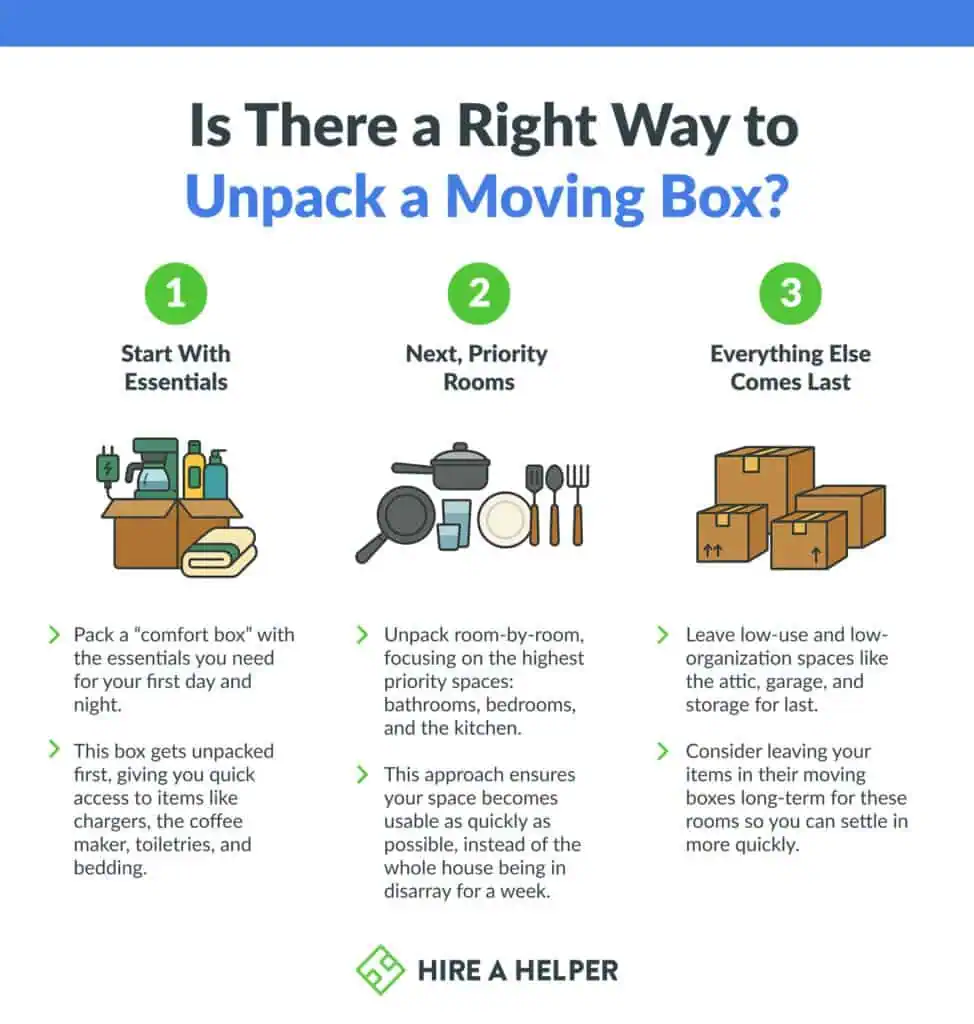
Start With the Essentials
When planning how to unpack after moving, start with making an essentials box. Items in this box are often the last thing you pack and include toiletries, bedding, device chargers, and some basic kitchen items.
Your essentials box should be tailored to your needs. While necessary items like toothbrushes and your phone charger should be included, consider what other items might be most important to you in the first hours or day in a new home. Must have hot tea or coffee to keep you motivated? Put the kettle or coffeemaker in. Need music to drive your unpacking efforts? Toss a Bluetooth speaker into the box.
Keep this box with you during the moving process. Transport it in your car instead of the moving truck so you always know where it is and can grab essentials as needed.
Unpack Room by Room
While it might be tempting to start with the nearest box, that’s an easy way to get overwhelmed. Instead, take a breath and consider one room at a time. Start with critical spaces for comfort and cleaning, and move through the house at a pace that works for you.
It’s okay if unpacking takes a few days or longer. Taking time to do it right without rushing cuts down on burnout and sets you up for better enjoyment of your home.
Bedrooms & Bathrooms: Comfort and Hygiene Come First
The bedrooms and bathrooms are the two places you need to be up and running to feel comfortable and to get back into your routine.
Set each bathroom up with toilet paper, hand soap, and a hand towel. Then add toothbrushes, hairbrushes, toothpaste, and other critical personal items. Finally, unpack wash cloths and regular towels. Moving is sweaty work, and everyone may want to refresh later.
“Set a realistic deadline — 2 weeks, for example — to finish any lingering [unpacking] tasks. Mark it on your calendar and commit to having every room functional and box-free by that date.”
Once beds are set up — including frames and mattresses — find sheets, comforters, and pillows. If you have kids, do theirs too, and don’t forget comfort items like nightlights and stuffies.
After you attend to these two important areas, you can spend some time setting up bedrooms with personal belongings and decor later. However, it might be a good idea to get some basics set up in the kitchen and come back to tweaking the bedroom afterward.
Kitchen: Time-Intensive but Essential

In most homes, the kitchen takes the longest to unpack fully. You may have hundreds of items, including dishes, appliances, utensils, and food, to set up.
Because it’s so time-intensive, a full kitchen unpack is not an ideal moving day task. Instead, concentrate on a few essential items. Set up the coffee maker for the morning, place a pan on the stove so you can cook breakfast if desired, and ensure you have a few dishes available. You can even use paper plates and cups for the first few days to reduce unpacking stress.
When you do tackle the rest of the kitchen, use a zone strategy. Unpack by category — glasses, cookware, utensils, plates, etc. — and put things into cabinets and drawers as you take them out of boxes. Avoid just stacking things on counters and tables. Organized unpacking is easier if you start with a good kitchen packing plan.
Pro Tip: Lay down shelf liners before filling cabinets — it’s much harder later.
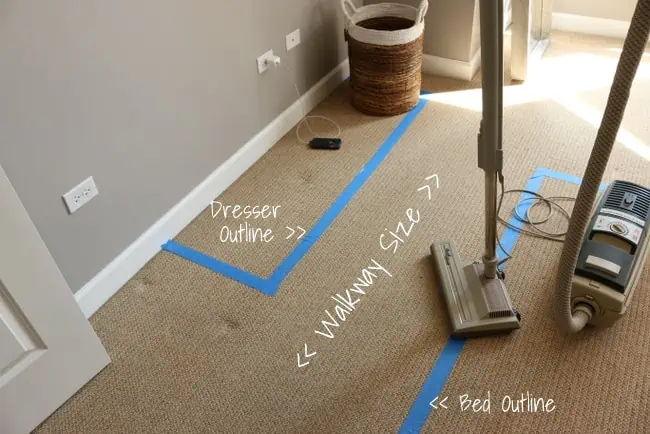
Living Area: Stage Furniture Before Unpacking Decor
While a well-appointed living room, dining room, or den can make a home feel truly comfortable, these areas are less urgent to unpack than bedrooms, bathrooms, and the kitchen. Take your time getting to these areas so you have functionality in the rest of the home and can enjoy the process of setting up your new family spaces.
Not sure where furniture might fit well? Measure out large items like couches and media centers. Then, use painter’s tape on the floor to outline where they might go. Walk around these areas to ensure you have sufficient aisles to move in.
Set up seating, lighting, and entertainment centers first. Add decor elements like mood lighting, small tables, and pictures afterward. You might want to unpack electronics, like gaming systems, last to ensure everyone stays on task while setting up the house.
Pro Tip: Set up a comfortable seating area early — it boosts morale while you work.
Garage, Storage, & Non-Essentials: Leave for the End
Basements, attics, garages, and other storage areas can typically wait until the rest of the house is functional. As you move boxes into the home, place those with seasonal items like holiday decorations where you plan to store them. Often, you can leave them as is until they’re ready for use. If you plan to donate items, don’t bother unpacking them.
Pro Tip: Label storage bins now — future you will be grateful.
Pro Tips for Room-by-Room Success
As you tackle unpacking in each room, keep the tips below in mind to support success.
- Color-code: Use color-coded labels so you know which boxes go in each room. Label boxes clearly with a description of contents, such as “bedding” or “kitchen dishes.”
- Break down boxes as you go: Keep a utility knife handy so you can break down boxes as you go to reduce unnecessary clutter and confusion.
- Work one room at a time: Finish one room or space before starting another to reduce chaos and keep yourself on task.
- Make it fun: Find ways to stay motivated, such as by playing your favorite music or having conversations with friends and family as you work.
- Ask for help: Ask trusted friends or relatives to join in. More hands make less work for each person, and doing the work together can be more enjoyable.
Beat the Overwhelm: Tips to Stay on Track
It’s common to feel overwhelmed when unpacking after a move, even when you’re excited about your new home. The number of boxes stacked around you and the action of deciding where each thing goes can quickly cause decision fatigue. It’s tempting to crawl into blankets or turn on the TV and leave unpacking for another day.
Instead of letting overwhelm take you out of the unpacking mindset, use some tried-and-true strategies to stay on track like a pro.
Set small goals
Start by breaking the work into small, manageable goals. Instead of telling yourself you’ll finish the kitchen, focus on unpacking just the glassware or setting up one cabinet. Completing small wins builds momentum and makes the job feel less intimidating.
Use the 45/15 method
Try the 45/15 method. Set a timer for 45 minutes of focused unpacking, and follow that with a 15-minute break to recharge. Use breaks to stretch, grab a snack, or check in with friends, but avoid getting pulled into distractions like TV or scrolling on your phone.
Keep clutter out of your new space
Minimize mental clutter by keeping your unpacking space organized. Flatten empty boxes as soon as they’re unpacked, and keep a donation bin nearby for anything you decide doesn’t belong in your new space.
Celebrate small wins
Celebrate progress — even partial progress. Snap a photo of a room before and after you unpack, or treat yourself to a nice meal once you’ve completed the day’s goals.
By focusing on what you’ve accomplished instead of what’s left, you can keep energy and motivation high until the last box is handled.
How Long Does It Take to Unpack After Moving?
It usually takes around 3 days to unpack essential belongings when moving into a home. However, when you’re unpacking around life schedules that include school or work, it might be a week before you feel like your home is mostly “done.”
Unpacking time can also vary depending on how well you’ve prepared, how you’ve packed your things, the size of your home, how much stuff you have, and whether you have help.
Smaller homes or apartments may take less time, especially if you packed strategically and labeled boxes clearly. Larger homes, cross-country moves, or situations where you’re juggling unpacking with family responsibilities may stretch the process to 2 weeks or more.
The key is to stay consistent without burning out. Set daily goals that feel doable — such as completing one or two rooms — and celebrate small wins along the way. Avoid letting boxes linger unopened for months, but give yourself grace if life slows you down.
Unpacking Help
Sometimes, calling in help is the smartest way to get settled quickly. Here’s some information on when to rely on the pros and what to expect from them.
When can professional unpackers help?
If you’ve had a large move, are short on time due to work or family obligations, or have physical limitations that make lifting and bending difficult, professional unpackers can take the pressure off your shoulders — literally and figuratively.
What’s included in unpacking services?
Unpacking services typically include unboxing items and placing them in cabinets, closets, or shelves. This can also include assembling furniture, removing packing materials, and breaking down boxes for recycling. Some providers might also help with basic organization so your space looks and feels functional right away.
Finding unpacking help
To find reliable unpacking help, look for experienced professionals with positive customer reviews and transparent pricing. HireAHelper’s marketplace lets you compare vetted movers who provide unpacking services side-by-side, so you can choose a team that fits your schedule and budget.
“Furniture, like tables and couches, gives you a place to set boxes as you unpack them. When boxes are higher up, you’re not bending or stooping as much.”
Even a few hours of professional assistance can speed up the unpacking process dramatically. That lets you focus on personal touches instead of heavy lifting.
After Unpacking: Organize & Settle In
Once the last box is empty, your work isn’t completely done. Taking a little extra time now to organize, clear out leftovers, and add personal touches can help your new house feel like home and stop clutter from forming in your space.
Donate what you don’t need
As you unpack, you might come across items that no longer fit your space or lifestyle. Instead of tucking them into a closet, set them aside for donation. Keep a box or bag ready for this purpose and schedule a drop-off with a local charity.
Recycle or dispose of packing materials

Flatten and recycle cardboard boxes as soon as you’re finished with them. If your area doesn’t offer curbside recycling, check with local recycling centers to drop off your old boxes.
You should also bundle packing paper neatly for reuse or recycling. Discard any damaged or unusable materials promptly to keep your space clear.
Add finishing touches
Now it’s time to make the space truly yours! Hang artwork, arrange photos, and add decor pieces that make each room feel warm and inviting. Fresh flowers, cozy throws, or a new welcome mat can make a big difference in how finished your home feels.
Set a deadline for wrap-up
Half-unpacked boxes have a way of sticking around for months if you let them. Set a realistic deadline — 2 weeks, for example — to finish any lingering tasks. Mark it on your calendar and commit to having every room functional and box-free by that date.
Be realistic about the deadline, though. If you have a lot going on or move slowly, it’s okay to take a month to wrap up or commit to having every box unpacked by the end of a season.
FAQs About Unpacking After Moving
Still not sure how to unpack like a pro? We’ve answered some frequently asked questions to help get you started.
How Long Does It Take to Unpack After Moving?
Most people can unpack essentials in 1–2 days and finish the rest of the home within a week. Larger homes or busier schedules may stretch the process to 2 weeks or more. A clear plan, daily goals, and consistent effort help speed things up without causing burnout.
Where Should I Start Unpacking First?
Begin with bedrooms and bathrooms so you have a comfortable place to sleep and take care of basic hygiene. Then, move on to the kitchen and unpack enough to support daily meals. Once essentials are in place, tackle living areas and storage spaces at your own pace, finishing one room before starting another.
How Do I Stay Motivated When Unpacking?
The best way to stay motivated is to make small, achievable goals and celebrate each win. You can also set timers for focused unpacking within 25 to 45 minute chunks to keep up momentum. Play music, enlist a friend, or take before-and-after photos so you can see and celebrate your progress. Also, avoid distractions as best you can, and focus on one room or category at a time to prevent feeling overwhelmed.
Is Unpacking Help Worth It?
Yes, in certain situations, professional unpacking help is worth the expense. If you’re dealing witha large move, have time constraints, or can’t manage heavy lifting, hiring unpacking help can save time and reduce stress. Professionals can quickly set up rooms, assemble furniture, and remove packing materials so you can start enjoying your home sooner.
What Should I Do With Leftover Moving Boxes?
Break down and recycle boxes you won’t reuse, and pass sturdy boxes to friends, neighbors, or local Buy Nothing groups. Some moving companies and storage facilities have free box exchanges, too. Keeping boxes in circulation helps others, reduces waste, and keeps your space clutter-free.
 It cost us each about $1,000 to hire this DIY out, but we weighed that against packing up one house to move to another, closing on a home, and finishing things up at your old pad. So yeah, painting a room will only take about 1-2 days and costs roughly $100 in supplies, but sometimes you don’t have an open schedule.