Designing a room isn’t rocket science, right?
That is, until you realize your brand new couch is too big and you need to return it. Or all your new paint colors end up clashing. Or heck, maybe you put all your new furniture down and suddenly realize you needed a rug to tie everything together.
Lucky for you, as usual, there’s an app for that. Virtual room designer apps let you set up and measure any kind of room ahead of time, so you can see what your imagination actually looks like (plus figure out what it might cost to make it).
And if you’re planning to relocate, they’re super handy for bringing your designs with you to your home inspection or walkthrough, so you can accurately design even before you move!
In This Article
Because there are dozens of virtual room design apps, we did the hard part and tried them all to see which ones actually get the job done.
Our research mostly focused on free virtual room designer tools (because remodeling and moving can be expensive enough as it is). Each app was used to create the same downstairs basement room to more objectively compare user experience. We separated our findings by smart device and desktop experiences, as we realize that not all people are comfortable with or have access to both. Some apps appear on both lists because they’re available for smartphones and desktops. We intentionally treated them as separate options because the functionality and UX can be incredibly different between platforms.
5 Best Free Virtual Room Designer Apps for Smartphones and Tablets
-
Planner 5D | ⭐⭐⭐⭐
App Store Rating: 4.3
Google Play Rating: 3.5
Pricing: 3-day free trial if you preapprove the $59.99 annual subscription, or $9.99 30-day subscription.
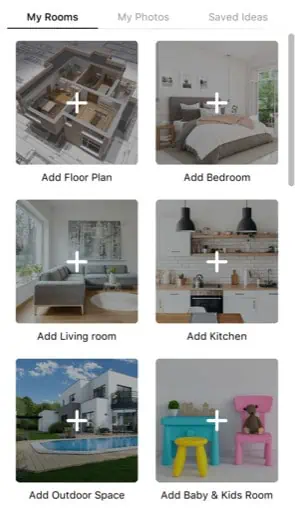
At the top of our list, Planner 5D is one of the best apps to design a floorplan, place furniture, and experiment with a new aesthetic. A necessary note is that it’s not the most straightforward home design app in the world, but can still be hobby-level simple once you get the basics down.
Why it’s good: Those willing to potentially spend a little money for an app that truly is a one-stop shop for floor plans, design options, and visual “inspo” (spoilers: most apps don’t do all three well).
What it’s not good for: Those who are short on cash or aren’t looking for the complexity of a fully-loaded app experience.
User-friendliness: Difficulty-wise, Planner 5D is on par with the other apps – a bit confusing, but doable. We found its room scanner function to be inaccurate and difficult to edit. Of all apps reviewed, this one was hardest on phone storage, requiring a photo dump before it could be downloaded. Lastly, a credit card is required to use the free trial, so it’s not totally free.
-
Room Planner | ⭐⭐⭐⭐
App Store Rating: 4.6
Google Play Rating: 4.2
Pricing: Free, $5.99/week for the PRO version to gain access to more items and functionality.
This is the best option if you want to draw your floorplan and design a room all in one app without putting in your credit card info. Room Planner has much of what you get from Planner 5D listed above, minus the more extensive catalog of furniture and 3D viewing options.
Why it’s good: Most users will find Room Planner a great fit for their needs, especially given that it’s free and your floor plans are saved in the account you create.
What it’s not good for: Those wanting more furniture options to cultivate a more unique look may not love it. Generally, while it’s a great planning tool, it does fall a bit short of what most users are looking for in the design department.
User-friendliness: Room Planner could do with fewer interruptions asking you to upgrade to the PRO version and to rate the app. Additionally, the tool layout is very detailed for the limited room smartphones generally have on a small screen, so placing and turning furniture is a bit difficult.
-
Home Design 3D | ⭐⭐⭐⭐
App Store Rating: 4.3
Google Play Rating: 3.5
Pricing: Free with in-app upgrades and purchases
The free version gives you the tools you need to draw a room to scale, although you’ll ultimately choose from a fairly limited furniture library to decorate.
Why it’s good: People who are mostly looking for floor planning with only some light interior design abilities.
What it’s not good for: Those who want a single app to make all of their design dreams come true. Home Design does an okay job, but you won’t be able to easily change colors and designs to achieve a specific aesthetic unless you choose the paid version.
User-friendliness: Home Design is surprisingly intuitive. You’ll use drag-and-drop motions to draw rooms, place furniture, and arrange items. Those familiar with other basic design tools like Canva would likely be able to use this. However, it is difficult to scale items up or down, meaning you won’t be able to perfectly mock up your existing furniture. Lastly, the free version of this app doesn’t allow you to save your designs, so plan ahead if you want to keep your project.
![]()
See prices for movers by the hour – instantly.
Read real customer reviews.
Easily book your help online.
-
Homestyler | ⭐⭐⭐
App Store Rating: 4.5
Google Play Rating: 3.6
Pricing: Free with in-app upgrades and purchases
This is one of few design apps that allow users to really explore more specific design styles and trends. The free version allows you to design blank rooms for fun, or take a photo of your space to place virtual decor in for inspiration.
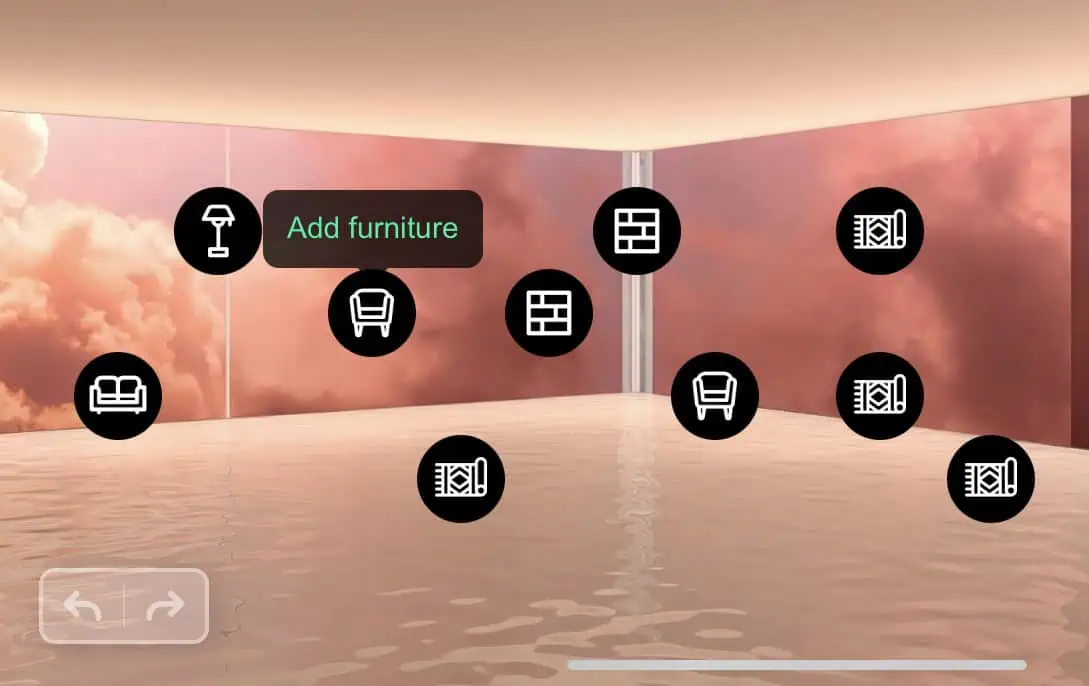
Why it’s good: Those looking to test-drive cool new aesthetics in their current space layout (or those who just like to design just to pass the time).
What it’s not good for: Planning where your current furniture will go in your new space, or anything that requires size and space coordination. The app simply doesn’t have these capabilities.
User-friendliness: It couldn’t be easier to drag and drop furniture into your space on the app. However, advanced functions like turning an item were very difficult to get the hang of. This app works best if you have an empty space to place virtual furniture in; otherwise, it’s challenging to work around your existing furniture.
-
MagicPlan | ⭐⭐
App Store Rating: 4.7
Google Play Rating: 4.1
Pricing: Free trial, then $9.99 for additional projects
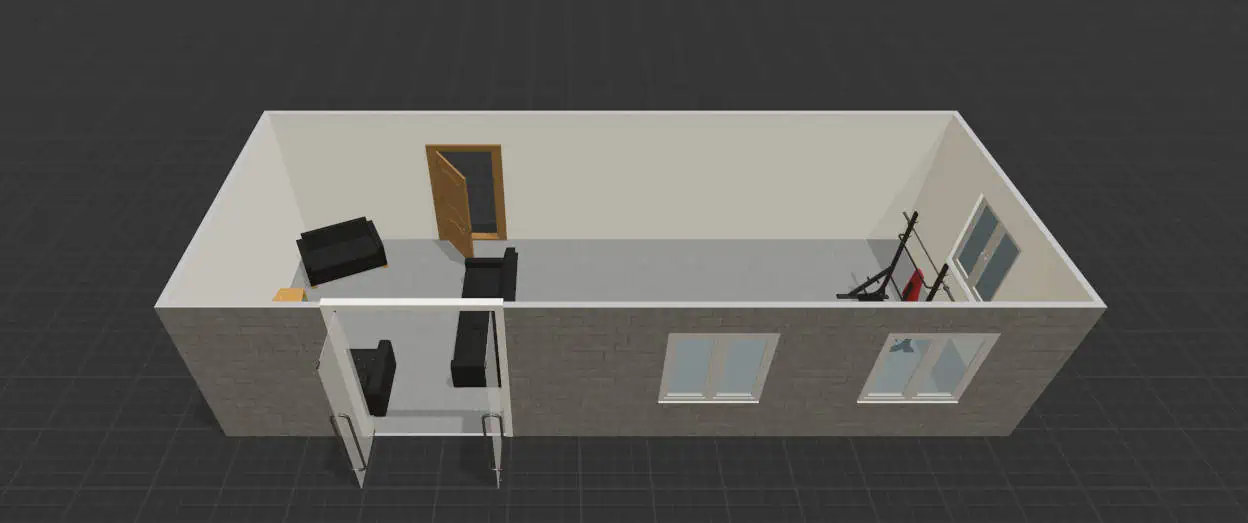
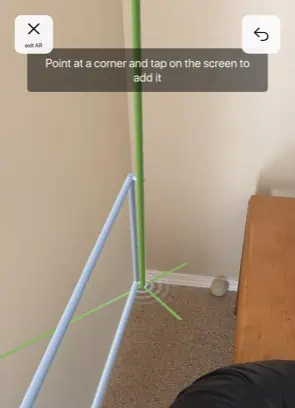
Lower on our list is Magicplan. The app was made to create floorplans, reports, and estimates, so expect it to be geared more toward home professionals than DIY designers. That said, it’s still on this list because it’s a pretty powerful program if you only need floorplanning.
Why it’s good: Virtually planning where your furniture will go in 3D space. Think planning for a medium- or long-distance move, or even just furniture shopping.
What it’s not good for: Those looking to flex their design muscles. Its design capabilities are almost nil compared to other apps, meaning that you’ll only be able to add placeholder furniture to your room. You won’t be able to design colors, patterns, or add specific furniture models.
User-friendliness: MagicPlan is relatively easy to get started with, especially with the on-screen prompts and its ability to scan through items on the floor. That said, it can be hard to understand when the room scan should end and the planning phase begins.
5 Best Free Virtual Room Designer Apps for Computers
-
Sweet Home 3D | ⭐⭐⭐⭐⭐
(Web access or download for Windows/macOS/Linux)
Pricing: Free
At the top of our list is Sweet Home 3D, a free and fairly easy-to-use platform that allows you to customize virtually everything about your hopeful designs. Beginners often love this app enough to spring for the premium version, thanks to how easy it is to use and the ability to import from photos.
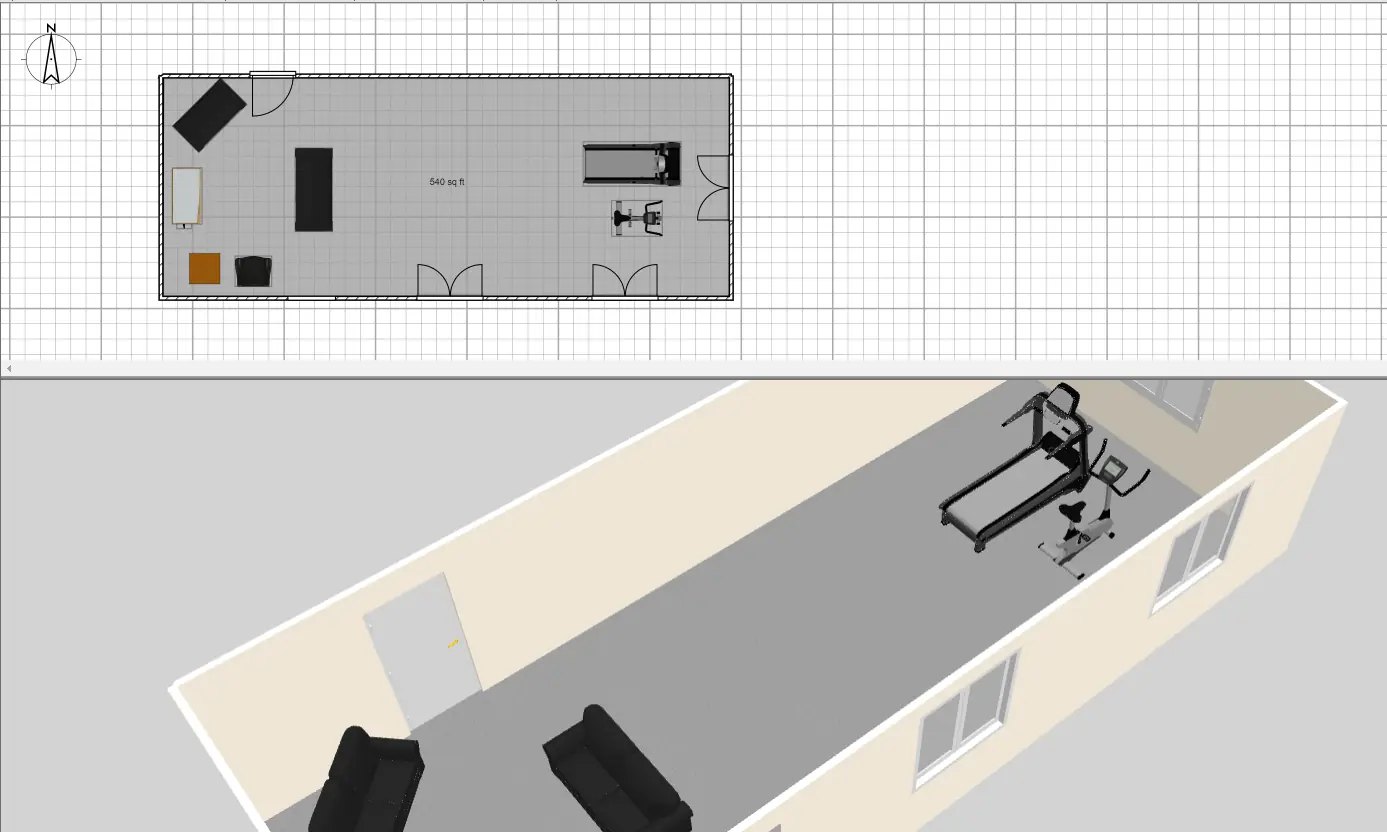
Why it’s good: Those with highly specific space and detail needs who are comfortable with a powerful tool that provides lots of options and customization.
What it’s not good for: Someone looking for a quickstart tool that provides lots of design aesthetic inspo. Sweet Home 3D doesn’t provide that for you.
User-friendliness: Sweet Home 3D isn’t as intuitive as other options… however, it is still fairly easy to use, as long as you’re comfortable with design programs. (And if not, you can easily Google help if you get stuck.) This app earns bonus points for having one of the only user-friendly search functions in its furniture library, meaning more time designing and less time scrolling.
-
Homestyler | ⭐⭐⭐⭐⭐
(Web access only)
Pricing: Free with account creation
An excellent professional quality app with an easy-to-learn and use interface for people just starting out. Homestyler currently boasts the design genre’s biggest catalog of design aesthetic furniture in its free category, which makes it especially good for those doing renovations.
Why it’s good: It’s a free and fully-loaded design experience that can easily transition onto the app version. Also great for those planning renovations who want a large catalog of trendy furniture and accessories.
What it’s not good for: There aren’t many drawbacks to Homestyler, except for its inability to fully customize doors and windows. If for whatever reason those are an important part of your design plan, this may not be the tool for you.
User-friendliness: For most features, Homestyler is a big thumbs up. It’s easy to draw your room and place openings and furniture in it. However, the tool for adjusting flooring does needs some work. Getting started may take you some extra time because you do have to create an account and click through tutorial prompts before you can design.
With that said, having the option to use the paired app is a big plus if you’re on the go, or house-hunting in a different city or state.
-
Roomstyler | ⭐⭐⭐⭐
(Web access only)
Pricing: Free with account creation
Another PC app with a smartphone version, Roomstyler is also high on our list because of its relative ease of use and decently extensive library of free furniture and accessories. Users have reported that the import option is a breeze to use on your computer, plus you can access your finished designs on the smartphone app to reference away from your computer.

Why it’s good: Most basic design needs are met, including just placing furniture in a room to check for fit. The Roomstyler site also provides plenty of design inspo.
What it’s not good for: This is another slightly complex tool. Those who aren’t tech-savvy may have some difficulty (though all design tools seemingly share this critique to a certain extent).
User-friendliness: Generally this is a very intuitive platform with the only downside being that the search function for different types of furniture doesn’t operate that well. Also, options for window and door styles are limited.
-
Planner 5D | ⭐⭐⭐
(Web or download for macOS)
Pricing: Free with account creation
Planner 5D’s desktop tool is also a fairly solid option if you’re not loving the others for whatever reason. This program toes the line between serving hobbyists versus professionals, so it can be a little complicated, but it’s plently learnable for most tech-savvy people. (Users have reported that larger files can be slow to load on phones supporting lower RAM, so keep that in mind.)
Why it’s good: Those looking for a tool with a ton of design capability.
What it’s not good for: Those who need maximum customizability for their designs should look elsewhere. Planner 5D comes with a lot of furniture and design options, but most of them are only available in the paid version… and even then, it’s not a full assortment.
User-friendliness: The free web version of Planner 5D is seriously limited in terms of doors, windows, and furniture you can add to your design. The free option simply won’t work if you’re really looking to design your home.
When we tested it, we found the web version of Planner 5D to be a little slow. Pro tip: don’t use the smart wizard to start if you know your room dimensions, as it’s easier to just dive right in by drawing your room.
-
Ikea Home Planner | ⭐⭐
 (Web only)
 (Web only)
Pricing: Free
Arguably the most straightforward design app out there, Ikea has made its own program available on its website so you can test out its products before you buy. Unfortunately, you can only use Ikea items, earning this a lower spot on our list.
Why it’s good: People who exclusively want to design their home with Ikea furniture. (Look, we know that’s a lot of you, so here we are.) It’s worth a spin when you’re IKEA shopping.
What it’s not good for: Literally any other use-case is non-existent. You won’t find design inspo in this web app, nor will you be able to resize items, change their colors, or take creative liberties in your room design.
User-friendliness: Of all of the apps and tools, Ikea home planner was the easiest to customize my doors and windows and to make sure they were centered/in the right place. Ultimately, anyone serious about designing will be disappointed with the lack of carpet and furniture options.
![]()
See prices for movers by the hour – instantly.
Read real customer reviews.
Easily book your help online.
Tips for Newbies Using Design Apps

Smartphone vs. computer: honestly, use whichever you’re most comfortable with. If you’re a professional, chances are you already know what your needs are. For amateur designers, you’ll get the most out of your design experience on the tech you’re most proficient at. Keep in mind though that benefits of a computer include more space and freeing up your phone from having to run sometimes heavy software.
Make sure your phone has enough storage to save your pictures. Your phone needs room for the app and any saved photos and designs. I started my reviews with a pretty full phone, so I couldn’t download more than one app a time. I had to do an impromptu app and video purge when some of the downloads stalled.
“…decide if you’re capable of painting, coordinating new flooring, and finding and transporting décor. If you’re extremely not confident, it’s actually not that hard to hire an interior decorator.”
You don’t necessarily need a new smartphone to use a virtual design app, but your old phone might have problems. A newer smartphone is likely to be most compatible with the complexity of virtual design. The Apple iPhone 13 has up to 256 GB of storage for iOS users, or maybe opt for the Samsung Galaxy Note 20 Ultra.
Similarly, computers are only really better if they’re new enough. Of course, compared to phones, computers can show higher-quality mockups, render images instantly and load multiple files at a time. But this all relies on the ability of your laptop’s CPU and RAM (without sufficient RAM, your computer won’t be able to run the app while doing anything else). I recommended that you use a Macbook Pro on the newer side, or for PC users, something in the neighborhood of the Acer Nitro 5, both with at least 16 GB of RAM.
How To Actually Finish Your Room Design Project

Just getting started on your design project? A little prep can really upgrade your chances of success.
- Start with one room, not the whole house. It can be tempting to renovate the entire house at once. For most of us, this is a huge financial and logistical feat. Consider trying to fit your designing into a day or two, instead of starting a huge project that may take weeks or months to complete.
- Agree on a budget and stick to it! Your costs will vary depending on your personal style, quality preferences, and whether or not you hire professional help. (For context, a basic bedroom costs between $880 and $2,300 to furnish, while a living room will run you $2,050 – $3,150.)
- Capture design inspo from everyday life. Great design inspiration can come from anywhere. That said, it’s usually easiest to use sites like Pinterest, Modsy, or Havenly that let yoy save your inspiration (don’t forget to screenshot photos from your Instagram and TikTok feeds).
- Pick your color scheme BEFORE you start buying. Color scheme is a highly personal choice, so talk with those you live with ahead of time before picking paint colors and upholstery. When it comes to mood, bright, energetic colors stimulate energy, so choose oranges and yellows for exercise rooms or play areas, not bedrooms. Conversely, cool colors are typically calming and great for bedrooms and bathrooms (plus great for resale value).
- Incorporate your personality. It’s surprisingly easy to lose your personal touch when redecorating. To avoid this, design around your values by opting for décor that aligns with causes you agree with, like unique taste, sustainability, or even businesses led by minorities. You can also try centering the room around a sentimental piece of furniture or décor.
- Think about future needs. Your design requirements should take into account your style inspiration and any future needs (think: pets, children, future moves).
- Decide on DIY or hiring a pro. Now that you know what you want, decide if you’re capable of painting, coordinating new flooring, and finding and transporting décor. If you’re extremely not confident, it’s actually not that hard to hire an interior decorator.