10 Step Guide to Moving for the Blind and Visually Impaired

Author:

Publish Date:

Last Modified Date:

Category: How To Pack, Loading & Unloading Guides, Moving Checklists & Planning

Tags: Tags: , , , , , , , , , , , , , , , , ,

Anyone who’s ever moved knows that it takes some careful planning and preparation for things to go smoothly (especially if you’re moving long-distance). For those who are visually impaired or blind, this process might seem especially intimidating.

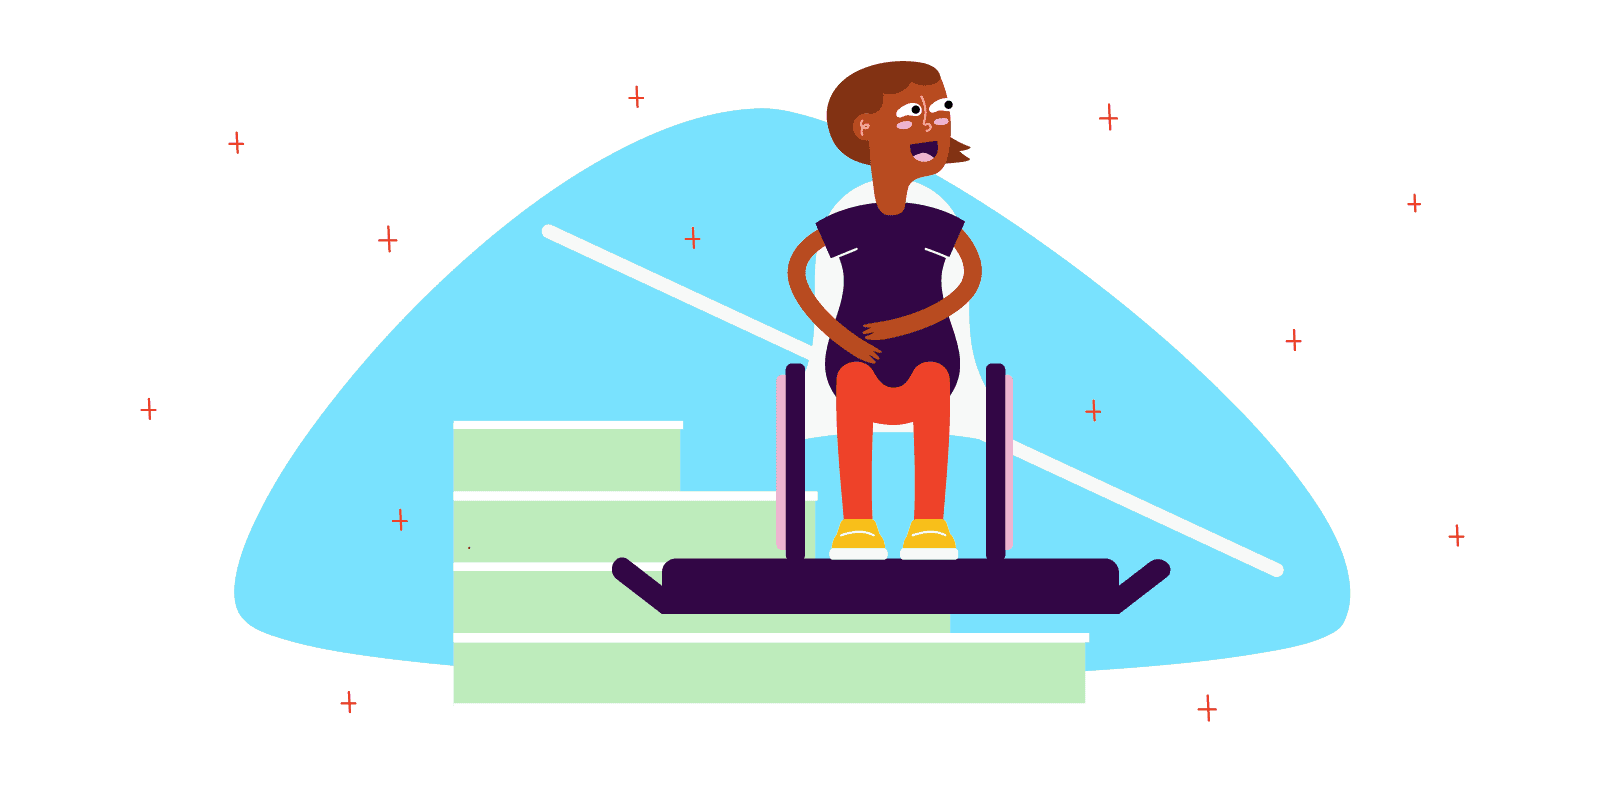
But it doesn’t have to be if you know what steps to take. Just ask Daniel Hodges, a resident of Springfield, Missouri and president and co-founder of Peaces of Me Foundation. Hodges is a blind man who has moved dozens of times all around the country, learning must-know info along the way.

Here’s what you can do as a blind person to ensure your move is safe and successful.

1. Find someone to be your moving point-person

As anyone with a physical impairment knows, having a friend, assistant, or family member around can help tremendously. This is vital for a move.

Specifically, your “moving person” can help out with packing, driving, paperwork, running errands or anything else you need. In fact, Hodges says that when he’s moving, he’ll have someone travel to his home to help out when the date of the move approaches. He covers expenses such as flights and meals, and says that in terms of cost, “I’m usually still coming in several hundreds, if not thousands, of dollars less than what the moving companies charge (for the same services).” He adds that it may not be the best option for everyone, but it’s still a good option.

(Also, if you have a guide dog, read up on how to effectively move with a dog!)

2. Choose your new destination wisely

Sometimes we have to move for reasons out of our control, such as starting a new job or attending school. But when you have the choice, it’s important to do some digging into the lifestyle and overall culture of a city before committing to a move—especially if you’re visually impaired.

Get Help Unloading Your Rental Truck

See prices for movers by the hour—instantly.

Read real customer reviews.

Easily book your help online.


Many of Hodges’s moves were the result of finding adequate medical care for his two children, both born with a rare eye cancer inherited from their mother, who is also blind. Their second daughter was born at a hospital in Colorado, where the medical staff “…could not and would not believe that blind parents were capable of raising a child,” despite the fact that they had clearly demonstrated otherwise.

When they were finally allowed to leave the hospital and return home, they found a note from child protection services waiting on their door. 

Hodges attributes this discrimination to the common, negative attitudes found in the area in which his family resided. “We’ve learned the hard way, where you move to…really can play a pivotal role in your experience as a blind person,” Hodges said.


“…Medicaid benefits for vision impairments also vary greatly state-to-state, as do Supplemental Security Income (SSI)  benefits.”


While that may be an extreme example, it shows how challenging it can be to navigate a new city as a blind person, even beyond the logistics of the actual move; it extends to necessary access to healthcare and helpful medical staff. 

Hodges also points out that Medicaid benefits for vision impairments also vary greatly state-to-state, as do Supplemental Security Income (SSI) benefits. Even equal employment laws are implemented differently in every state, “So one’s ability to get a job can vary greatly depending on what part of the country they’re in,” he explains. (Click here to apply for SSI benefits, or call 1-800-772-1213 or TTY 1-800-325-0778 if you are deaf or hard of hearing.)

The safety and accessibility of a city are also important. When Hodges moved to the east coast to attend law school, he wanted to live somewhere that was affordable, safe, and easy to get around. He settled on an apartment in Baltimore that was two blocks from campus.

“I had to figure out where there are stores, restaurants, recreation…because Uber and Lyft and Instacart…have made things a lot easier, but they haven’t completely wiped out the need to be able to occasionally go out and grab something for yourself,” said Hodges.

3. When considering movers, be upfront about your impairment (and shop around)

Even if there isn’t anyone available to assist you with your move, it’s still borderline essential that you hire movers.

It’s helpful to speak directly with several companies to find out if they have experience working with customers who have impairments and disabilities. As professionals, they will understand the unique challenges you face when moving. Remember that any mover you hire should also be licensed and bonded, highly reviewed on websites such as the Better Business Bureau, and have plenty of references.

hireahelper
Sites like HireAHelper.com sort movers near you by their prices and reviews

It’s also important to gather several quotes before making a final decision, no matter how good they say they are. Moving can be expensive, especially if you’re moving across state lines. In fact, it can cost around $5,000 for an interstate move that spans a distance of more than 1,000 miles, according to Consumer Affairs. However, that number can vary quite a bit based on exactly how far you’re moving and what types of services are provided by the movers. 

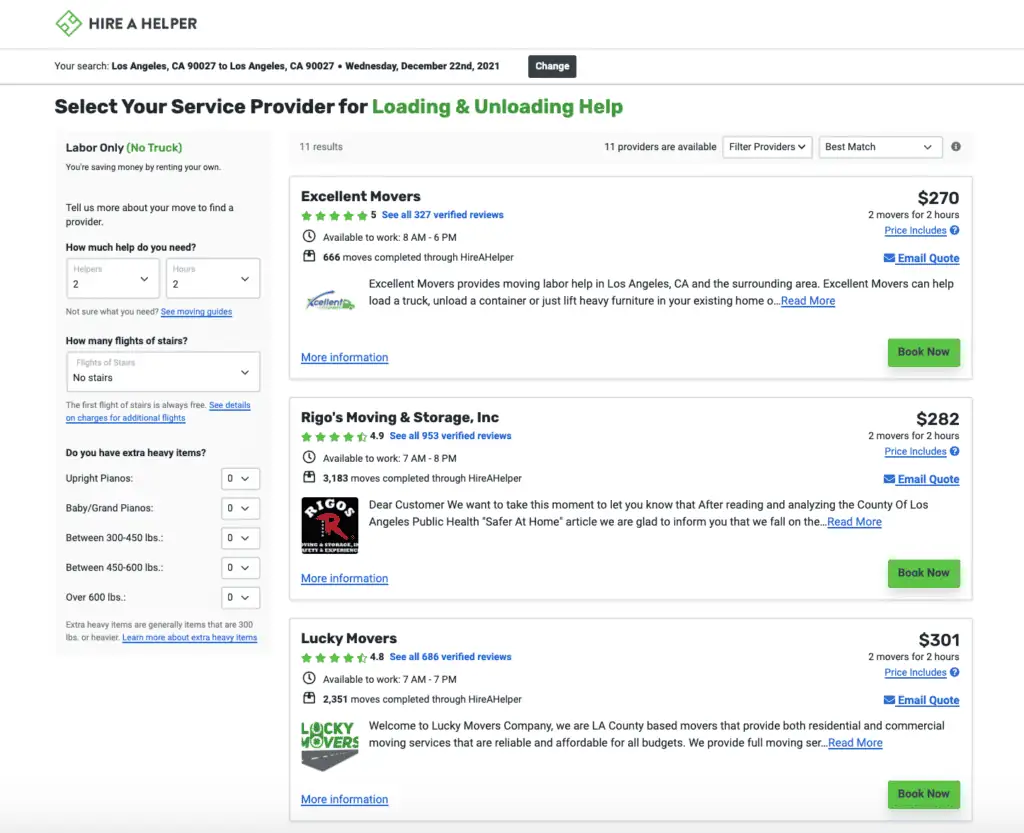
Trusted third-party sites like HireAHelper can help with finding the right moving company for you. On a smartphone or at a computer, you can sort available movers with verified reviews by their quality and price, or you can call HireAHelper at 1-800-995-5003 any day of the week to have them figure out the best fit for your budget—all for free.

4. File for a moving grant for people with vision impairments

Since moving costs can add up quickly, it’s helpful to look into any discounts or grants for which you may qualify. Blind citizens might be able to get a relocation grant through the federal government, which can offset a portion of your moving expenses. On top of that, many other nonprofit organizations provide grants for various uses.

Here are a few places you can check for moving grants for people with severe vision impairments or blindness:

Many moving companies themselves also offer a variety of discounts for certain subsets of people, such as veterans, teachers, college students, union members, and more. You may also qualify for a discount if you’re a senior or belong to a club such as AAA or AARP. Be sure to ask about what types of discounts your movers offer!

Moving far away?

Do it cheaper.


MovingPlace can save up to 40% compared to traditional interstate moving companies. Click here to learn how.

5. An inventory list is extra important

Once you’re ready to start prepping for the move, it’s a good idea to take an inventory of everything that will be packed and moved to the new location. A simple Google doc with all your stuff listed on it (transcribed by voice or typed) is all you need. Even better, put each item on the list as it’s placed into a box.

blind moving

Always have this on you during the move. Make sure your movers are intimately familiar with your list. Having this list in writing will ensure that nothing gets lost or broken (or if it somehow does, you can hold your movers accountable). Be sure to do this after you’ve decluttered so you know what you’re keeping versus what was tossed or donated.  And if you have a point person, they can use that list to help confirm all your things have arrived.

Also, have your inventory handy when you do the final walkthrough with your movers (more on that later).

6. If possible, make a ‘furniture placement guide’ for your new place ahead of time

To help you accelerate the time it takes to become acquainted with your new place, it’s a huge help to start developing a mental map of your new home before you even settle in. If at all possible, decide where the main pieces of furniture will be placed not during, but ahead of your move. This can be physically mapped out for the movers with as little as a napkin and a pen (especially if you have a point person to help).

If you want to get into the nitty-gritty of setting up your home, check out this detailed guide for how to modify a home for the blind or visually impaired.

7. Sort moving boxes by room, not by what’s inside

The time and care you put into packing will determine how easy it is to unpack and get settled into your new home. Which is to say, don’t haphazardly pack random items into boxes and hope to sort it all out later. 


“…no matter which state you live in, you cannot be legally discriminated against or be asked discriminatory questions by the landlord.”


Instead, come up with a simple packing system. Label boxes by room instead of contents (but you should still inventory what’s inside each box). Make sure others can read your labels, so your personal helper or movers know where to put everything.

Consider using a numbering system, with each room represented by one number (e.g., living room = 1, dining room = 2, etc.), so it’s easier and quicker to label and unload. Also, whenever possible, keep your boxes small and less than 50 pounds before you create a new one, so they aren’t a hassle to move around.

8. If it would be helpful, use a braille label maker (but keep your essentials nearby)

braille label maker
Braille label maker

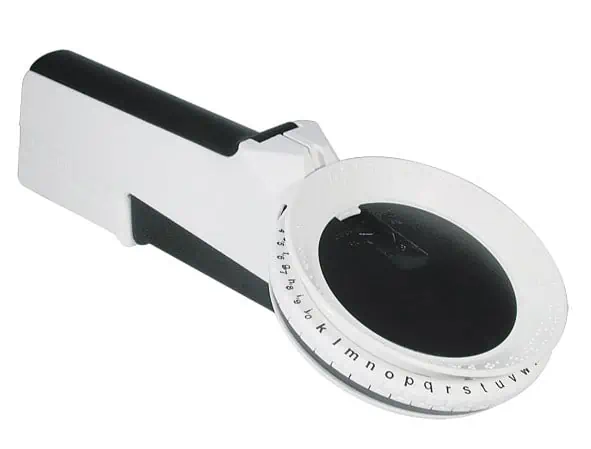
Packing and unpacking is a chore no matter who you are. One tool you don’t need to do without, however, is a simple braille label maker. These are light, handheld devices for you or a helper that imprint braille onto a sticky piece of vinyl. This may be a great aid no matter if you have move help, or are doing it solo. You can order one of these for usually around $25-$35.

Also, remember the process of moving could take days, depending on how much stuff you have and how far you’re going. You don’t want to be stuck without your laptop charger or toothbrush until everything gets unpacked at your new destination, so pack an essentials bag that you can keep with you at all times.

9. Use your inventory list during the final walk-through with your movers

Once your belongings have been transported to your new home and unloaded/unpacked, it’s important to do a final walkthrough with your movers. Be sure that everything from your inventory list is accounted for. If you need help finding a particular item, have your movers assist before they leave. Or if you need the furniture adjusted (or changes have been made to your furniture placement guide you might have made), make sure they help you get everything in the right place before heading out.

10. Know your rights

The Fair Housing Act puts protections in place for people with disabilities, and it’s important that both you and your landlord (if you’re renting) know what they are. For example, no matter which state you live in, you cannot be legally discriminated against or be asked discriminatory questions by the landlord. You also have the right to request certain accommodations associated with your impairment, such as owning a service animal or getting preferential parking. 

If you feel as though your rights under the Fair Housing Act have been violated, you should file a complaint with the Fair and Equitable Housing Office.


Illustrations by Hannah Lock

Home Modifications for the Visually Impaired or Blind – The Complete Guide

Author:

Publish Date:

Last Modified Date:

Category: Home Improvement

Tags: Tags: , , , , , , , , , , , , , , , ,

If you are visually impaired or blind (or caring for someone who is), modifying your house to fit your specific needs can make all the difference. It can allow you to move around more easily and complete day-to-day tasks in less time.

While everyone is different and there are varying degrees of vision loss, there are usually fairly simple, low-cost changes you can make to the spaces you spend the most time in.

If you or your loved one’s vision is gradually diminishing, you can start making these changes ahead of time for added convenience. If the vision loss is sudden or you have a child that is visually impaired, there are adaptive techniques you can learn to help your days go by smoothly.

In either instance, it’s important to ensure your living space is safe, comfortable, and easy to navigate. In this guide, we’ll show you how to make sure your home is organized in a way that meets the most important requirements.

Update: If you haven’t made the move yet, here is a 10 step guide to moving for the blind and visually impaired.

Types of visual impairment

Types of Visual Impairment

First off, let’s explore the varying degrees of visual impairment. Visual impairment usually means that both eyes are experiencing a significant loss of vision that cannot be fixed with glasses. The two main categories of visual impairment are:

Low Vision – These people are partially sighted, which means they can see to varying degrees but have a visual acuity of 20/70 or poorer. Experiencing low vision to the point that it interferes with your daily life can be incredibly frustrating. People with low vision may require special equipment and/or modifications.

Most people described as “legally blind” have some vision, but are experiencing enough vision loss to be entitled to government or private agency services. Their vision is usually around 20/200 or less. The degrees of visual impairment are:

    • Moderate Visual Impairment: 20/70 to 20/160
    • Severe Visual Impairment (Legally Blind): 20/200 to 20/400
    • Profound Visual Impairment (Legally Blind): 20/500 to 20/1000

Those with profound visual impairment are often able to perceive the difference between light and dark, or daylight and night time. Some of these people can recognize forms or where the light is coming from, which allows them a bit more flexibility than those who are totally blind.

Total Blindness – These people have no light perception and are unable to see forms. Around 85% of people with eye disorders have some remaining sight, while only 15% of them are totally blind. Being totally blind is the most difficult visual impairment to live with, but also the rarest.

Home modifications for those with low vision

Home Modifications for Those With Low Vision

If you or a loved one is living with one of the above types of visual impairment you will want to outfit your home in a way that will make life more efficient. Depending on the degree of visual impairment, there are simple adjustments that can be made to help with your day-to-day activities.

Thankfully, many of these modifications are low-cost and can be fairly easily implemented. It’s just a matter of knowing the basics and planning.

Adjust the Lighting

You will want to provide plenty of light in the areas of the home that are used for recreation, reading, and socializing. The light should always be aimed at the point of focus, i.e., where you will be doing work, not at the eyes. Tips to help provide adequate lighting around the house include:

  • Adding floor and table lamps around the living room, dining room, kitchen, and bedroom. Clip-on lights can be placed strategically around the house for added convenience.
  • Use lighting that is 60-100 watts. Replace burned-out bulbs regularly so that you are able to see better.
  • Allow for natural light throughout the home by using adjustable blinds or sheer curtains.
  • Experiment with lighting to find out which works best for your individual needs. There is halogen, fluorescent, incandescent, or flood lighting and most people will prefer different ones. It’s worth noting that fluorescent light does bother many visually impaired people.
  • Keep a flashlight or heavy-duty light on a keychain or have a few around the house in case you need additional light at night.
  • Make sure light is uniform throughout your entire hallway to more easily identify where it curves or ends.

Home modifications for those with low vision header

Rearrange the Furniture

Rearranging the furniture in your house can help you move around more easily and avoid injury. There are also certain ways you can arrange your furniture to add convenience and functionality to your living space. You can:

  • Place mirrors strategically to avoid glare or reflecting light.
  • Keep some chairs near the windows in case you want to read, work or craft in the natural light.
  • Arrange furniture close together so that you can easily converse with others.
  • When buying new furniture, try to pick upholstery with texture. This will help you identify the different pieces of furniture better.
  • Place brightly colored vases or lamps near key items of furniture so that you can locate it more easily.

Eliminate Safety Hazards

Feeling safe inside your own home is important. There are a number of things you can do to prevent falls and other injuries—and most of them are quite simple. You can:

  • Keep desk and table chairs pushed in and train your family to do the same. All of the time. No exceptions.
  • Use non-skid, non-glare products to clean and polish your floors. Avoid waxing floors, which can make them slippery!
  • Remove low-lying objects that might be trip hazards such as coffee tables and end tables.
  • Ensure there are no cords in any of the pathways so that you don’t trip.
  • Make sure electrical cords are removed from pathways or taped down securely.

  • Tape down any area rugs you have and replace any worn carpeting or floor coverings.
  • Keep all floors dry and wipe up any spills immediately.
  • Install grab bars or safety rails in high-slip areas like your bathroom or on the stairs.
  • Mark step edges with yellow reflective tape so that you can easily identify them.
  • Always keep your fire extinguisher and first aid kit in the same, easily accessible place.
  • Make sure all exits are marked with a bright, contrasting color in case of emergency.
  • Have smoke and fire alarms checked often, and ensure they are loud enough that you can hear them in all areas of the house.

Additional Home Modifications for the Totally Blind

Use Contrasting Colors

Keep the color principles top of mind as you prepare your home. Know that bright colors are often the easiest to see since they reflect light. Solid, brighter colors such as orange, red and yellow are more visible than their muted counterparts.

It’s important to keep in mind that dim light can wash out certain colors, while bright light can amplify them. Test what works best for you, and use contrasting colors to make the areas of your house easier to distinguish.

  • Use brightly colored vases, lamps or sculptures to help identify where key pieces of furniture are.
  • Avoid upholstery and rugs that are patterned. Stripes and checks can create confusion for some people who are visually impaired.
  • Use color to indicate changes in surface level (such as on the stairs).
  • Use contrasting colors to warn about places that may be hazardous or require extra attention (such as fluorescent tape on the inside of doors or cabinets that may be ajar).
  • Color-code household items you use often or bills and documents you may need to work with. (Brightly colored Post-it notes work great!)
  • Drape a brightly colored blanket or towel in a contrasting color on the back of your favorite chair or your spot on the couch.
  • Use dark, solid colors as borders around white or light objects (such as a light switch). This will help it to stand out.
  • Place dark objects (like chairs) in front of lighter-colored walls which will also help these items to stand out.
  • Avoid using clear glass dishes and cups, as they are more difficult to see.
  • Paint door knobs and door frames a bright color so that they are easier to see.
  • Use a different color of paint on the ceiling than the walls.
  • Use solid (non-patterned) rugs to help you identify different areas of the home.

Create an Organized Environment

If you keep your home organized it will be easier to find things when you need them. It can also eliminate any tripping hazards and reduce frustration when doing everyday chores. Here are some tips to help you say organized:

  • Label, label, label. Label everything in your home, from reusable bottles to hangers for clothing to on/off switches. You can even label cabinets!
  • Use drawer dividers and closet organizers to separate clothing.
  • Label clothing with the letter of the clothing color on the tag.
  • Develop a system to keep food and toiletry items organized. Always keep these items in the same place and label them as necessary.
  • Always keep chairs and other easily movable furniture in the same place.
  • Use large numbered devices for telephones, timers, calculators or anything with numbers that need to be seen.
  • Train family members to respect the organizational system you’ve developed. Explain to them why and how it helps you.

Additional Home Modifications for the Totally Blind

Additional Home Modifications for the Totally Blind

If you or your loved one are fully blind, there will be some additional unique procedures that you will need to implement. (Of course, the inability to see light, color or form will make the lighting and contrast instructions from the last section impractical). There are also extra precautions you will need to take to stay safe and organized in your house.

However, there are still plenty of inexpensive, simple ways to make your house safer and more livable.

Remove Obstacles and Hazards

As with those who have low vision, people who are fully blind will want to remove as many trip hazards and obstacles as possible. Things should always be placed in the same spot, and you should make sure your family follows these house rules whenever possible. Other tips to keep yourself safe from hazards at home include:

  • Install a phone entry system for your front door so that you can speak to anyone who comes to it.
  • Avoid having any low-hanging lamps or other obstacles you could bump your head on.
  • Keep furniture in the same place at all times and instruct family members to do the same.
  • Identify spots throughout your home where you can put your walking cane down and easily retrieve it again.
  • Keep anything that can be easily knocked off a table away from the edges, perhaps avoid having too many lamps, art or breakable sculptures.
  • Label all medicines and any unidentifiable food with braille labels.
  • Keep any cleaning products in a safe cabinet and ensure each product is properly labeled. It can be handy to keep these in a completely separate spot from the food products to avoid contamination.
  • Avoid having a flat-topped stove in your kitchen. Your stove should have a change of texture to indicate where the burner is located. If possible, avoid easy to turn knobs on the stove and oven.
  • Install handrails in the bathroom, by the tub, in the shower and down the side of any stairs in your house.
  • Close closet and cupboard doors as soon as you are done with them (and have your family do the same).

Additional Home Modifications for the Totally Blind

Install Safe Flooring

Installing safe, non-slip flooring throughout your home is one of the best things you can do for your safety. Nowadays, there are even tactile warning strips and tiles to help you easily navigate your house. Here are some things you can do to your floor to keep you safe:

  • Install warning textiles in front of doorways or changes in level throughout the home.
  • Install tactile strips along routes you often take in the house. This will make it more convenient to get around!
  • Take away any area rugs or, if you prefer to have them, ensure they are taped down properly.
  • Avoid slick surfaces in areas like the kitchen and bathroom. Have a bath-mat (or several) in the bathroom at all times.

Give Your Home a Tactile Effect

Adding tactile elements to your interior design can help you use your sense of touch to navigate your house with ease. There are several things you can keep in mind when designing your home or that you can easily modify after the fact. You should:

  • Buy furniture that has textured upholstery. This will allow you to recognize furniture in different rooms by its texture.
  • Use tactile markers in your kitchen and bathroom to let you know where things are located and when to use caution.
  • Use embossed letter stickers to help you distinguish between different things. For example, an “F” could let you know you are turning on the living room fan.
  • Mark toothbrushes or other important items with rubber bands or other tactile aids so that you can easily identify them.
  • Use braille labels for anything that needs special identification.

Adaptations to Help With Daily Living and Chores

Adaptations to Help With Daily Living and Chores

There are tons of things you can do to make you or your loved one’s day-to-day life more efficient. These home adaptations are simple and can give you a sense of independence and safety while performing everyday tasks.

Label Foods

If there is some usable vision you can use a magnifying glass to identify the foods in your kitchen; however, if you can’t see that well then there are a few modifications you can implement:

  • Use braille labels to mark foods and medicines, especially if they can pose some kind of danger (like if you are allergic or need to take a specific dose).
  • Use rubber bands to identify certain food or medicine items. Place a different number of rubber bands on each different container.
  • Use brightly colored and labeled index cards to label items around the kitchen.
  • Use pipe cleaners, velcro, velour pads or foam alphabet letters to label different things (like canned goods).
  • Learn to identify kitchen items by their weight, location, sound, size, or shape.

Adapt Your Kitchen

Adapt Your Kitchen

Cooking with impaired vision can be not only frustrating but also dangerous if the right precautions aren’t taken. When cooking, there are a few safety tips, tricks, and adaptations we’d like to suggest:

  • Use scoop measuring cups that hold exact amounts such as ½ cup, ⅓ cup, and 1 cup measurements. You can store these inside food canisters like flour, sugar, or oatmeal for added convenience. Always have extra measuring cups nearby when cooking.
  • Store spices in baby food jars with a wide mouth for easier measuring.
  • Keep a cutting board that has a light and a dark side so that you will have a contrasting surface no matter what you are cutting.
  • Store knives in old paper towel rolls so that you don’t accidentally touch the sharpened edge of the blade.
  • Keep everything in its place at all times. It will be so much easier to navigate your kitchen if you know exactly where to look.
  • Keep a cafeteria tray handy to use as a prep area. This will help you contain any spills and keep you organized.
  • Label shelves and drawers, if needed.

Adjust for Housekeeping and Laundry

Even simple chores like laundry can take longer than necessary if you don’t have some modifications in place. There are a few things you can do to make  life easier:

  • Place tactile stickers on the dials and commonly used settings of your washing machine and dryer. If you share a household, you can use transparent stickers to make sure the rest of your family can see the dials as well.
  • Pin your socks together with sock locks before putting them away, and teach your family to do the same.
  • Load the dishwasher from back to front and remember to always load knives and forks point-side down.
  • Place safety pins in the clothing of the same color or label clothing with a letter of clothing color on the tag.
  • Place dividers in drawers and closets to separate different kinds of clothing.
  • Label all cleaning supplies with braille or felt letters so that you know what you are cleaning with at all times.

Improve Communication and Technology Usage

Improve Communication and Technology Usage

Part of feeling at home in your living space is being able to function and use technology normally. These tips can help you stay in touch with your loved ones and the world more easily:

  • Make sure your telephones have large print keypads or dials.
  • Use felt-tip markers on white paper or 20/20 high-contrast pens when writing.
  • Purchase a large-screen, high-definition television to improve your viewing experience.
  • Turn your computer’s settings to use speech synthesis to read the on-screen text and relay screen contents.
  • Make sure all emergency contact numbers are written largely and clearly or programmed into your phone.

Modify for a Service Dog

If you or your loved one is fully blind you might have a seeing-eye dog. This can be a life-changing opportunity, but it requires lots of preparation. While we could write an entire guide on this subject alone, here are some easy modifications you can make for your service dog:

  • Make sure any paths or walkways are large enough to accommodate both you and your service dog.
  • Ensure the backyard is fenced and doesn’t have any holes your pet can escape from.
  • Give your service dog ways to open and close doors around your house so that they can always get to you. You can do this by adding “tugs” to each door and teaching them how to use them.
  • Add tugs to the fridge, freezer or any cabinets you will want them to be able to access.
  • Store toxic items securely in a drawer or cabinet your dog doesn’t have access to.
  • Install a self-feeding system so that they are always fed and have access to water
  • Create a sleeping area for your pup in your room. Make sure it is nearby in case you need assistance but also in a place that you won’t trip over it.

General Costs of Home Modification

Modification Costs and Funding

While many home modifications for the blind are on the lower end of the cost spectrum, it can still feel overwhelming to make these changes. Making your home comfortable, navigable and safe should be top priority and there are several organizations ready to help.

General Costs of Home Modification

According to HomeAdvisor, the average cost to remodel for disability accommodation is between $1,271 and $8,934. While costs will vary greatly depending on the modifications you require, there are some general price estimates available.

  • Devices like glasses, sticks, computer software and rehabilitation equipment cost $120 total a year on average, per person.
  • Healthcare, home help, personal affairs, personal care, transportation and social activities can cost almost $2,000 annually.
  • A trained service dog can cost anywhere from $40,000 to $60,000 initially and will, of course, require maintenance costs like food and veterinary bills.
  • Tactile markers, braille labels and other tactile aids are quite inexpensive, at around $3 for a sheet. Tactile floor tiles and surface indicators can get a bit more pricey depending on how many and what material you buy.

Help with Adaptations_1

Help with Adaptations

If you have recently become visually impaired or are changing to a new living situation that will need accommodations, you can contact your local social services department and find a social worker that can help fund your home improvements.

If you are a homeowner with savings, it’s likely that you will have to pay for the repairs out of your own pocket. However, if you are unable to, there are options available to help you cover some (or all) of the costs.

HomeAdvisor has a list of tons of grants for disability accommodation in the home, but we’ve listed some of the more well-known ones below.

Help with Adaptations

If your home modifications are going to be major, you may want to consider some of the above resources. Luckily, you can make many of the modifications listed in this guide at a low cost.

We recommend checking with your occupational therapist to see what they recommend before setting in on any home renovations.

Home adaptations for visual impairments are meant to enhance your home and make it easy for you to do the daily tasks you need to do. We hope you found some of our ideas helpful and they make a positive difference in your life.

Outfitting Your House for a Child With a Disability

Author:

Publish Date:

Last Modified Date:

Category: Home Improvement, Kids & Pets

Tags: Tags: , , , , , , , , , , , , ,

Are you outfitting a home for a child with a disability? The U.S. Census Bureau reports that around 12 percent of the population is disabled while the PEW Research Center puts that number even higher. That means while only 5.4 percent of children five to seven years old are disabled, they still comprise a pretty large part of the population.

For those children, having a home that they can feel comfortable in is very important. Outfitting your home for a child with a disability, however, can be a nuanced process. Each type of disability is different and each requires special modifications to the house. Home modifications for disabled kids can also be costly depending on the amount of work that needs to be done.

If your house needs modifications because of a disabled child, or you’re looking for ways to create a space where your child with a disability can lead a safe and happy life, this guide will help. We’ll discuss the most common impairments and adaptations that can be made for every situation.


Creating a Space Where Disabled Kids Can Thrive

Creating a Space Where Disabled Kids Can Thrive

Whether you recently acquired your new ability status, have moved into a house that needs updates or have a sudden need to make your home accessible, it’s important to assess the needs of your disabled child.

You will want to create a space where your disabled kid can feel at home, feel safe and free to be themselves. It’s important to consider the safety of each room, as well as the exterior of the house and common spaces. Consider your child’s unique needs and how you can make your house safer for them.

Adapting a Home to Medical Equipment

Adapting a Home to Medical Equipment

If your child will need medical equipment or medications, there are a few things to consider, such as safe storage for medical supplies and medicines. You may need to add outlets or additional power options if your child’s medical equipment is powered by electricity.

You must also consider whether your child’s equipment needs a backup power source. Would they need a generator during a power outage? If so, you should have one or two on hand. If your house has stairs and your child is mobility challenged, you may need a stair lift to ensure they have access to the whole house.

Staying in Budget when Modifying Your House

The cost for accessibility modifications can be anywhere from $1,600 to $14,160. Since there are such a variety of customizations, the gap is quite large.

Some children may struggle more than others. If you need to buy multiple pieces of equipment or make extensive modifications, it can get very expensive. When purchasing the equipment, consider which purchase is more important. Those that are life-sustaining or give your kid mobility will be the most important—prioritize these.

If you are having trouble affording the equipment you need, consider a loan. If you own your house, you may be able to use its equity to make modifications to it. The first step is to get a cost estimate from a contractor, then talk to your bank about acquiring the funds.

Staying in Budget when Modifying Your House

Undertake as many of the projects as you can on your own. Modifications such as grab bars and stepping stools can be easy to DIY. Contract out what you can’t do yourself with a local handyman or contractor and compare prices.

Since children grow fast, it can make more sense to buy secondhand equipment. Talk to your doctor first to discuss whether or not the items you need are safe to buy secondhand. If they are, you can look for used mobility equipment, therapy toys or adaptive furniture on Craigslist in your area. Medical equipment that must be sanitary is not a good choice for this option.

When to Move Instead of Modify

Modifying a house for a disabled kid can be difficult. Making renovations can get costly, so sometimes it makes sense to move into a house that is already accessible. If the costs to modify a house far exceed its worth, it may not be smart to modify.

If serious modifications are needed (like taking out walls or widening hallways), it can drive costs up fast, making it more affordable to move. If you live in a two-story house and your child cannot get up the stairs (or use a stair lift) on their own, it may be smart to move into a one-story house.

If the layout of your house does not allow for the necessary modifications or if the rooms are too small to accommodate your medical equipment, it may be time to move.

Talk to your real estate agent about new home options that are more fitting for your needs and compare costs of purchasing vs. modifying.

Modifications for Children in Wheelchairs

Modifications for Children in Wheelchairs

Your child in a wheelchair will have very different household needs compared to a child who is visually impaired or has cognitive struggles. Thought should be given into what modifications will make it easier and safer for your child in a wheelchair to get around.

Flooring

Throughout the house, flooring should be non-slip, which includes hardwood flooring, laminate flooring, most ceramic flooring and vinyl flooring with an embossed surface. Laminate flooring is a popular choice, as it is very durable and scuff marks are easily removed. If selecting carpet, low pile carpet should be used.

Exterior Modifications

Modifications will likely need to be made to the exterior of the house to make it safe and easily accessible for your child in a wheelchair.

  • The front door should be widened to at least 36 inches to follow ADA recommendations for doorways.
  • You will need to install an entrance ramp if there are stairs outside your house. The entrance will need to be step-free, meaning a level threshold, or have a small ramp to make it easier for your child to enter. There are many different options for wheelchair ramps.
  • Concrete and sidewalks outside should be level and outfitted with traction control.
  • There should be nothing blocking the entryway or path to the entrance. It’s best to have a five-foot square space in the entryway for the wheelchair to maneuver.
  • Motion sensored lighting will make it easy for your child to access the entryway at all hours.

Adapting a Home to Medical Equipment

Doors, Hallways and Stair Modifications

Again, it’s incredibly important for your child to be able to move around inside the house easily.

  • Hallways should be wide enough for a wheelchair to navigate through (at least 42 inches).
  • Doors throughout the house should be a minimum of 34 inches but preferably 36 inches.
  • In some situations grab bars on either side of the stairs will work, especially if it’s a small stairway. Larger stairways may require a stairlift installation.

Kitchen Modifications

Since your child will not be doing the bulk of the cooking, kitchen modifications don’t need to be as extensive as they would be for a disabled adult. But there are still a few modifications that can help your child feel welcome and at home in the kitchen.

  • If your child will be able to warm things up for themselves and get snacks, it’s important to have at least one low cabinet or pull out drawer that they can utilize. This should also house something to eat on and utensils.
  • If possible, have a wide open floor space so that your child can easily navigate the kitchen.
  • There should be a kitchen table of appropriate height so that your child can pull up and eat, work on homework or craft.
  • It would help to have a grabber device in the area so that the child can grab any snacks that are out of reach or light items they need.

Kitchen Modifications

Bathroom Modifications

The bathroom can be one of the most dangerous areas in the house due to slipping hazards and will likely require significant adjustments for a child in a wheelchair. Since each situation will be different, it can be helpful to watch your child maneuver the area and see where they are struggling. You can add grab bars and make modifications as they are needed. You will also want to:

  • Ensure your bathroom is large enough for a wheelchair to turn around in.
  • If possible, eliminate any edge or obstruction that would make it hard for them to get into the shower. Doorless showers can make it easy for a child to get in and out of the area to wash.
  • Install grab bars along all sides of the shower so that your child can get themselves in and out easily.
  • Place a seat inside the shower and position it so that your child can move easily from their chair to the bench.
  • Make sure the floor has a no-slip pad to prevent injuries associated with slipping.
  • Modify your sink for wheelchair access by either lowering it or reinforcing it to hold the weight of someone leaning on it.
  • Lower the mirror so that someone in a wheelchair can see into it.
  • Install grab bars by the toilet so that your child can easily maneuver onto it. The toilet area should be around 48 by 56 inches with at least 18 inches from the side wall.

Living Room and Bedroom Modifications

The living and bedroom areas should be positioned so that it’s easy for your child to move about.

  • Arrange furniture so that there is nothing obstructing pathways in the house. Keep electrical cords off the floor.
  • Designate a spot in the living room where your child can park their chair to join in on the activities.
  • Avoid having area rugs as these can obstruct a wheelchair.
  • Make sure there is ample room for your child to turn around and move freely in a wheelchair. Open-concept floor plans are great for this.


Modifications for Visually Impaired Children

Modifications for Visually Impaired Children

Modifications for a visually impaired child should make it easier for them to navigate the house or evacuate in case of an emergency. Fortunately, modifications for the visually impaired can be done more easily and are often less expensive than modifications for the mobility challenged.

Exterior Modifications

The exterior of the house should be modified for safety when your child enters or leaves the home or spends time outdoors.

  • The areas around the house should be well-lit and free of debris or things your child can easily trip on.
  • It’s helpful to have grab rails available to your child if there are any stairs or steps up into the house.
  • Keep items like tools or toys stored in the same area.
  • Move fragile or dangerous items into a locked shed or garage.

Doors, Hallways and Stair Modifications

Any area that your child will be traveling through often will need to be cleared of debris and safe for them to move about.

  • Tack or tape down any rugs or runners. Add non-slip mats underneath if you are able.
  • Tape down any electrical cords or ensure they are not laying where your child can trip on them.
  • Keep hallways and stairwells well lit.

Doors, Hallways and Stair Modifications

Kitchen Modifications

The kitchen can be a particularly dangerous place for the visually impaired. These modifications can help reduce the chance of injury.

  • Food, drinks and anything consumable should be labeled very clearly. If your child is blind or has extremely limited vision, you will need to label food items with braille. Here is a website that goes into extensive detail about labeling food items for the visually impaired.
  • If your child will be heating up snacks or doing small cooking tasks, label the microwave or dials on the stove top. Make sure everything they will need is always in the same location.
  • Keep dangerous things like knives and medication out of reach so your child can’t grab them.

Bathroom Modifications

The bathroom can also be dangerous for children who can’t see well (or at all). You can prevent injury by making sure special modifications are in place.

  • Install a safety rail at the edge of the tub or in the shower.
  • Mark their toothbrush with a rubber band or piece of tape so that it is easily identifiable.
  • Buy towels and mats that have contrasting colors to the floors and fixtures in the bathroom. All mats should be non-slip.
  • Use non-slip surfaces on the floor of the shower or tub.
  • Purchase non-spill dispensers for soap, shampoo and other liquids.

Living Room and Bedroom Modifications

Your child should feel the most at home in your living areas and bedrooms. There are several modifications you can make to the room so that finding needed items becomes second nature to your visually impaired child.

  • Use textures whenever possible so that your child can distinguish between things more easily.
  • Keep all pathways clear of obstructions that your child could possibly trip over. Make sure other children in the house are aware that they will need to pick up after themselves consistently.
  • Avoid area rugs or install non-slip rugs in common areas.
  • Make sure everything your child would need has a “home” and try to remember to put it back after you’re done using it every time. Teach your children to do the same.
  • Remove low-lying objects like coffee tables and ottomans that your child could trip over.


Modifications for Children with Sensory Concerns

Modifications for Children with Sensory Concerns

Sensory processing issues like hypersensitivity or hyposensitivity can be caused by a number of reasons. For children with sensory processing issues, dealing with sensory information can be confusing and at times frustrating. They may exhibit resistance to change and trouble focusing, problems with motor skills, lack of social skills or poor self-control.

If you have a child with sensory needs, you will need to outfit your house so that it feels like a safe space for your child.

Throughout the House

Sometimes, even the normal hustle and bustle of a home is too much for a child with sensory issues. There are things you can to do tone down the intensity of your house so your child can function properly.

  • Paint the walls in your house with neutral, soothing colors and avoid bright, bold colors.
  • Install light dimmers so that you can dim the lights when needed.
  • Keep your home free from clutter and unnecessary decor to cut down on the distractions.
  • Avoid having candles or diffusers that may emit strong odors.
  • Use weighted blankets in your child’s bedroom so that they can sleep better.

Create a Safe Space

Create a Safe Space

It’s a good idea to have a safe space your child can retreat to if they need a moment to regroup. A “sensory corner” that is quiet and stocked with cozy, comfy things is a smart idea.

Pick a corner that is dim, quiet and warm. You could even consider building a little “fort”. They sell fort beds, but you can also get creative and make a DIY fort.

Fill it with blankets and pillows, quiet, imaginative toys, squishy seating like bean bag chairs, and books or some music they can listen to.

Provide for Sensory Input

While some children thrive with sensory avoidance, others actually need sensory input. If you have a sensory seeking kid, your home can become damaged as your child explores their surroundings seeking different sensations.

Create safe spaces for sensory experiences by adding things your child can play on like a trampoline for jumping or safe, padded spaces for jumping into. Noisy toys, seats that wiggle and bounce or any kind of toy where your child can create sensory experiences is helpful. Each child will be different, so keep an eye on your child to decipher their specific needs.

Modifications for Autistic Children

Modifications for Autistic Children

New studies report that around 1 in 68 children in the United States are on the autistic spectrum, with the majority of them being male. Cases can range in severity, so it’s important to assess your child’s individual needs and outfit your home accordingly.

Exterior Modifications

There are several things you can do to ensure that the exterior of your house is safe for your autistic child. It is common for autistic children to want to be outside and in motion, so leaving the home to go outside unsupervised is sometimes an issue.

Use locks and alarms on doors and windows so that you will be alerted when your child enters and exits the home. You will also want to make sure your yard is safe from dangerous items like yard-work tools or sharp objects.

Kitchen Modifications

Kitchen Modifications

The kitchen can become a dangerous place for an autistic child if the proper precautions aren’t taken. There are a few things you can do to make it safer and more difficult for them to injure themselves or others.

  • Install durable surfaces and keep breakables out of reach. If your child has an outburst or participates in exploratory behavior, they can be destructive in the kitchen.
  • Arrange kitchen furniture so that your child has an appropriate place to sit and work if they need to. Keep furniture away from shelves and anywhere else that they could possibly climb.
  • Label things to explain their function or enforce rules. Images that say “STOP” or “NO”  work well to deter your child from getting into things they shouldn’t. You can place these on doors that are not to be opened or containers that hold poisonous substances. Cleaning supplies should be locked away in these drawers or cabinets.
  • Put sharp items such as scissors, knives or any other sharp tools high up or secured in a place where your child can’t access them.
  • Keep lighters or matches locked up so your child doesn’t burn themselves while exploring their world.
  • Store things in cupboards or pantries as much as possible to cut down on clutter which can upset autistic children.
  • Buy appliances with safety features such as child locks or hidden controls.

Exterior Modifications

Living Room, Bathroom and Bedroom Modifications

In the rest of the house, you will want to use special precautions to make sure your autistic child doesn’t harm themselves or cause damage to your house.

  • Avoid using fluorescent lighting as these can tire autistic children out. Choose incandescent lighting whenever possible.
  • Build a playroom or safe play space where they have free reign. Create an environment where it’s easy for your child to focus on you or their learning activities and explore the world around them.
  • Reduce visual stimulation by coloring the rooms neutral or soothing colors and keeping the home clutter-free.
  • Make electrical outlets safe by placing plastic covers over them when they are not in use. You will want to ensure that wiring for electronics is concealed in a way that the child can’t access the wires.
  • Appliances can be made safe by using plastic child-proof knob covers for doors, faucets, ovens and stove burners. Lock the door to rooms that house the washer and dryer or power tools.
  • Organize functional items in see-through plastic bins so that your child knows where everything is. Use visual labels like symbols or photos to mark these bins.
  • Use visual signals to help your child understand limits and set expectations. Using colored tape to designate boundaries on carpets, floors and walls can visually remind children where their bodies should remain.
  • Make fire safety a priority and always keep matches and lighters out of reached or locked up. Supervise your child closely when there is a fire in the fireplace or a barbecue with open flames. Make sure smoke detectors are always working properly.


Resources for Parents of Special Needs Children

Resources for Parents of Special Needs Children

There is a wealth of information available for parents of special needs children on the internet. Whether you’re interested in learning more about the needs of your child, gaining financial assistance or looking for emotional support, there is something available. We’ve listed some of our favorites below.

General Information and Support

  • Care.com has a number of helpful resources for parents of children with disabilities.

Financial Resources

×

I'm Moving

Moving? Thinking about moving? Whether your move is off in the distance or you already have one foot out the door, you'll learn about everything you should expect through our useful how-to's, cool articles and much more. It's all specially curated for you in our "I'm Moving" section.
Explore
×

I'm a Mover

For rookies or veterans alike, our "I'm a Mover" section is filled with extensive industry news, crucial protips and in-depth guides written by industry professionals. Sharing our decade of moving knowledge is just one way we help keep our professional movers at the top of their game.
Explore