Most people who move have to pack and transport belongings and memories from just their homes. But if you have a greenhouse on your property, you need to decide what to do with a whole other structure.
Should you move your greenhouse with you, or should you build a new one? Can you even move a greenhouse to begin with?
Yes, you can move it, and there are many reasons why that might be a better option than building a new one from scratch. It can save you time and money, it’s more sustainable, and it preserves the sentimental value of your greenhouse.
Read on for the lowdown on all things greenhouse, from the supplies you need when taking it down to the permits you need at its final destination.
Decide If Your Greenhouse Can Be Moved
Not all greenhouses can (or should) be moved. Moving yours depends on several factors, including its age, the material it’s made from, and its size. A polycarbonate greenhouse typically lasts 10 to 20 years. If yours is at the upper end of this age range, you may be better off replacing it, especially if it’s already worn or damaged. The older a greenhouse gets, the more vulnerable it becomes, and you certainly don’t want yours collapsing on your precious plants.
“Your local zoning department will issue this permit that regulates how many accessory buildings, such as greenhouses or conservatories…you can build and where on the property you can build them.”
Size matters, too. Obviously, a smaller greenhouse is typically easier to move than a larger one, and it may also be cheaper to relocate. However, buying an entirely new greenhouse, regardless of the size, might be more affordable than transporting the old one. Compare the costs of moving vs. replacing before making a decision.
Don’t forget to check zoning permit laws in your new area! Make sure greenhouses are allowed at your new property and that yours doesn’t exceed any size restrictions.
Prepare the Greenhouse for Moving
Collect the Tools and Supplies You’ll Need

There are numerous parts to a greenhouse, and you’ll need various tools to carefully take them apart and pack them for your move. Here’s a checklist of the basic items you need:
For the greenhouse structure
- Pair of pliers
- Flat and crosshead screwdrivers
- Adjustable wrench
- Short ladder to reach the roof
- Containers to gather brackets, clips, nuts, and bolts
- Masking tape
- Marker
For the plants
- Hand shovel
- Burlap bags, plant pots, buckets, or trash bags
- Extra potting soil
Personal protective equipment
- Thick gloves
- Safety glasses
- Sturdy shoes or boots
Packaging materials
- Bubble wrap, foam padding, and foam corners to safeguard fragile components, especially glass panes
- Rope to secure them
Document What Your Greenhouse Structure Looks Like
Before removing anything, make detailed notes about your greenhouse to make reassembling it easier. You can start by drawing a rough sketch of the floor plan that maps out where each plant goes, or taking several pictures of the interior.
Then, take photos of the general shape of the greenhouse from different angles to document what the final structure looks like. Zoom in and photograph the joints so you know where the nuts and bolts fit together.
Clear Out Everything From Inside
Start with items that are easy to remove and work your way to heftier things. Remove any small, unsecured items like tools, heaters, and fertilizer bags. Next, move out the heavier mobile items like pots, shelves, and benches. Finally, remove secured items like lighting and shades.
Once you have the accessories out of the way, it’s time to focus on the plants.
Remove and Prep Your Plants for Moving

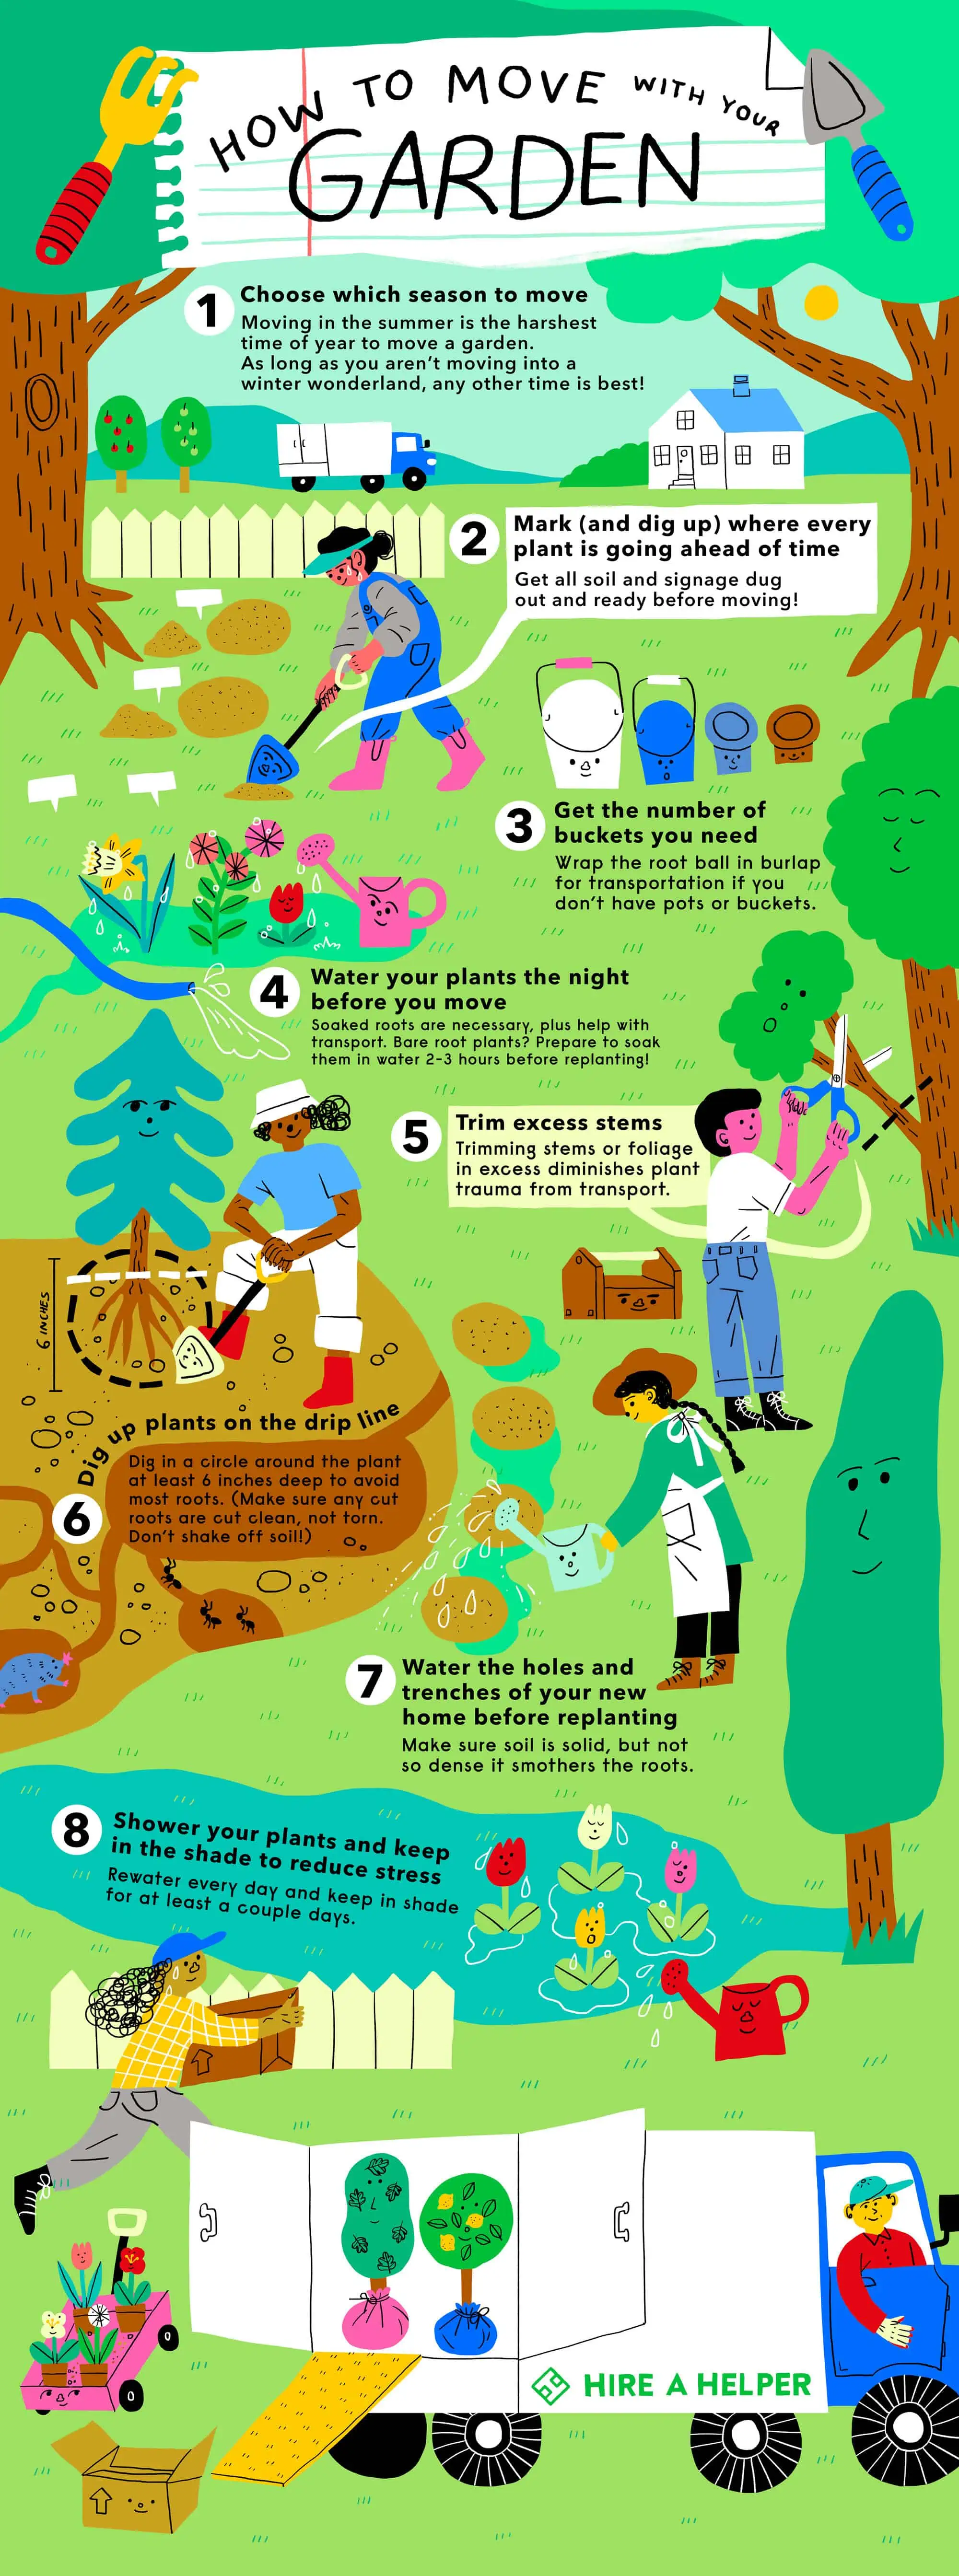
Changing a plant’s environment — even temporarily during transport — can cause distress. To make the journey easier on them, trim dying or surplus stems from any plants that need it before you dig them up.
When digging up plants, take special care not to damage the roots — use a hand shovel to dig a ring around the plant’s main stem, following the roots’ position in the drip line. That’s the outer edge of a plant’s foliage where water naturally drips down to the soil. Make sure you keep the soil around the roots intact.
Once removed, place the plant in a bucket, plant pot, or burlap bag for transport. You can then place the relocated plant in a trash bag so that loose soil doesn’t spill all over your vehicle.
To learn more about how to move your plants safely, including watering and replanting recommendations, check out our guide for how to move your garden.
How to Dismantle a Greenhouse

Start With the Roof and Work Your Way Down
You’ve cleared out the movable items, and now it’s time for the heavy lifting. It’s possible to do this yourself, but it’s not the best idea. Having someone to hand off panes to will make your job much easier and safer.
- First, remove the glass or polycarbonate panes from the roof and then tackle one wall at a time. As you remove the panes, use masking tape and a marker to label where they came from — North, South, East, or West walls, and roof.
- Clips, brackets, nuts, and bolts are easy to lose, so put them in a bucket or plastic bag immediately.
- Clear moss off any panes before taking them out. The last thing you want is to lose your grip and drop them! You can scrape off dead moss using your screwdriver or a plastic spatula. Fresh moss needs to be sprayed with moss killer first and scraped off after 15 minutes. If you’d rather not use harsh chemicals, try a dish soap and warm water mix instead, although it might take longer to work.
- Next, take the door off its hinges (or brackets, if it’s a sliding door) and then move on to the roof vents.
- When you’re left with just the greenhouse frame, try to keep as much of it intact as you can. Instead of detaching each beam, keep each wall or roof frame in one piece if your greenhouse is small enough to do so. This will make reassembling it easier at your new home. Don’t forget to use masking tape and mark each frame too!
Protect and Pack the Different Components for Transport
It’s not just bumps on the road that can break glass during transport — prolonged vibrations between panes of glass can also damage them if there’s direct contact. You can place bubble wrap or foam padding between the glass sheets and use foam on the corners to protect them.
“Your local extension office is an excellent resource to help with all things gardening, including answering your burning questions about specific soil, drainage, weeds, and landscaping.”
ou could add an extra layer of protection and wrap each pane and padding item with packing paper. Label each one with ‘Fragile – Glass’ to prepare for loading onto the truck.
Polycarbonate, on the other hand, is 250 times stronger than glass, so you don’t have to worry about breakage en route. You can place thinner sheets of packing paper between polycarbonate panes to shield them from scratches.
The frame is also less prone to breakage. Use the bubble wrap or foam padding on the corners of your frames to protect other items they might come into contact with on the journey.
How to Transport a Greenhouse

Consider Hiring Professional Movers
Here’s the not-so-great news — most moving companies won’t transport potted plants with soil. They’re delicate and messy, and if you’re moving interstate, there are multiple state laws about transporting plants to take into account. You can always ask, but be prepared to make your own arrangements. To learn your options, check out our blog post about how to move your plants long-distance.
But the actual components of your conservatory? Those are fair game! You can hire professional movers to transport the panes and frames. They’ll have the equipment you need to secure these parts in the truck and transport them safely.
Safely Load and Secure Greenhouse Parts
You’ve already packed your greenhouse glass (or polycarbonate) panes safely. Now it’s time to load them onto the moving truck.
Stack them vertically or diagonally in the truck so that each pane is only bearing its own weight. Use rope to secure the panes to the truck so they don’t shift or bounce during transport. Secure the frames to the truck as well to avoid them tipping over and breaking the glass.
Keep Road Regulations in Mind and Plan Your Route
If you’re bringing any plants with you in your car or rental truck, you’ll need to carefully map out your route before you hit the road to ensure you’re allowed to take them through each state you’ll be driving through.
Check for issues in each state you pass through on the Department of Agriculture and National Plant Board websites. If you have any prohibited plants that are allowed at your final destination, you’ll either have to go around that state or ship those plants by mail through UPS, USPS, or FedEx. Check the guidelines for these companies before you pack up the plant and send it on its way.
Set Up Your Greenhouse at Your New Home

Find a Spot With Ideal Sunlight Exposure
If it’s possible, observe the sun’s movement across your garden throughout the day to find a spot that gets plenty of sunlight for a long time. Make sure you place your greenhouse a safe distance away from the shade of tall trees — not only do they block direct sunlight, their branches pose a risk to the glass if they fall on the structure.
Check Local Climate and Weather
Unless you’re moving a short distance, you might have questions about which plants will survive the move with you. The answer lies in their hardiness, or what cold weather and low temperatures they can withstand. This isn’t an abstract concept — the USDA Plant Hardiness Zone Map can help you figure out whether your plants will thrive in their new environment.
Your plant tags should state their hardiness zones. If you don’t still have the tags, you can look up your zone by zip code to find plants that will survive there.
And the plants that don’t make the cut? You’ll have to find someone to take them. Here are some ways to make sure the plants you can’t bring with you find a new home:
- Donate them to friends, family, or neighbors who’d like to take care of them
- Put them up for adoption on Plant Amnesty’s Adopt-a-Plant listing
- Check if your local garden club would like to take them
- List them on Facebook Marketplace
Consider Soil and Drainage Options

You can grow your plants directly in the ground by using pots or raised plant beds, or a combination of the two.
You can get soil for raised beds at your nearest hardware store, but for plants that will grow directly in the ground, the soil in your garden will need to be suitable for them to flourish. Your local extension office is an excellent resource to help with all things gardening, including answering your burning questions about specific soil, drainage, weeds, and landscaping. Ask them about soil testing to discover your garden soil’s nutrient levels and how acidic it is.
Your greenhouse needs to be on level ground to avoid drainage problems like water pooling after watering your yard or a heavy rain. If the ideal spot is on uneven ground, you’ll have to level the land before you build.
Comply With Legal and Regulatory Requirements
Unfortunately, there’s no one-size-fits-all checklist as to what regulations, permits, and codes might apply to building a greenhouse at your new home. These vary from state to state, and you’ll need to check with the local authorities in your area for what’s applicable to you.
- Zoning permit: Your local zoning department will issue this permit that regulates how many accessory buildings, such as greenhouses or conservatories, storage sheds, swimming pools, gazebos, detached garages, etc. you can build and where on the property you can build them.
- Building permit: Your local building department will issue this permit to ensure your greenhouse complies with safety standards. It assesses the structural integrity of your greenhouse and how it looks, including its size and height.
You should also check if your Homeowners Association has any specific rules or requirements for greenhouses and comply with those. You don’t want to get into a scuffle with your new neighbors!
“Changing a plant’s environment — even temporarily during transport — can cause distress. To make the journey easier on them, trim dying or surplus stems from any plants that need it before you dig them up.”
Lastly, don’t forget about the Environmental Protection Agency. You don’t need a permit from them, but keep in mind the EPA’s best practices to prevent pollution.
- Store fuel, wood waste, fertilizer, and pesticides contained and far away from streams, springs, creeks, lakes, ponds, etc. on your property.
- Design your greenhouse to work well with efficient watering and drip irrigation systems. If you can, separate and disinfect wash water or wastewater for reuse.
Common Mistakes to Avoid When Moving a Greenhouse
Never rush the process of prepping a greenhouse for relocation. It leads to headaches, stress, broken pieces, and basically nothing good. Let’s discuss some of the most common mistakes people make so you can avoid them and save yourself the hassle.
- Not labeling parts: Label all the greenhouse parts. Otherwise, you could spend countless hours trying to figure out where everything is supposed to go. Consider writing on painter’s tape with a permanent marker. It’s highly visible and the tape won’t leave behind a sticky residue.
- Rushing disassembly or reassembly: Not many people enjoy either process, but that doesn’t mean you should speed through disassembling or reassembling your greenhouse to get it over with. Rushing could lead to a host of problems, from missing parts to broken pieces.
- Forgetting to prep the new location: There’s a lot that needs to be done, including leveling the soil. Forgetting to do this before your greenhouse arrives could result in a lot of frustration. It can also lengthen the time your plants are unprotected.
- Breaking panels during transport: You can’t be too careful when packing the panels. Give them plenty of cushion and protection so they don’t shatter en route. Packing materials like thick foam, clean cardboard, bubble wrap, and packing tape can help give the panels the protection they need.
- Losing hardware: Keep all the pieces together in one place, like a covered plastic bin, so you don’t lose them and they stay protected. Don’t forget to label the container, too.
FAQs About Moving a Greenhouse
Before you make a decision about moving your greenhouse, review these FAQs.
Is it cheaper to move or rebuild a greenhouse?
It depends on factors like its size and condition, the cost to transport it, and the price of a greenhouse you’d get as a replacement.
Can I move a greenhouse by myself?
It’s possible, but you may want to consider bringing in the pros to make the process easier. They can pack and load items much more efficiently, but make sure the movers you hire have experience in moving greenhouses.
How long does it take to move a greenhouse?
The length of time it takes can vary. For example, a smaller greenhouse made of fewer pieces will usually take less time than a larger, more complex one. This means the entire process, such as disassembling it, packing it safely, and transporting it, can take from a handful of hours to a full day or more.
Can greenhouses be moved in winter?
Yes! However, you’ll have to take extra care to protect your plants from the cold to minimize their (and your) stress.
With your greenhouse built to code and plants rehomed, it’s time to enjoy the fruits of your labor. You can replace any plants you couldn’t bring with you to have a full, flourishing greenhouse to enjoy once again.