When it comes to learning how to pack plates for moving, you might view the task like a high-stakes Jenga puzzle. One wrong wrap, one careless stack, and suddenly your favorite dinner plates or heirloom china end up as pieces of heartbreak.
But don’t worry. Packing plates is easier than it looks, once you know the right techniques and tips. With the right materials and a step-by-step approach, you can keep your dishware safe whether you’re moving across town or across the country.
And that’s just what this guide aims to walk you through. We’ll cover the best materials to use, the safest wrapping and boxing methods, and extra precautions to take with glass plates and long-distance moves. We’ll even throw in some common mistakes to avoid, so your fragile items arrive in one piece.
Gather the Right Packing Materials
Before you start wrapping, make sure you have the right supplies on hand. Using proper materials can be the difference between broken dishes and a stress-free unpacking day.
Here’s what you’ll need:
- Dish pack boxes: These are double-walled and sturdier than regular boxes, designed specifically for breakables.
- Packing paper: Soft, ink-free paper cushions without leaving residue.
- Bubble wrap: Ideal for delicate glass or fine china. It adds extra cushion as well as preventing scratches and chips.
- Packing tape: High-quality tape to seal the box securely — you don’t want any part to collapse or open unintentionally.
- Foam pouches or sleeves: A quick and easy way to protect individual plates.
- Cardboard dividers: Helpful for added structure and spacing. Consider a dish saver packing kit.
- Old towels or cloths: A great budget-friendly alternative to commercial padding for the bottom or top of the box.
Pro Tip: Avoid using newspaper to wrap your plates. The ink can smudge and stain your dishes, and it doesn’t provide nearly as much cushioning as proper packing paper.
Prep Your Plates Before Packing
Take the time to get your plates ready for safe packing. It’s only a few extra minutes, but it’ll help protect them and make the packing process faster.
- Wash and dry each plate thoroughly: Moisture can lead to mildew and cause paper to tear. And any leftover food particles or dust can scratch surfaces when wrapped.
- Sort by size and type: Group dinner plates, salad plates, and bowls separately. It’s easier to wrap similarly sized items together, and it ensures better weight distribution in the box.
- Declutter before you pack: If you have chipped, mismatched, or rarely used plates, now’s a great time to donate or recycle them. No point in paying to move what you don’t use.
Getting organized before you grab the tape will save you time and maybe even a few bucks in moving supplies.
Step-by-Step: How to Pack Plates for Moving
Plates are one of the most commonly broken items during a move. Most break because they’re either packed flat or left loose in boxes. Follow these steps to keep them safe and snug:
1. Prepare the Box
Start with a sturdy dish pack box or reinforce a regular moving box with extra tape on the seams. Once your box is properly set up, line the bottom with 2–3 inches of crumpled packing paper, bubble wrap, or a folded towel to absorb impact from bumps or drops. If you’re using dividers, insert them now so you can slide plates into individual sections.
2. Wrap Each Plate Individually
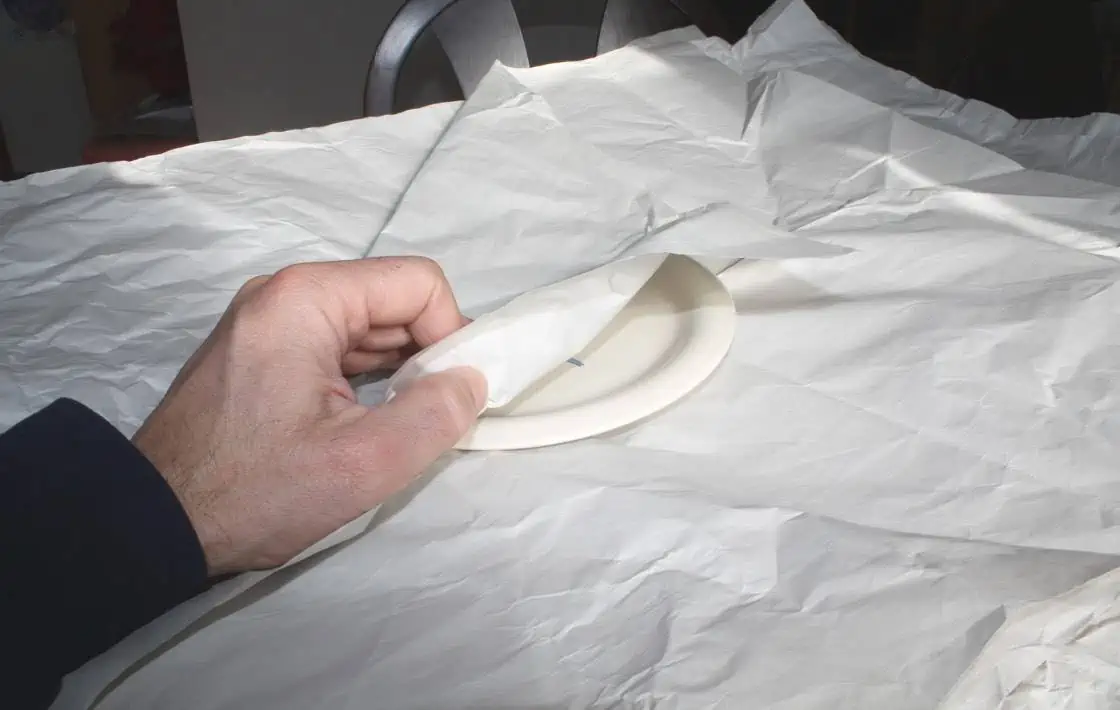
First, place a plate in the center of a sheet of packing paper or bubble wrap. Then, fold each of the corners over the plate, wrapping tightly. For extra protection, use a second sheet or a foam pouch. You can also secure the wrapping with tape if needed, especially for slick materials like glass or porcelain.
3. Stack Plates Vertically
When setting your plates in the box, you should always place the wrapped plates on their edge, like vinyl records, not flat. This position distributes pressure better and reduces the risk of cracking. Keep stacks at 4 to 6 plates per bundle, and use packing paper or foam between each plate to add cushioning.
4. Fill Empty Gaps and Cushion the Top
Once your box is mostly full, you should fill any empty spaces on the sides with crumpled paper, towels, or soft linens. Then, add a final padded layer on top to keep anything from pushing the dishes down during the move.
5. Seal and Label the Box
Once everything is safely and securely packed, close the flaps of the box and seal it securely with strong packing tape. Don’t skimp here! Label it clearly with: “FRAGILE – Plates – This Side Up.” The last thing you want is for you or your movers to unintentionally flip the box with all the plates in it upside down, or put something heavy on top of it.
“If you have chipped, mismatched, or rarely used plates, now’s a great time to donate or recycle them. No point in paying to move what you don’t use.”
You should also list the contents on the box (e.g. 8 Dinner Plates, 6 Salad Plates) so you can quickly find your dishware when unpacking.
How to Pack Glass Plates or China Safely
Glass plates, fine china, and heirloom dishes deserve a little extra care and attention. These items are more fragile than standard stoneware and often irreplaceable. The steps are similar, but with a few key upgrades.
- Wrap each plate in bubble wrap: Alternatively, use foam sleeves designed for dishes. For high-end sets, consider double-layering both.
- Secure each bundle with tape: This prevents wrapping from coming loose in transit.
- Stack fewer plates per box: Go with 3 to 4 per bundle, and use filler to absorb shocks.
- Use the double-box method: Place your packed dish box inside a slightly larger box lined with crumpled paper or foam. This adds another layer of impact protection.
Pro Tip: Glass and china are heavy. Packing fewer items per box means more boxes, but it reduces the chance of breakage and keeps the weight of each box low.
Extra Packing Tips for Long-Distance Moves
Moving across town is one thing, but if your plates are going across the state (or country), you’ll need to take a few extra steps to make sure they can handle the extra distance.
- Use more padding: Longer trips mean more bumps. Double-wrap plates or add extra cushioning between layers.
- Avoid packing plates with other heavy items: This includes small appliances or cookbooks. These items can shift and crack even well-packed dishes.
- Don’t overpack boxes: Try to keep each dish box under 40 pounds to prevent crushing or tearing in transit.
- Ask your moving company about fragile box policies: Some movers won’t guarantee protection for owner-packed fragile boxes, especially glassware.
If you’ve hired professionals to help you move, you might consider adding a packing service. Make sure you know what they charge and what happens if items get damaged, just in case.
Common Mistakes to Avoid When Packing Fragile Items
Even with the right materials, a few simple mistakes can put your plates at risk. Here are the most common ones:
- Stacking plates flat: Always pack plates on their edge. This helps them absorb pressure and shock better.
- Leaving empty space in the box: Any gaps can cause shifts during transit. This leads to cracks and chips from the plates knocking into each other or into the sides of the box. Fill every inch with crumpled paper or soft material.
- Using oversized or flimsy boxes: Plates need strong, compact containers to prevent collapse or tipping.
- Overloading the box: It might seem easier to pack every plate you own into one box, but that’s a recipe for disaster (and back strain).
- Forgetting the “Fragile” label: Movers won’t know what’s inside unless you tell them. Consider using pre-made sticker labels to mark which boxes should be handled with extra care.
Skip these mistakes and give your plates the best chance of making it to your new home in perfect shape.