How To Seriously Lessen Your Carbon Footprint When You Move

Author:

Publish Date:

Last Modified Date:

Category: Green Moving, Moving Checklists & Planning

Tags: Tags: , , , , , , , , , , , , , ,

About 11.8% of Americans moved to a new home in 2024. That’s a lot of relocations — and a lot of extra strain on the environment.

If you’re planning a move in 2026, there are ways to reduce the greenhouse gases generated by your actions, also known as your carbon footprint. Eco-friendly and zero-waste moving requires more time and detailed planning, but it can benefit your budget and the planet. HireAHelper, we’re all about making your move easier, no matter what kind. This guide provides eco-friendly moving tips and helps you plan a green relocation by decluttering, recycling, conserving fuel, and offsetting emissions.


1. Declutter and Donate Before You Move

moving boxes

Moving is a great opportunity to go through everything you’ve collected since you moved into your current place. The less stuff you have to move, the cheaper and quicker it will be.

If you’re trying to lower your environmental impact, give yourself plenty of time for this step. That way, you’ll be less likely to toss stuff in the trash just to be rid of it, and instead, you can sort and dispose of anything you need to in a more eco-friendly way.

To start, create separate piles for items that you want to sell, donate, and throw out. You can label a few boxes or designate specific spots for each category.

Don’t wait until the last minute to deal with donations, either. Many charity organizations offer free pickups for furniture and other large items as long as you schedule in advance. It saves you a trip, and because the driver usually has multiple stops, it reduces overall emissions.

When it comes to things that can’t be donated, sold, or given away, consider recycling. It’s a great way to reduce your contributions to the landfill. You can recycle a variety of home goods, including:

  • Carpeting
  • Old mattresses
  • Scratched CDs, game discs, and DVDs
  • Stained or torn clothing or bedding
  • Large and small appliances (dryer, microwave, etc.)
  • Old electronics (cell phones, TVs, computers, printers, and stereos)
  • Crayons and dry markers
  • Ink cartridges
  • Working and non-working holiday lights

If you have old paint, cleaners, or fertilizer lying around, don’t throw them out; they can cause serious environmental damage if they leach into the ground. Call your local hazmat office and ask where you can drop them off for recycling. You can also recycle hazardous items, including solvents, motor oil, and pesticides.


2. Plan a Carbon-Neutral Move

The average move involves a lot of driving, which generates more emissions than usual. b. That will help reduce your impact, but it’s not possible to cut out emissions entirely.

That’s where carbon offsets come in. These credits help pay for projects that reduce emissions or remove CO2 from the environment. You can buy them by the metric ton to effectively bring your moving emissions to zero. This strategy is called carbon neutrality.

How to offset your carbon emissions for a move

To start, calculate the emissions for your move. Multiply the average emissions per mile by the number of miles. The average moving truck creates 10-20 pounds of carbon dioxide (CO2) per mile, and a passenger vehicle creates about 400 grams of CO2 per mile. Talk to your rental company or check the manufacturer’s website for specifics.

Once you have a rough idea of your extra emissions, add 100-200 extra pounds per person. This helps cover the extra bags of trash you’re sending to the landfill over the course of a move. Or, go the extra mile and buy enough to offset your family’s entire carbon footprint beyond the move by using the EPA’s carbon footprint calendar to estimate it.


“In general, rental crates tend to be the most eco-friendly [packing] option. While plastic bins eliminate your personal cardboard waste, a rental crate can be used for about 500 moves.”


From there, offsetting your emissions is a breeze. All you have to do is buy offsets from organizations such as the United Nations carbon offset platform and Terrapass. The money helps pay for projects including reforestation, renewable energy, and green waste management, just to name a few. Carbon offsets cost as little as $1 per metric ton, and many programs even allow you to pick which projects to fund.

How to Find Eco-Friendly Movers

Working with sustainable movers is an easy way to reduce your emissions and plan an eco-friendly move. Look for companies that use planet-friendly practices. They might have a fleet of hybrid or electric moving trucks, for example, or provide reusable plastic bins for packing. Some movers even offer carbon offsets to make your life a little easier.

As you compare companies, keep an eye out for green credentials. Many eco-friendly movers belong to groups like the Climate Action Business Association. Others have certifications from organizations such as the Green Business Certification Inc. (GBCI).


3. Create an 8-Week Green Move Timeline

Whether you’re planning a carbon-neutral move or simply trying to reduce emissions, it’s important to start early. After all, finding eco-friendly supplies and figuring out what you can recycle and donate takes time. When you give yourself a longer runway, you’re less likely to get overwhelmed by the process.

Here’s a sample 8-week timeline for an eco-friendly move:

  • Week 1: Start decluttering your home, separating items that can be donated, given away, sold, or recycled. Create a moving budget, and schedule your utility and service cancellations.
  • Week 2: Photograph items you want to sell, and create listings. Research local recycling options for electronics, appliances, and other household goods.
  • Week 3: Schedule large-donation pickups. Organize other donations by organization, and try to make all drop-offs in one trip. Pack documents and other important records, plan maintenance, and start changing your address.
  • Week 4: Compare quotes from eco-friendly movers and book your date. Buy or rent reusable packing bins and biodegradable packing materials, and stock up on tape. This is also a good time to start working through the food in your house to reduce waste.
  • Week 5: Start packing things you’re not using, such as holiday decorations, out-of-season clothing, and sporting goods.
  • Week 6: Drop off recyclables at your local recycling center. Bring large waste items to a nearby Waste Management site or set out for curbside pickup. Continue packing clothing, toys, and non-essentials.
  • Week 7: Forward your mail, and pack non-perishable foods. Start deep-cleaning packed rooms with non-toxic, biodegradable products. Pack the remaining rooms.
  • Week 8: Confirm move details with your movers. Dispose of any remaining trash or recycling. Clean remaining spaces. Leave out essential items for moving day.

The key to stress-free green moving is to declutter and pack gradually. Tackle projects slowly, pack as you go, and you won’t need to rush before you hit the road. And for tips on what to do during and after the move, check out our green move checklist.


4. Packing Materials: Life-Cycle and Cost Comparison

Packing materials are the perfect opportunity to create a greener move. Your packing containers make up the bulk of the supplies you need, which means that they offer the biggest potential for reducing emissions and waste.

Here are 3 green options to consider:

  • Cardboard boxes: While they’re affordable and readily available, cardboard boxes have the shortest life cycle of all packing containers. At about $1-$8 each, they also have a relatively high cost per use. Reduce your impact by finding used boxes, and if you must purchase new, look for options made from post-consumer recycled materials. After the move, make sure to give away or recycle the boxes to reduce CO2 emissions.
  • Reusable plastic bins: Basic bins cost about $10-$20 each, but you can use them to store everything from holiday decorations to tools and off-season clothes. These bins can cut your carbon emissions by up to 29% compared to cardboard boxes. Plus, they stack easily in your moving truck, garage, or storage space.
  • Rental crates: For the lowest emissions and cost per use, check out rental crates. These sturdy plastic crates can be used over and over again by multiple people, drastically reducing emissions. And if you rent a multi-bin package, the cost per bin is usually between $3 and $5.

The best option for you depends on your needs. If you have a lot of stuff to store and organize once you get to your new home, it’s simple to find uses for plastic bins. However, if your new place doesn’t have much space, rental crates are probably a better way to reduce waste. And if your top priority is cost-cutting, try to find free, gently used cardboard boxes.

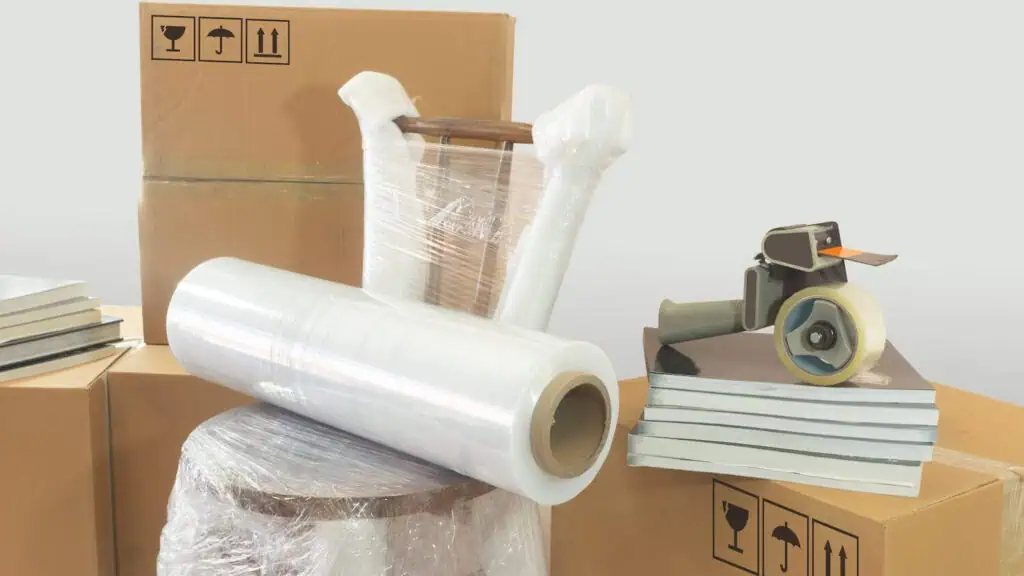
Once you’ve settled on containers, consider the other materials you’ll need. Choose eco-friendly cornstarch peanuts instead of styrofoam peanuts, which don’t biodegrade (at least, not in our lifetime). You can also use recyclable bubble wrap or corrugated cardboard wrap. When it comes to tape, consider biodegradable paper tape made with a water-activated adhesive.

Comparing Eco-Friendly Packing Materials

Packing Option Lifecycle Cost CO2 Savings
Cardboard boxes 1-2 uses, recyclable $1-$8 per box Low
Plastic bins 5-10 years, recyclable $10-$20 per bin Medium
Rental crates 3-5 years, recyclable $3-$5 per crate High

In general, rental crates tend to be the most eco-friendly option. While plastic bins eliminate your personal cardboard waste, a rental crate can be used for about 500 moves. In other words, they prevent a lot of boxes from ending up in the landfill.


5. Zero-Waste Moving-Day Kit Checklist

If you’re serious about going green, a zero-waste move could be the right fit. Planning is key — when you’re prepared with a zero-waste kit, it’s easier to avoid disposable materials. Wait until the last minute, and you’ll be running to the store to stock up on boxes and plastic tape.

Here’s what to include in your moving-day kit:

  • Rent reusable crates: Moving companies often rent reusable, heavy-duty moving crates that come in many shapes and sizes. When you’re done moving, simply return the boxes. Assemble the crates about 2 weeks in advance to make sure they’re ready to go.
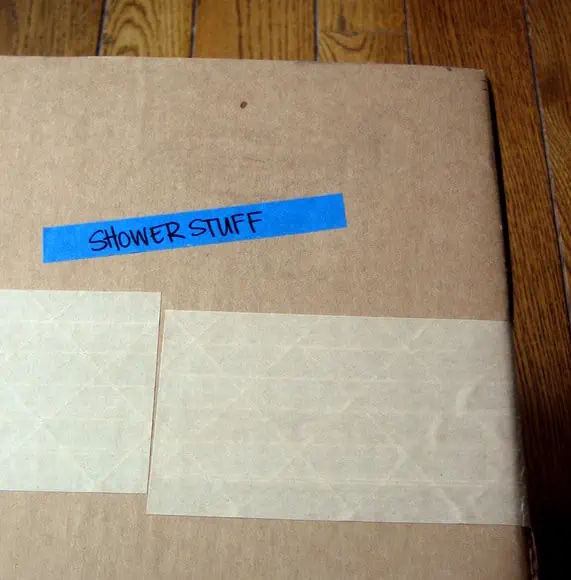
  • Sustainable crate labels: Rental crates may come with reusable labels. If not, look for biodegradable or compostable labels.
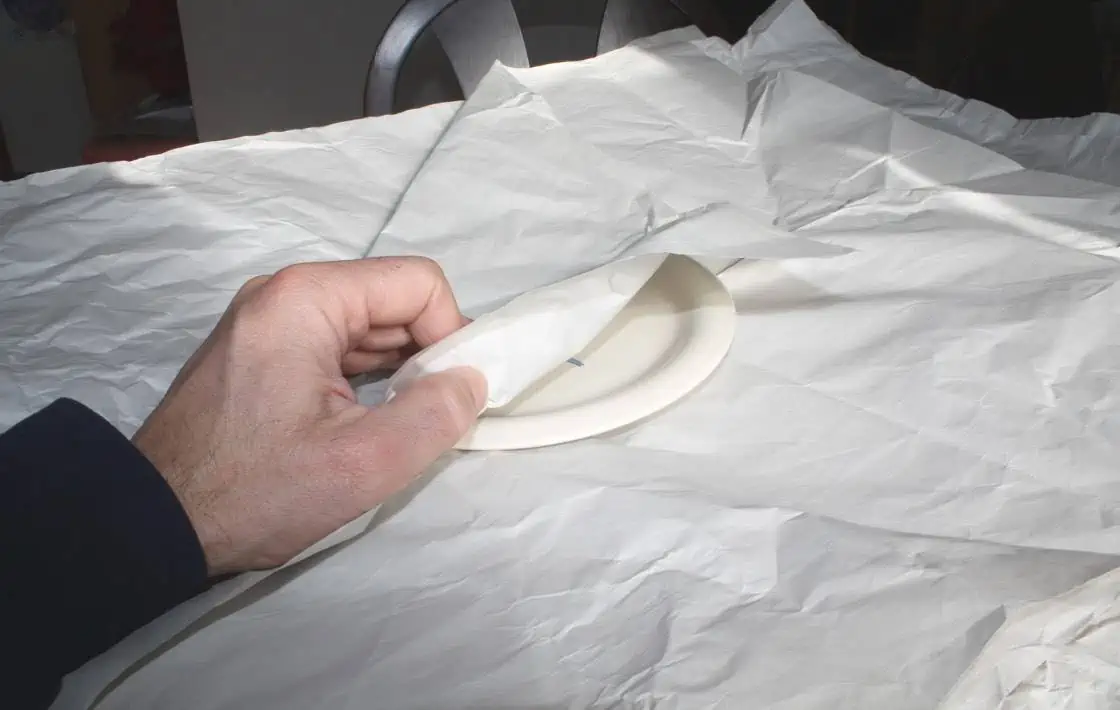
  • Washable padding: Instead of disposable packing paper, pad your boxes with towels, sheets, or even pillows and clothes. You’ll save space, and you can simply wash the items after the move.
  • Refillable cleaners: Transport the bottles during the move, and refill them at your new home to reduce plastic waste.
  • Multi-use straps: Secure your stuff in the moving truck with ratchet straps. You can reuse the straps for camping, hanging gear, or securing a kayak to the top of your car.

A good money-saving tip is to pack as much as you can in empty drawers, laundry baskets, suitcases, tote bags, and other containers you already have on hand. Then, you can rent fewer crates and reduce the weight in the moving truck.

If crates aren’t an option, source free cardboard boxes from friends and local stores. Close them by interlocking the flaps rather than taping. Instead of plastic sheeting, cover mattresses and other large items with blankets, sheets, or a drop cloth.


6. Energy and Fuel Efficiency During the Move

If you’re hiring a moving company, you don’t have control over the road they take or how much fuel they use. Don’t worry — conserving gas boosts the bottom line, so moving companies plan their loads and routes carefully. When you’re booking through the HireAHelper platform, check out each company’s listing to find out if they use fuel-efficient hybrid or electric moving vehicles.

If you’re moving yourself, here’s what you can do to save on gas:

  • Plan your route. Take a route to your new place that will use the least amount of gas. The best route may be the shortest, or it may be a longer one with less traffic congestion — and therefore, the fewest idling stops. Most traffic apps offer the option to filter by fuel-efficient routes.
  • Make as few trips as possible. The fewer trips you need to take to get your stuff to your new place, the less fuel you’ll use and the more eco-friendly your move will be. The same logic applies when you’re dropping things off for recycling and donation.
  • Optimize your load. When you’re packing, fill your containers as full as possible so you’ll need fewer of them. Pack your things in the vehicle(s) carefully to reduce wasted space. Efficient packing allows you to use a smaller truck with lower emissions.

You can also save on energy by turning off the HVAC during the move. Since your doors will be wide open while you’re loading boxes into the moving truck, turn off the heat or A/C to save energy. Keep the lights off when possible. If it’s extremely hot or cold outside, move everything close to the front door to speed up the process and keep everyone comfortable.


7. Post-Move Reuse and Recycling

eco friendly packing

A move isn’t really eco-friendly until you deal with the leftover boxes and packing materials. As you unpack each box, set the packing materials aside. Give usable boxes to friends, or put them up on a free online marketplace for people to claim. Some moving companies, including U-Haul, allow you to drop off used boxes for other people to take.

If the boxes are too beaten up to be reused, recycle them. Create separate piles for boxes that can be recycled curbside and boxes you’ll need to drop off. Remove tape from the cardboard before you break down the box.

Are you planning to set up a compost system in your new home? Many types of cardboard and packing paper are compostable, so you might be able to avoid recycling completely. Just make sure to shred them into small pieces before adding them to the pile. You’ll eliminate waste and help your new garden or flower beds grow.


A New Start: Sustainable Living in Your New Home

Now that you’re all settled in, take a deep breath, relax, and take a good look around your new place. Now’s the best chance to evaluate what you can do to reduce your carbon footprint and your utility bills as you settle into your routine.

Protect your air quality

Poor air quality in your home is bad for your health and for the environment. Keep your indoor air quality as high as possible by:

  • Using eco-friendly wall paint: Paint is notorious for off-gassing volatile organic compounds, or VOCs, into your home. Plus, the production of conventional paint has serious environmental consequences. When it’s time to decorate, choose low-VOC paint, which is less harmful to the environment and your health.
  • Switching to non-toxic cleaners: Conventional home cleaning products often contain toxic chemicals that can end up in our natural waterways and poison aquatic wildlife. Consider buying non-toxic cleaners or using vinegar and baking soda to get the entire place sparkling clean.
  • Changing the HVAC filter: A dirty filter makes your HVAC system work harder, which uses more energy. Inspect your filter each month, and replace it when it’s dirty.

Conserve energy and lower your utility bills

The less energy you use at home, the better it is for the environment, and the lower your gas and electricity bills will be. Here’s how to conserve energy in your new home:

  • Maintain your furnace and A/C. Your HVAC system is responsible for a large portion of your home’s energy consumption. Keeping it in tip-top shape can reduce your costs and emissions. Each year, schedule professional service for your furnace and AC.
  • Install solar panels. Consider installing solar panels on your home. Solar power generates zero emissions during operation and cuts your electricity costs.
  • Invest in ENERGY STAR appliances. When something breaks, replace it with an ENERGY STAR appliance. These efficient models can help you use up to 30% less energy and avoid 77,000 pounds of emissions over the product’s lifetime.

Conserve water

Less than one percent of the earth’s water is available for human use, so conservation is up to everyone. Here are some ways to do it at home:

  • Install low-flow fixtures. These efficient fixtures can reduce your water usage by up to 30%. They’re easy to install, and they don’t affect the quality of your showers, the cleanliness of your dishes, or the force of your flush.
  • Run the shortest cycles on the dishwasher and washing machine. Unless your clothes or dishes are heavily soiled, the shortest cycle will get them clean and save a lot of water.
  • Re-think your lawn. Lawns are one of the worst offenders when it comes to environmental damage. Use less water and ditch the fertilizers and pesticides by switching to a low-maintenance xeriscape or native garden to help your local wildlife.

Finally get your household waste under control

Every year, the U.S. produces 12% of the world’s trash. With a recycling rate of just 32%, most of that waste goes to the landfill. There, it breaks down into methane, carbon dioxide, and other poisonous gases.

If you don’t already, start recycling. Other ways to reduce waste include:

  • Going paperless: Opt for paperless bill paying, invoicing, and receipts. Then, opt out of junk mail.
  • Composting: A backyard compost pile can dramatically reduce food waste. Food isn’t the only thing you can compost — toss in non-glossy paper, cardboard, natural fabrics, and wine corks.
  • Buying in bulk: Food packaging makes up nearly half of all municipal waste, and it ends up in waterways and inside wildlife as microplastics. To reduce your contribution, buy your food in bulk, and bring your own bags to the store.

Frequently Asked Questions

What is a carbon-neutral move, and how do I plan one?

A carbon-neutral move happens when you reduce and offset the extra emissions created by your moving activities. You can plan one by reducing waste, using reusable plastic crates, renting fuel-efficient moving vehicles, and taking fewer trips. It’s also helpful to book low-emission movers on the HireAHelper platform. To make up for the remaining emissions, consider buying carbon offsets.

Where can I find eco-friendly movers?

Use HireAHelper to research eco-friendly moving companies in your area. You can read mover profiles and reviews on our platform that often mention a company’s commitment to green moving and the services they provide. Other ways to find green movers include:

  • Researching individual moving company websites
  • Calling local movers to ask about their environmentally friendly practices
  • Contacting local sustainability groups for recommendations

As you compare moving companies, look for businesses that offer reusable rental crates, hybrid or biodiesel trucks, and paperless billing. Some movers also use route-optimization software to maximize fuel efficiency and cut emissions.

What moving companies offer eco-friendly moving options?

Moving companies that offer eco-friendly moving services include:

  • Gentle Giant Moving Company (reusable supplies, recycling, biodegradable materials)
  • U-Haul (rental crates, sustainable energy, box reuse)
  • Green Van Lines (crate rentals, tree planting)

You can also find sustainable local movers through HireAHelper. Look at the company description and reviews to find information about green practices and fuel-efficient fleets.

How can I find electric or biodiesel moving trucks?

If you’re booking labor-only movers through HireAHelper, you can plan a green move by renting an electric or biodiesel moving vehicle. Penske and Ryder rent electric cargo vans. For small moves, you might be able to get away with a large electric pickup rental from a regular car-rental company. Biodiesel rentals aren’t as common, so you’ll have to check with local providers in your area.

What are the most sustainable packing materials?

When you’re planning an eco-friendly move, look for packing supplies that can be reused — or, if necessary, recycled. Reusable items are a great way to reduce waste. Recyclables have fewer emissions than disposable items, but they’re not completely green. The most sustainable packing materials are:

  • Plastic packing crates or bins
  • Washable padding
  • Biodegradable or compostable packing paper and packing peanuts
  • Recyclable paper tape

How do I assemble a zero-waste moving-day kit?

As you build a zero-waste moving kit, make sure to include rental moving crates, sustainable labels, and reusable packing materials. Instead of traditional disposable cleaning supplies, look for containers you can refill and reuse. Build the crates at least 2 weeks before the move, and if they’re not in the budget, consider getting free boxes from Facebook Marketplace or local buy-nothing groups.

How do I set up recycling and composting after I move in?

Once you get to your new home, check the city website for details about curbside recycling. If that’s not available, find the nearest recycling and hazardous waste drop-off centers. If you’re planning to compost, build a slatted wooden bin in the yard. Alternatively, invest in a compact indoor composter if your new place doesn’t have outdoor space.

Moving Tips and Tricks From 12 Professional Organizers

Author:

Publish Date:

Last Modified Date:

Category: Moving Checklists & Planning

Tags: Tags: , , , , , , , , , , , , , ,

If you’re counting down to moving day and find your to-do list getting longer, some moving tips and tricks from a professional organizer can get you on track. We have tried-and-true strategies from a dozen experts to help you declutter, pack, and schedule a move. Read on for some practical pointers that make the whole moving process easier to handle.


Moving, Organization, and Stress

When you’re getting ready to move, the pressure comes from all directions. According to a HireAHelper report on the hidden health toll of moving, 55% of Americans said they found moving highly stressful. They cited reasons such as:

  • Financial strain (52%)
  • Packing (47%)
  • Logistics (39%)
  • Change in surroundings and routine (38%)

These stressors, along with the physical strain of moving, can take a real toll on both your body and mind. Respondents reported symptoms such as fatigue, burnout, anxiety, back injury, and joint pain during or after their moves.

Why Organization Is the Secret to a Smoother Move

It’s difficult to make a move completely hassle-free, but the reality is that disorganization makes things worse. The more chaotic things feel, the more likely you are to forget important details, make rushed decisions, and haphazardly throw things into boxes and hope for the best.


“Although you might think it’s easier to pack by item, like all bedding in one box, it’s actually better to go room by room when you pack…”


Check out our moving tips and tricks from professional organizers, designed to make moving feel less overwhelming. By using a moving checklist, clear systems, and a packing schedule, you can tackle your relocation purposefully and confidently every step of the way.


How Do You Get Organized Before Moving?

Getting organized for a move requires a project management approach. You’ll need to have lists and a solid plan to help you keep your sanity. Here are some tried and true steps given by Ellen R. Delap at Professional Organizer:

  • Start with developing a timeline for your move: Work backward to include key dates, such as when movers will load the truck, when packers will arrive, and when you’ll need to be out of the house during packing. Don’t forget to plan for decluttering, change of address, optional items you’ll sell or donate before the move, and other items coming out of storage for your move. Record this timeline in your planner.
  • Add team members to your project: It’s much harder to do this project entirely alone! Bring movers, packers, professional organizers, childcare help, and other resources on board. Be sure to add the cost of all these additional tasks to your budget.
  • Start decluttering at least 3 months in advance: One of the universal rules of moving is that the less stuff you have, the cheaper, quicker, and easier it is to move. You should allow yourself plenty of time to work through and eliminate what you don’t use or need at your new residence.
  • Keep your move organized with labels: Have plenty of markers available to write the contents on your boxes. Be sure to list what’s inside, where it goes, and whether or not it’s fragile. You can use numbers or color-coding to indicate which room it belongs in. Your movers will appreciate knowing that they can unload in the correct room without your direction because you’ve labeled the rooms and boxes.
  • Remember the “last-in, first-out” box, and your personal needs during this move: The last-in, first-out box should contain all the hardware for beds and the remote controls. These are vital to your happiness and routine during the first 24 hours in your new home. Your personal needs items include medications and comforting stuffed animals for your children that must be a part of your first night in your home.

How Do You Make a Schedule For Moving?

Although moving has been ranked as one of the three most stressful life experiences, a plan in place helps make things a lot easier. Lisa Zaslow at Gotham Organizers has been helping people with all aspects of moving for over 15 years, and here are some of her most helpful tips about creating a moving schedule:

  • Start with an old-school blank calendar: Even if your whole life is digital, there’s something about seeing your key dates on paper — starting with your move date and current commitments — that gives you a realistic overview of what to do when.
  • Search online for “move checklistfor a general sense of the steps involved: Most will have a 6-8 week plan. The checklist Zaslow uses with clients is 18 pages long to ensure nothing falls through the cracks.
  • Customize the checklist to reflect your needs and time frame: If you’re hiring movers and are relocating moving locally, there’s less to do. But if you’re if you’re planning to pack and move yourself and not use movers, there’s a lot more you have to take care of yourself.
  • Make appointments with folks who can help — from professional organizers to help manage your move and declutter, to movers, and even handymen for tasks like installing your TV and window treatments.
  • Block out time in your main calendar to work on your move.
  • Stick to your schedule and adjust as necessary. Plan for the unexpected!

By creating a realistic, comprehensive moving schedule, you’ll save yourself time, money, and aggravation and will feel in control of the process.

Pro tip: Unless your move is very small, it’s worth getting a free quote from movers. Hiring movers is usually money well spent.


How Do You Pack Kitchen Items?

Because there are a lot of heavy, expensive items in the kitchen, experts suggest you use small boxes when packing, to prevent any one box from becoming too difficult to lift. You should also label each box with the room — kitchen, dining room, or pantry — and the contents.

As you pack, pare down your kitchen items. Get rid of any gadgets that only do one thing (avocado slicer, banana saver, lettuce knife, etc.) or a crystal glass set you never use. Movers charge by volume and by how long it takes to move your stuff, and getting rid of these items can save you a lot in the long run.


“Use a small suitcase or duffel bag for each person’s clothes, accessories, school or work items, toiletries, and medications, plus… chargers, toilet paper, and a new shower curtain. Keep these items and all financial records safely with you during transit.”


Use up the food and pantry items you already have, and don’t buy anything in bulk for the last few months in your old house. If you come across expired foods and spices, throw those away as you pack, too.

Pack Your Kitchen in Phases

The kitchen and pantry are some of the places you use the most, so they tend to have a lot of important items you want to pack carefully. Give yourself time to do so, and follow this expert-approved timeline to make the process a breeze.

Up to 2 months ahead:

First, you should pack anything you know you don’t use regularly, like entertaining/party supplies.

If you’re moving far away, think ahead of time about who can use your extra food, toiletries, and cleaning supplies when you leave. Women’s shelters and other charities often take these kinds of things, even if they’ve been opened.

Up to 2 weeks ahead:

Pack up everything else in the kitchen by category, leaving out the bare essentials. You want to leave enough plates and glasses, napkins, and cups for your family to cook and eat for a day. Pack all but one pot and two pans, two dish towels, two sets of silverware, etc. Leave just the basics out, nothing extra.

The day before you move out:

Now’s the time to pack up these everyday supplies and food (if it’s a local move). Nonnahs at Get Organized Already suggests you label those boxes “Kitchen — OPEN FIRST,” so once you arrive in your new kitchen, you can open those and use the items inside to make do until you have time to unpack fully.


Tips for Packing Your Clothes

Like most aspects of moving, the best way to pack clothes is to begin with a plan. Amy Trager agrees and suggests the following:

“Before I pull anything out of the closet, I make a list of the specialty pieces I may need for where I’m going (e.g., exercise clothes, swimsuit, ski jacket). I also note if I need multiples, like 4 pairs of ski socks for 4 days of skiing.”

From there, you can think about how many days and nights of clothes you need, as well as things like underwear and accessories. You should also check the weather to see if you’ll need a heavy jacket or rain boots on hand.

There’s also the question of whether it’s better to fold or roll your clothing. Treager says that while she’s a “folder”, if rolling works better and avoids wrinkles, you’re better off with that method. She also mentions:

“Laying out the items in stacks or rolls also allows me to quickly assess whether I need a piece of luggage in a different size. Now that I’ve secured my clothes, I can snugly fit shoes, accessories, and toiletries in the space between clothing stacks and other pockets.”


What Order Should You Pack In?

Julie Bestry advises that you begin with the home areas that you use the least because you’ll have to live without these items from now until you have unpacked in the new space. Start with rooms you rarely use or are mainly used for storage, like:

  • Guest bedrooms
  • Rooms of children away at college
  • The basement, attic, and garage

Consider whether youreallyneed and want to keep the item. Keep a box marked “Donate” by the doorway, and any item that doesn’t make the cut for your new home should go there. As you pack, move carefully stacked, inventoried, and labeled boxes to one side so you can see your progress as items “disappear” and the boxes are filled.

“The earlier you start organizing and decluttering, the less likely you are to pay to move stuff you end up donating… You’re also more likely to get the dates you want with movers if you book them early.”

Instead of working on whatever area you’re nearest to at the time, it’s better to methodically move cabinet by cabinet, drawer by drawer, or room by room. However, because there may still be weeks (or more) until you move, you’ll need to consider where to keep an item until much closer to moving day, on top of deciding whether to move, donate, or discard it. Here are some more tips on what to pack and when to pack it:

  • If it’s winter: Pack the summer clothes and shoes from your closets.
  • In living or family rooms: Keep the TV and sound system, but pack up the books, puzzles, photo albums, and games.
  • In the linen closet: Pack everything except one change of sheets per bed and a few extra blankets.
  • In the kitchen: For your remaining time at home, pack whatever you can live without (e.g., gadgets, small appliances you rarely use, specialty supplies, and items).
  • In your home office: Pack all of your files in banker’s boxes, and pack office supplies you won’t need daily in a separate container. Box up financial files and essential documents related to the move separately to travel with you. Don’t leave them with the movers!
  • In areas you use most often: Envision what you’d pack if you were setting up a vacation cottage for just a few weeks. Only leave minimal cookware, enough supplies to prepare simple meals, and adequate silverware, plates, and glasses to serve your needs for your time away. Then, pack everything else, leaving only your imaginary vacation essentials unboxed until right before moving day!

While packing, if you find something in the “wrong” space, move it to the room that corresponds to where it will go in your new house.

Finally, the only things left to pack should be what you’ll need for the first few days in your new home. Use a small suitcase or duffel bag for each person’s clothes, accessories, school or work items, toiletries, and medications, plus a box of first-night essentials like chargers, toilet paper, and a new shower curtain. Keep these items and all financial records safely with you during transit.


The Top 3 Most Important Factors Before Moving

There are a lot of steps and tasks that go into moving, but here are 3 of the most important ones, and advice on how to tackle them, courtesy of Janine Adams at Peace of Mind Organizing.

1. Take Time to Declutter Before Moving

Moving is an excellent opportunity to declutter since everything has to be looked over and packed anyway. Ask yourself if you’ve used the item in the past year or if you have a place to store it in your new home.

If you don’t use it or, or you can’t easily store it, now’s a great time to let it go. You won’t have to pay or expend the effort to pack it, move it, and unpack it.

2. Organize Your Packing

If you’re packing yourself, group items that go together in a room into categories and pack them in the same boxes. That way, you can label each box with a category. For example, a kitchen box might also have the label “food storage containers.” That will make it easier to unpack in an organized fashion. Plus, if it takes you a while to unpack, you’ll be able to find the appropriate box if you’re looking for something.

If you hire movers to pack, take the time to group categories of items together before they arrive so that your boxes don’t contain a hodgepodge of stuff. Try to also label your boxes for the destination room (not the origin room) so that movers can get them to the right place in your new home.

3. Start Early

The earlier you start organizing and decluttering, the less likely you are to pay to move stuff you end up donating on the other end. Starting early also cuts down on stress and makes the move calmer.

You’re also more likely to get the dates you want with movers if you book them early. And if you’re hiring a professional organizing company or move manager to help, the earlier they get on board, the easier everything will be.


How Do You Pack Valuables?

Firstly, it’s all going to depend on what the valuables are. A good rule of thumb is that if you still have the original packaging for jewelry (or anything else!), use that. If any of your valuables are fragile, it may be worth hiring professionals to pack them. Here are some more tips on packing valuables from Julie Coraccio at Reawaken Your Brilliance:

  • Reduce paperwork: See if you can lighten your load of any physical paper you don’t need anymore. For example, if you have care instructions for valuables, can you scan them? Or, if you have a valuation and a scanned copy is enough proof, shred the physical paper.
  • Keep essentials close: You’ll want to keep valuables like medicines and prescriptions close and in an “Unpack First Night” box, or in your suitcase or toiletries.
  • Label by room, not content: If you can’t keep valuables close, mark the box by room instead of by content. For example, “Living Room” instead of “Antique Vase.”
  • Track your valuables: Keep track of all your valuables using a system. Take pictures and write descriptions and values. Consider an app like Sortly to keep track of everything.
  • Use a disc lock: If you’re using a packing cube or driving yourself, invest in a disc lock, as they’re a lot harder to break.
  • Add a tracking device: Use an inexpensive tracking device like Tile or TrackR so you’ll be able to know where your items are if you’re using a truck.

What Do You Unpack First at Your New Home?

According to Betsy Fein at Clutterbusters, necessity is always first when it comes to unpacking, so you should prioritize the rooms that you use daily. Think logically about the items you’ll need most to sleep, eat, and take a shower — all the essential activities you’ll need to do in your new home.Here’s how to set up the necessities:

  • Set up the bedroom: After a long day of traveling and packing, you are going to want a good night’s sleep in your own bed. Reassemble the bed frame, unpack your sheets, and make up your bed along with the pillows and bedspread. The rest of your bedroom items can wait.
  • Set up the bathroom: You’ll feel instantly at home if you get yourself settled into the bathroom. Hang a shower curtain, fill the medicine cabinet, and hang your towels.

How Many Days Before Moving Should I Start Packing?

If you’re packing yourself, you’ll ideally start as soon as you know you’re moving. But as far out as 3 months will make things easier (and cheaper) for you.

People often wait until the last minute and then get overwhelmed. Liz Jenkins at A Fresh Space recommends starting to pack non-essential items (e.g., holiday, guest room, sentimental items, decor) and storing them in the garage or a less frequently used space in the home.


“…[I]nstead of writing just the location of where [a box] is going to, you should write ‘Bathroom Shower Items’ or ‘Bathroom Under The Sink.’ This will make it easier to unpack those items in the new home.


Make sure to set aside and identify things you’ll need during the move (e.g., clothing, pet care, personal items, linens, chargers), and as the move date gets closer, start packing more and more.

By the time you are a few days out, the only things left should be furniture and a few bare essentials. This gives you space to deal with any issues or emergencies and reduces your overall stress of the move.


How Do You Move Perishable Food (i.e., Refrigerated/Frozen Foods)?

Take an Inventory of What You Have

Natalie Gallagher at Refined Rooms suggests that one month prior to your scheduled move date, create an inventory of the perishable food you have on hand throughout the house. Don’t forget the refrigerator in the garage and the deep freezer in the basement!

Create a Plan to Shrink Your Inventory

Your plan for dealing with perishable food will depend on a few factors:

  • Whether your move is local vs. long-distance
  • Whether you’re using a moving company

It’s important to understand that sometimes laws prevent movers from transporting perishable items. So, whatever you plan to move will need to be transported by you. Given these limitations, your goal should focus on reducing the volume of refrigerated and frozen food you have as much as possible before moving day.

With your inventory in hand, create a meal plan for the next few weeks that incorporates the food you want to consume. When you’re a week away from your move date, reassess what you still have and determine if anything can be given away to neighbors, family, or friends.

When you’re getting ready to move whatever you have left over, locate your portable coolers and make sure you have plenty of ice packs on hand.

Prepare Food for Move Day

On the morning of your move, set aside whatever food you need for breakfast, lunch, and dinner that day. If you’re moving locally, pack whatever food remains in your coolers with ice packs. If it’s a long-distance move, you’ll need to throw out whatever perishables remain.

With some planning, you can avoid wasting food (and money) during the move.


Is There a Packing System You Recommend For a Move?

There are a lot of systems and methods when it comes to packing, like color-coded labels and inventory lists. Here are some tried and true ways from Shanice Bannisat City of Creative Dreams to make sure everything ends up in the right boxes and the right rooms in your new home.

Make a Checklist of Your Items

A checklist is the one thing you need to prepare for a move, and it is the best way to remember everything you need and prevent items from slipping through the cracks. List all the things you need for your move, like purchasing boxes and tape or hiring movers. Include all the rooms that still need to be packed.

Don’t forget to add a list of what you need to do before and after moving, like any spaces in your home that need to be repaired or painted.

Color Code Boxes and Rooms

When it comes to packing systems, Bannis is all about setting up color-coding systems for each room, such as red for the kitchen, blue for the bathroom, yellow for the bedrooms, and so on. That way, when you start packing, you can tape the box with the corresponding room color. It doesn’t have to be the entire box, but enough to see where the boxes will belong.

By giving each room of your new home a designated color with tape or even a sign on the door, it makes it easy for your movers to put boxes in those areas.

Label Boxes by Room and Sub-Section

You can keep your labeling system simple with the name of where it will go, but it’s often more convenient to go with a little more detail. For example, for the bathroom, instead of writing just the location of where it is going to, you should write “Bathroom Shower Items” or “Bathroom Under The Sink.” This will make it easier to unpack those items in the new home.


Should You Pack by Room or Item Category?

Although you might think it’s easier to pack by item, like all bedding in one box, it’s actually better to go room by room when you pack, as advised by Julianna Poplin at The Simplicity Habit. It’s a great opportunity to move items that are in the wrong room to the room that they’ll belong to in your new home.

If you don’t have the same number of rooms in the new home, consider that as you label your boxes. Unpacking is much easier the more organized you are during the packing process.

Now you’re ready for moving day! Simplify your relocation and cut down on stress by following these moving tips and tricks from professional organizers. Consider making things even easier by hiring professional movers.


FAQs

How do I start organizing for a move?

Begin organizing your move with a moving checklist that breaks the process into manageable steps. Set deadlines for completing each task, such as scheduling movers, changing your address, arranging utility services, and packing. Decide if you’ll need help from family, friends, or professionals so you can coordinate their services in advance. Update your checklist as new tasks come to mind.

What’s the best way to pack efficiently?

Declutter first so you’ll have fewer items to pack.Then, stock up on moving boxes, packing tape, bubble wrap, and labels so you don’t have to run to the store in the middle of packing. Start with seldom-used items like seasonal decorations and then work room by room. Use towels and t-shirts to cushion items and save space, and label boxes clearly to make unpacking easier.

How early should I start decluttering?

Start downsizing your belongings about 6 to 8 weeks before your move. This enables you to sort through items thoughtfully and decide what to keep, recycle, or discard. You’ll have time to organize donations for drop-off at thrift stores, take recyclable items to local facilities, and arrange for curbside pickup of furniture and appliances.

What items will movers not move?

Ask your movers about their rules, but in general, a few things aren’t allowed on moving trucks. Dangerous or flammable items such as gasoline, aerosol cans, fertilizers, bleach, paint, and pool chemicals are usually prohibited. Alcohol, firearms, and marijuana may also be restricted. Perishable items like plants and food don’t hold up well in moving trucks. For your protection, keep sentimental or valuable items with you on moving day.

The Moving and Stress Guide: Statistics, Tips, and More

Author:

Publish Date:

Last Modified Date:

Category: Movehacks, Moving Checklists & Planning, Moving Day

Tags: Tags: , , , , , , , , , , , , , , , , ,

If you’re feeling overwhelmed by an upcoming relocation, keep in mind that moving stress is completely normal. Moving stress is so common that 55% of people rate the experience as “highly stressful,” and they rank it as worse to deal with than getting divorced or beginning a new job.

But why is moving so stressful? There are a lot of reasons, including the fact that the process comes with both physical and emotional challenges that put you and your entire household to the test. Not to mention the financial burden. With many Americans living paycheck to paycheck, adding in the cost of a move puts tremendous pressure on those responsible for the bill.

Thankfully, there are a lot of ways to make it easier on yourself. In this guide, you’ll find statistics, tools, and coping strategies to help you manage moving stress and make the transition easier.


Moving Stress Statistics

When moving stress starts to settle in, it helps to know that you’re not alone. Our research shows that relocating can put a significant strain on many people’s finances, health, and well-being. Here’s what the data says about the hidden health toll of moving:

How Stressful Is Moving?

  • 55% say that moving rates 7+ on a 10-point stress scale
  • 1 in 10 describe moving as traumatic or “crisis-level”
  • 53% say moving was more stressful than expected, while 22% say it was much worse
  • 31% would pay $10,000 to avoid moving again

Top Stressors of Moving

  • 52% cite finances as the #1 stressor
  • 41% report stress on household members, while 38% cite logistical chaos
  • 47% say packing is the most stressful task, followed by 42% for cleaning the old home, and 39% for handling logistics like utilities and movers

Mental & Emotional Health Impact

  • 55% feel overwhelmed because of their move
  • 50% report anxiety
  • 47% feel fatigued
  • 45% experience burnout
  • 37% struggle to sleep during a move

Women experience more intense stress symptoms than men, including:

  • 62% vs. 43% report feeling overwhelmed
  • 50% vs. 38% report burnout
  • 43% vs. 30% report irritability
  • 41% vs. 30% report difficulty sleeping

How Stressful Is Moving Compared to Other Life Events?

  • 29% would rather get divorced than go through another move
  • 36% would rather have a colonoscopy
  • 21% would prefer to lose their job

Why Moving Is So Stressful

Moving is particularly taxing because it affects every aspect of your life, from your job to your relationships. It disrupts major life factors, such as where you live and where your kids go to school, and minor things, such as where you shop for groceries. The process comes with logistical and emotional challenges for everyone.

The Logistics of Moving

Woman planning moving logistics in cluttered room filled with boxes and furniture

Moving is a puzzle that never seems to end. As soon as you decide to relocate, you’ll need to sell your home or get out of your lease. Movers are a great help — but before booking, you must choose a moving day that works for you, your current and future employers, and everyone in your household.

Moving also comes with a significant amount of administrative work. Depending on your situation, you may need to research new schools, disconnect and reconnect utilities, change your address, and update your insurance coverage.

Then, there’s the packing, which 47% of people say is the most stressful part of moving. And it’s no wonder why. You have to sort and declutter — and decide whether to sell, donate, or toss the extra items — before you can box up each room. The entire process can take weeks to complete.

The Emotions of Moving

Relocating can be an emotional experience filled with highs and lows. The prospect of new adventures and opportunities is exciting, but you might also be sad to leave friends and familiar places.

These intense emotions, coupled with the fear of the unknown, can add to the stress of moving. You might find your mood changing from one day to the next as you realize what it means to leave a comfortable home and job and start fresh.

Money challenges can be emotionally exhausting — for 52% of people, financial strain is the most stressful part of moving, especially when the move requires you to miss weeks or months of work. In fact, work interruptions are a major source of stress for 35% of men and 26% of women.

Moving Is Stressful for the Entire Household, Not Just Us

Mother comforting child about moving stress while sitting on couch in new home

When you’re moving with other people, you’re not the only one feeling the pressure of a relocation — it hits everyone in your household. Your kids might worry about changing schools and making new friends. Your partner could stress about money, finding a new routine, and supporting the family through the transition.

This fact — that your family is struggling — can be a significant source of stress for you. In fact, 41% of people say it’s one of the most difficult parts of moving. It’s normal to feel guilty or responsible, especially if you’re the driving force behind the move.

Compounding stress can cause issues in your relationships over the course of a move. If you’re like most people, stress can make you feel less patient or more easily irritated. It’s not surprising, then, that fighting with your partner is one of the biggest problems that come with moving.


Common Signs of Moving Stress

An overwhelming majority of people (95%) experience at least one negative stress symptom when they’re moving, but moving stress isn’t always easy to identify. It can manifest in a wide variety of ways, depending on your personality and your situation.

For some people, the symptoms of stress are obvious. They might feel more anxious or irritable than usual, or they might find themselves fighting with other people in the household. In some cases, feelings of overwhelm could make it difficult to make progress on packing and planning.

Signs of moving stress can also be subtle, showing up in seemingly unrelated areas of your life. For example, you might find that you’re having unusually intense dreams. Stress can also make you get sick — so if you’re down with the cold or flu, the move might be the cause.

Not sure if you’re dealing with stress symptoms? According to our research, these are the most common signs of moving anxiety and stress, and the percentage of people who report them:

  • Overwhelm – 55%
  • Anxiety – 50%
  • Fatigue – 47%
  • Feeling burnt out – 45%
  • Irritability – 38%
  • Difficulty sleeping – 37%
  • Decision fatigue – 30%
  • Stress dreams – 25%
  • Fighting with a partner or family member – 24%
  • Brain fog – 21%
  • Panic attacks – 19%
  • Getting sick – 13%

Who Feels Moving Stress the Most?

Moving stress affects people disproportionately based on lifestyle factors. For example, families with young children are very likely to feel high levels of stress during a move because kids come with a completely separate set of logistics. In addition to meeting their own needs, parents must find and vet new childcare providers, schools, play areas, activities, and doctors.


“To prevent a stressful last-minute rush, create a schedule as soon as you have a moving date… If you’re moving on July 1 and you think it will take four weeks to declutter and pack, for example, you should start at the beginning of June.”


People who relocate frequently, such as students and young professionals, can also experience intense moving house stress. Students constantly transition from their parents’ homes to school, which can be expensive and time-consuming. For young professionals moving to advance their careers, each transition requires a housing search and building a new social circle.

However, moving stress doesn’t necessarily ease up as you get older. Advanced professionals moving for jobs might have bigger salaries, but they may also be paying to move a family. And since the stakes are higher in terms of career and finances, they also have more riding on the new job.


Strategies and Tools to Reduce Moving Stress

The data is clear: moving in general is stressful. However, that doesn’t mean there’s nothing you can do about it. With the right strategies and tools, you can plan a move that’s easier on you and everyone in your household.

Keys to a Low-Stress Move

When it comes to figuring out how to make moving less stressful, the magic is often in the planning. By tackling the sources of stress proactively, you can enjoy a more relaxed experience.

1. Plan backwards from your moving date

There’s nothing worse than racing to pack the night before your movers arrive. To prevent a stressful last-minute rush, create a schedule as soon as you have a moving date. Estimate how much time it will take to complete each task — finding housing, packing, booking movers, cleaning your house, etc. — and work backwards.

If you’re moving on July 1 and you think it will take four weeks to declutter and pack, for example, you should start at the beginning of June. And if you’re anticipating an eight-week housing search, you should start looking at listings in April or May.

Mapping out the timeline this way can be an important reality check. It reminds you of how much there is to do and how much time each task takes, which helps prevent you from procrastinating. Taking action early and working gradually is the key to stress-free moving.

2. Divide the responsibilities of moving

Friends smiling while packing moving boxes together

If you have a partner, don’t try to collaborate on every moving task. Instead, consider your to-do list and divide the tasks fairly based on each person’s availability, skills, and interests.

Here’s the key: each person should take full ownership of the task. That means that if your partner is responsible for setting up new utilities, they’re in charge of all the decisions and scheduling. And if you’re in charge of the new lease, you should also make the deposit and find out about move-in requirements.

This strategy eliminates a lot of questions and discussions, which can reduce stress for both people. You don’t have to weigh in on when to connect the power in your new home, and your partner doesn’t have to remind you to ask about reserving an elevator on moving day.

3. Implement an organizational system for your move

Disorganization can make your move more chaotic, which increases stress. That’s where a system comes in — it collects important information and helps you stay on task.

As you start the process, create a folder on your computer or designate a physical container. Use it to store copies of all relevant documents: leases, utility contracts, real estate documents, HOA rules, truck rental agreements, and moving-company contracts. With everything in one place, you’ll know where to look when you forget the size of your moving truck or what day the internet service will be active.


“Money challenges can be emotionally exhausting — for 52% of people, financial strain is the most stressful part of moving, especially when the move requires you to miss weeks or months of work.”


While you’re at it, create an inventory of every item in your home. As you pack, number each box, and every time you put an item in a box, add the box number to your inventory list. This simple strategy eliminates the need to dig through multiple boxes when you’re hunting for the coffee maker or hair dryer.

Tools to Make Moving Easier

With the right systems and resources, you can take control of your move and cut down on stress at every stage.

  • HireAHelper’s moving checklist: Use this checklist to identify all the tasks involved in your move and build a schedule.
  • HireAHelper’s change of address checklist: This guide helps you make a list of all the organizations and institutions you’ll need to contact to change your address.
  • Apps and AI tools: Use ChatGPT or moving apps to help you create a budget, make a packing plan for your specific house size, make an inventory, and delegate tasks according to each person’s availability.

Emotional Coping Strategies During a Move

Once you’ve tackled the practical stressors of moving, it’s time to tackle the emotional challenges. Protecting your mental health before, during, and after the move can reduce stress for you and your family.

Use these coping strategies to manage your emotions when moving:

  1. Set time limits for decision-making: Decision fatigue can add emotional stress when you’re moving, so instead of agonizing about what to pack or donate, set a time limit. For example, you might give yourself 30 minutes to sort a box of items into keep, sell, donate, and discard piles.
  2. Outsource everything you can: Take a look at your to-do list, and outsource the tasks that don’t require your direct involvement. Instead of hauling your old couch to a thrift store, schedule a pickup or instead of running to the grocery store, get your groceries delivered. Your tasks will still get done, and there will be fewer demands on your attention.
  3. Stick to your schedule: When you’re in the thick of moving, it’s difficult to make time for a regular exercise class or happy hour with friends. Keep these engagements whenever possible — you’ll feel happy and relaxed as you go back to packing.

Professional Help That Can Ease Stress

Sometimes, the best way to reduce emotional stress is to bring in the professionals. If you’re starting to feel the pressure, you can hire professional movers to do the heavy lifting and driving. If there’s room in the budget, you can even add on a packing service for extra convenience.

Is the stress of moving starting to take over your life? Consider seeking professional mental health support. A therapist or counselor can help you work through the emotions and learn how to deal with moving in a healthy way.


Final Thoughts

Moving stress is normal, but it doesn’t have to get out of control. With comprehensive planning and the right support systems, you can make stress more manageable. The key to success? Anticipate common sources of stress and find ways to address them in advance.

If you’re dealing with moving stress, take heart — it’s uncomfortable but temporary. Once the move is complete, your life will likely return to normal. And when it does, you’ll enjoy the long-lasting benefits of an exciting new life chapter.

How Do I Pack Glass Plates?

Author:

Publish Date:

Last Modified Date:

Category: Packing & Unpacking, Pro Packing Guides

Tags: Tags: , , , , , , , , , ,

When it comes to learning how to pack plates for moving, you might view the task like a high-stakes Jenga puzzle. One wrong wrap, one careless stack, and suddenly your favorite dinner plates or heirloom china end up as pieces of heartbreak.

But don’t worry. Packing plates is easier than it looks, once you know the right techniques and tips. With the right materials and a step-by-step approach, you can keep your dishware safe whether you’re moving across town or across the country.

And that’s just what this guide aims to walk you through. We’ll cover the best materials to use, the safest wrapping and boxing methods, and extra precautions to take with glass plates and long-distance moves. We’ll even throw in some common mistakes to avoid, so your fragile items arrive in one piece.

Gather the Right Packing Materials

Before you start wrapping, make sure you have the right supplies on hand. Using proper materials can be the difference between broken dishes and a stress-free unpacking day.

Here’s what you’ll need:

  • Dish pack boxes: These are double-walled and sturdier than regular boxes, designed specifically for breakables.
  • Packing paper: Soft, ink-free paper cushions without leaving residue.
  • Bubble wrap: Ideal for delicate glass or fine china. It adds extra cushion as well as preventing scratches and chips.
  • Packing tape: High-quality tape to seal the box securely — you don’t want any part to collapse or open unintentionally.
  • Foam pouches or sleeves: A quick and easy way to protect individual plates.
  • Cardboard dividers: Helpful for added structure and spacing. Consider a dish saver packing kit.
  • Old towels or cloths: A great budget-friendly alternative to commercial padding for the bottom or top of the box.

Pro Tip: Avoid using newspaper to wrap your plates. The ink can smudge and stain your dishes, and it doesn’t provide nearly as much cushioning as proper packing paper.


Prep Your Plates Before Packing

Take the time to get your plates ready for safe packing. It’s only a few extra minutes, but it’ll help protect them and make the packing process faster.

  • Wash and dry each plate thoroughly: Moisture can lead to mildew and cause paper to tear. And any leftover food particles or dust can scratch surfaces when wrapped.
  • Sort by size and type: Group dinner plates, salad plates, and bowls separately. It’s easier to wrap similarly sized items together, and it ensures better weight distribution in the box.
  • Declutter before you pack: If you have chipped, mismatched, or rarely used plates, now’s a great time to donate or recycle them. No point in paying to move what you don’t use.

Getting organized before you grab the tape will save you time and maybe even a few bucks in moving supplies.


Step-by-Step: How to Pack Plates for Moving

Plates are one of the most commonly broken items during a move. Most break because they’re either packed flat or left loose in boxes. Follow these steps to keep them safe and snug:

1. Prepare the Box

Start with a sturdy dish pack box or reinforce a regular moving box with extra tape on the seams. Once your box is properly set up, line the bottom with 2–3 inches of crumpled packing paper, bubble wrap, or a folded towel to absorb impact from bumps or drops. If you’re using dividers, insert them now so you can slide plates into individual sections.

2. Wrap Each Plate Individually

How To Pack Glass Plates 8

First, place a plate in the center of a sheet of packing paper or bubble wrap. Then, fold each of the corners over the plate, wrapping tightly. For extra protection, use a second sheet or a foam pouch. You can also secure the wrapping with tape if needed, especially for slick materials like glass or porcelain.

3. Stack Plates Vertically

When setting your plates in the box, you should always place the wrapped plates on their edge, like vinyl records, not flat. This position distributes pressure better and reduces the risk of cracking. Keep stacks at 4 to 6 plates per bundle, and use packing paper or foam between each plate to add cushioning.

4. Fill Empty Gaps and Cushion the Top

Once your box is mostly full, you should fill any empty spaces on the sides with crumpled paper, towels, or soft linens. Then, add a final padded layer on top to keep anything from pushing the dishes down during the move.

5. Seal and Label the Box

Once everything is safely and securely packed, close the flaps of the box and seal it securely with strong packing tape. Don’t skimp here! Label it clearly with: “FRAGILE – Plates – This Side Up.” The last thing you want is for you or your movers to unintentionally flip the box with all the plates in it upside down, or put something heavy on top of it.


“If you have chipped, mismatched, or rarely used plates, now’s a great time to donate or recycle them. No point in paying to move what you don’t use.”


You should also list the contents on the box (e.g. 8 Dinner Plates, 6 Salad Plates) so you can quickly find your dishware when unpacking.


How to Pack Glass Plates or China Safely

Glass plates, fine china, and heirloom dishes deserve a little extra care and attention. These items are more fragile than standard stoneware and often irreplaceable. The steps are similar, but with a few key upgrades.

  • Wrap each plate in bubble wrap: Alternatively, use foam sleeves designed for dishes. For high-end sets, consider double-layering both.
  • Secure each bundle with tape: This prevents wrapping from coming loose in transit.
  • Stack fewer plates per box: Go with 3 to 4 per bundle, and use filler to absorb shocks.
  • Use the double-box method: Place your packed dish box inside a slightly larger box lined with crumpled paper or foam. This adds another layer of impact protection.

Pro Tip: Glass and china are heavy. Packing fewer items per box means more boxes, but it reduces the chance of breakage and keeps the weight of each box low.


Extra Packing Tips for Long-Distance Moves

Moving across town is one thing, but if your plates are going across the state (or country), you’ll need to take a few extra steps to make sure they can handle the extra distance.

  • Use more padding: Longer trips mean more bumps. Double-wrap plates or add extra cushioning between layers.
  • Avoid packing plates with other heavy items: This includes small appliances or cookbooks. These items can shift and crack even well-packed dishes.
  • Don’t overpack boxes: Try to keep each dish box under 40 pounds to prevent crushing or tearing in transit.
  • Ask your moving company about fragile box policies: Some movers won’t guarantee protection for owner-packed fragile boxes, especially glassware.

If you’ve hired professionals to help you move, you might consider adding a packing service. Make sure you know what they charge and what happens if items get damaged, just in case.


Common Mistakes to Avoid When Packing Fragile Items

Even with the right materials, a few simple mistakes can put your plates at risk. Here are the most common ones:

  • Stacking plates flat: Always pack plates on their edge. This helps them absorb pressure and shock better.
  • Leaving empty space in the box: Any gaps can cause shifts during transit. This leads to cracks and chips from the plates knocking into each other or into the sides of the box. Fill every inch with crumpled paper or soft material.
  • Using oversized or flimsy boxes: Plates need strong, compact containers to prevent collapse or tipping.
  • Overloading the box: It might seem easier to pack every plate you own into one box, but that’s a recipe for disaster (and back strain).
  • Forgetting the “Fragile” label: Movers won’t know what’s inside unless you tell them. Consider using pre-made sticker labels to mark which boxes should be handled with extra care.

Skip these mistakes and give your plates the best chance of making it to your new home in perfect shape.

What Should You Pack First When Moving?

Author:

Publish Date:

Last Modified Date:

Category: Moving Advice

Tags: Tags: , , , , ,

The short answer to what you should start packing first is to pack things you don’t use daily. If it can sit in a box for a few weeks without disrupting your routine, it can be packed early. Items in garage storage, off-season clothes or decor, and kitchen tools you rarely touch are all good candidates.

With an entire home to box up, knowing where to begin can feel overwhelming. That’s why starting with a plan can make all the difference. This guide walks you through what to pack first when moving, what to save for last, and when to start so your move feels less chaotic from beginning to end.


What to Pack First When Moving

A well-paced packing plan helps you stay organized and avoid last-minute rushing that can lead to errors, panic, or lost items. Start packing for your move using the timeline below.

8 Weeks Out

Bikes, sports equipment, several backpacks, a cooler, and sleds are all set against or hung on a garage wall

  • Garage, attic, and basement items
  • Holiday decorations
  • Off-season sports gear
  • Camping equipment
  • Storage closet contents
  • Unused or decorative furniture

Start with anything literally collecting dust. Label your boxes clearly and consider packing items in plastic bins if you plan to store them long-term once you move into your new home.

Also, evaluate items as you pack. If you haven’t used something in a year or more, consider donating or selling it to make room for other items. The less you have to pack and haul, the more time and money you can save on your move, so decluttering is an important step.

4 Weeks Out

  • Guest room linens and pillows
  • Out-of-season clothing
  • Spare bedding or towels
  • Fragile items that need extra care
  • Heirlooms and sentimental items

A good tip is to combine spare linens with fragile items, wrapping breakables in extra towels or pillowcases to save on bubble wrap or packing paper. You should also pack clothing by season so you don’t have to pull every box out at once just to find what you need for the current weather. Instead, you can unpack clothing throughout the year.

2 Weeks Out

  • Books, wall art, and knickknacks
  • Decorative mirrors and lamps
  • Linen closet contents
  • Exercise equipment
  • Furniture like nightstands or accent chairs that you can do without for a few weeks

When possible, take large items like furniture and exercise equipment apart for easier storage and transport. As you do this, make sure you put all the hardware for each piece in its own bag, then label and tape it to the item for more convenient reassembly. It also helps you keep track of these items, so you’re not scrambling to find a missing screw when trying to put your couch back together.

1 Week Out

Parents help their young child put some of their toys into a cardboard box

  • Kids’ toys and board games
  • Art supplies and hobby gear
  • Less-used bathroom items
  • Shoes and off-rotation clothes
  • Laundry room extras
  • Home office furniture and accessories — if you can continue working without them

At this point, your house really looks like you’re moving and not just decluttering. Consider packing a suitcase for everyone in the family with clothing and essentials during this week.

Assign a small laundry basket to each person for toys and other items used during the last few days in your home. This helps everyone keep track of belongings, and it’s easy to grab the laundry basket on moving day.

2-3 Days Out

  • Kitchen essentials
  • Primary bathroom items
  • Plants
  • Valuables and important documents

Pack high-priority items in clear totes or small boxes with descriptive labels so you can get to them easily and quickly. Be sure to set aside anything movers won’t transport, like flammables, pesticides, cleaning/pool chemicals, and perishables — you’ll need to transport those yourself.

Moving Day: What to Pack Last When Moving

Medications, personal items like your toothbrush and deodorant, and nonperishable foods are some of the last things most people pack. Moving day essentials, like a change of clothes or a first aid kit, should also be packed last.

Make sure you keep this on you and in your own vehicle as you make a final trip from your old house to your new home.

When Should You Start Packing to Move?

You should start packing about 8 weeks ahead of your move. This gives you time to work in stages. If you’re hiring packers, you can plan ahead, but begin later.


“You should also pack clothing by season so you don’t have to pull every box out at once just to find what you need for the current weather. Instead, you can unpack clothing throughout the year.”


Long-distance moves require extra prep since leaving items behind isn’t an option. The more distance, the more lead time you’ll need.


How to Start Packing to Move

The best way to start packing for a move is with a checklist. If you have goals, a timeline, and a process for taking inventory, this really reduces the chance for last-minute scrambles and stress.

Knowing what to pack first is only part of a strong plan, and the earlier you get started, the more time you have to take things at your own pace and recalibrate in case something goes wrong. Thankfully, you can use our moving checklist to help you create a comprehensive plan to support a smoother, lower-stress move.

How to Organize Your Move: A Complete Guide

Author:

Publish Date:

Last Modified Date:

Category: Moving Advice

Tags: Tags: , , , , , , , , ,

Moving is a notoriously stressful undertaking, with seemingly endless logistics, to-dos, and boxes, but a little organization can go a long way and turn the chaos into calm productivity. In the following guide, we’ll walk you through both the big-picture strategies and small-but-mighty tips for every stage of your move so you can keep everything under control from start to finish.


Step 1: Declutter Before You Do Anything Else

A woman organizes clothing into three boxes labeled discard, donate, and keep in order from left to right

When it comes to moving, less is, well, less — less to pack, less to lift, and (probably the best part) less to pay.

So before you even think about collecting moving quotes or picking up the packing tape, take the time to declutter. Get started with the usual suspects: expired pantry items, worn-out linens, duplicate kitchen tools, and clothes that haven’t seen the light of day in years. Then you can move on to seasonal and less-used items, until finally you’re packing up everything except the things you need immediately for moving day.

Pro tips:

  • Start early — ideally a month before your move for a local move, and two months before a long-distance move.
  • Use up perishable food and open household products before Moving Day.
  • Set up simple “donate,” “sell,” and “toss” zones to stay organized as you sort.

Need a hand deciding what should stay and what should go? Our decluttering guide has your back.


Step 2: Choose Your Packing Strategy

A woman kneels in the middle of a room filled with moving boxes. She's carrying a clipboard and there's a thoughtful expression on her face.

Before you start packing, take a moment to decide how you want to go about it. Picking a strategy upfront not only makes the packing process smoother, but it will make unpacking a lot easier.

You have two main options at your disposal:

Room-by-room packing: As the name suggests, this approach involves packing up everything in a room, one room at a time. As you go along, label your boxes with the room name (e.g., “Living Room,” “Master Bed”) as well as contents (e.g., “Office—Files”). It’s simple and intuitive, and makes it easier to unpack, especially if your next home will have the same number of rooms and you want to keep the same stuff in each room.

Category-based packing: Packing your items by category (e.g., “Electronics,” “Books,” “Toiletries”) usually involves a bit more planning as well as careful labeling during the process.


“If you’re moving long distance, take your first steps at least eight weeks prior to your moving date. For a local move, aim to get started at least six weeks in advance.”


It’s ideal for moves where a simple room-by-room translation isn’t possible because you’ll be downsizing, upsizing, or reconfiguring your layout.

Whichever method you choose, just make sure to stick with it and that everyone who’s helping is on the same page.

Pro Tips:

  • Create a shared packing checklist if multiple people are helping with the packing. This way, you can avoid double work or missed items.
  • Set aside essential items for the final days in your current home and the first days in your new place. Think: toiletries, toilet paper, a few days’ worth of clothes, linens, towels, shower curtain and rod, coffee maker and coffee, mugs, pet food and dishes, medications, laptop, and charger.

For more tips, check out our guide on how to organize packing for a move.


Step 3: Label Like a Pro

a woman labels the side of a box with a permanent marker

Labeling means less stress on moving day and in the weeks that follow as you unpack your things. While it may feel like a chore in the midst of all the packing chaos, your future self will thank you for taking a moment to clearly label your boxes.

Here are three labeling styles we recommend:

  • Color-coded labels by room: Assign a color to each room and use matching labels or tape for every box.
  • Numbered boxes with a master inventory: Keep a running list, in a notebook, spreadsheet, or app, of what’s in each numbered box. This makes it easier to track down specific items if you need to find something fast, and it can come in handy for insurance purposes.
  • Short written summaries on each box: Make quick notes on labels or directly on the box specifying both the room and items in the box (e.g., “Guest Bath—Toilettries”). This one can be combined with the techniques above.

Supplies you’ll need:

  • Lots of markers
  • Pre-printed labels or washi tape
  • A notebook and pen, or a mobile-friendly app (like Sortly, Google Sheets, or Notes) for inventory tracking

Pro tips:

  • Pick a labeling style and stick to it.
  • Label all sides of your boxes, as you never know which side will be facing out in the truck or in your new home.
  • Label as you pack (don’t save it for later)

For more details on how to label boxes for your move, check out How to Color Code Boxes for Moving.


Step 4: Appoint a Moving Day Coordinator (It’s Probably You)

A woman directs movers where to put some boxes

As with anything, moving runs smoothly when someone is in charge. Chances are, that someone is you.

Some of the duties of this Moving Coordinator include:

  • Directing movers or helpers to the items that need to be loaded on the truck, and letting them know where the bathroom and water can be found
  • Making sure everything goes into the right rooms upon arrival in your new home
  • Fielding last-minute questions and resolving any issues that may come up

Pro tips:

  • Tape signs/colored labels or tape to the doors of your new home. This way, everyone will know exactly where to go without having to ask.
  • Create a moving day kit, complete with a clipboard, extra markers and packing tape, water, snacks, phone chargers, and anything else you need to keep everyone energized and everything under control.

Step 5: Unpack Systematically

A couple happily unpacks a box labeled "kitchen" in their new home

With Moving Day behind you (finally!), it’s time to settle in and unpack.

Prioritize the areas you’ll need up and running first — the bedrooms and bathrooms, the kitchen, and if you work remotely, your home office or workstation.

While you may be tempted to tear into every box, it’s best to unpack one room at a time so you don’t end up overwhelmed by the disorder of half-unpacked spaces.

While there’s less finesse needed with unpacking than with packing your stuff, there’s still an art to it, so make sure to check out our guide on How to Unpack.


Bonus Tips: Best Way to Organize a Move

Before the to-dos and the boxes start piling up, here are a few extra tips from our pros to help save you some headaches and hassles down the road.

  • Make a “moving binder” to keep your checklist, moving quotes, receipts, travel maps, and other important documents in one central place.
  • Put reminders on your calendar for key tasks during the moving process, such as transferring your utilities and arranging mail forwarding.
  • Digitize your important documents and back up all your digital files.
  • Pack essential items in clear plastic moving bins to keep them easily visible and accessible.
  • Before unplugging, take photos of complex electronic setups.
  • Keep your essentials, valuables, and important documents (like birth certificates and Social Security cards) on you during the move.

Stay Organized with HireAHelper

No matter how much you prepare, no move is perfect. But by staying organized, you can keep stress levels minimal and make the entire experience a lot less overwhelming. While it may seem like a lot of time and energy, you can rest assured that all that effort will pay off in the long run with a smoother moving experience.


Create a shared packing checklist if multiple people are helping with the packing. This way, you can avoid double work or missed items.


At HireAHelper, we make it easy to stay organized with our moving resources and curated hub for vetted moving help that lets you compare movers with ease. Check out our moving blog or get a fast, easy quote today to get started.


FAQs

How do I organize myself for a move?

To stay organized for a move, start planning as early as possible. If you’re moving long distance, take your first steps at least eight weeks prior to your moving date. For a local move, aim to get started at least six weeks in advance.

A detailed moving checklist will serve as your primary guide. Make sure to declutter your home before you start packing so that you have less to pack and less to move (not to mention, less to pay). Begin the process as early as you can, and make sure the first things you store in boxes are your off-season and less-used belongings.

Continue to follow the steps on your moving checklist one at a time, and you’ll be sure to stay on track.

How to pack for a move efficiently?

To pack your belongings as efficiently as possible, make sure to start the process by donating, selling, recycling, or tossing items you don’t need to bring with you. This can significantly cut down on packing time and your final moving costs.

Then pack up your home room by room and label boxes clearly with the room name and a list of boxed items.

Finally, keep essentials in their own separate box (or boxes) so that you don’t have to dig through mountains of boxes to find your laptop charger or coffee maker on Moving Day.

How long before a move should I start packing?

For a local move, it’s best to get started 4–6 weeks ahead of time. For longer-distance moves, such as out-of-state or cross-country relocations, aim to start planning 8 weeks in advance. Get started by getting rid of stuff you don’t really need or want to bring along, then begin packing non-essentials. Gradually work your way toward daily-use items as Moving Day approaches.

See prices for local moving labor. Read real customer reviews. Easily book your help online.

How To Color-Code Boxes for Moving

Author:

Publish Date:

Last Modified Date:

Category: Moving Advice

Tags: Tags: , , , , , , ,

Here’s a scenario: You’ve woken up the day after moving and would love nothing more than a cup of coffee, but your kitchen is filled with half a dozen boxes, and you have no idea which one your Kurig or mugs are in. Not an ideal start to living in your new home.

If you want to avoid the nightmare of digging through mystery boxes, you need a good labeling system. That’s why more and more people are learning how to label moving boxes using a color-coding system.

In this guide, we’ll give you detailed instructions on how to color-code boxes for moving. Whether you’re relocating to a five-bedroom family home or packing up a studio apartment, this method is easy to learn and worth the effort.


Color-Coded Moving System

A color-coded moving system is a visual organization strategy that uses colors—usually on color-coded moving labels, tape, or stickers—to designate where each moving box belongs.


Avoid marking the tops of boxes, as the labels will be hard to see when boxes are stacked in the moving truck.”


Instead of squinting at scribbled notes or opening every moving box to figure out its destination, you (and your movers) can instantly spot where things belong.

Here’s a quick step-by-step guide:

  1. Gather your supplies
  2. Assign a color to each room or zone
  3. Use numbers for boxes in each color category
  4. Mark the boxes
  5. Create a detailed legend
  6. Inform your crew
  7. Create signs to help guide your crew
  8. Dedicate a zone for unloading or furniture building

an example of a color-coded packing key. Different colored tape is assigned a different room, such as red for the kitchen and one patterned with bicycles for the playroomHow It Works

The idea is simple: Assign a unique color to each room or zone, mark every box with that color, and use labels on the boxes and signs around your home to match each box to its destination.

For example:

  • Blue = Bathroom
  • Yellow = Kitchen
  • Green = Living Room
  • Orange = Bedroom 1

To stay even more organized, add numbers or item lists to your color-coded boxes to make them easier to identify and track.

Many professional moving crews, especially those working on large-scale or multi-day moves, use some form of color-coding boxes for moving. It helps them streamline unloading, avoid misplaced items, and keep everything efficient.

That said, not every moving company offers a color-coded moving system by default. The good news? You can create your own method to label moving boxes for a smoother move. If you’re booking through HireAHelper, you can easily communicate with the movers on our platform to let them know your setup before moving day. They’ll take it from there!


Step-by-Step: How to Color-Code Boxes for Moving

Now, let’s take a detailed look at how to create a color-coded moving system that’s efficient and easy to follow. This breakdown will help you avoid confusion, save time, and make unpacking way easier.

Step 1. Gather Your Supplies

An array of colorful masking tape rolls in a box

You’ll need the following to create a color-coded moving system:

  • Brightly colored duct tape or masking tape: It’s durable and comes in a wide range of colors.
  • Labels or large color-coded stickers: Choose stickers big enough to spot at a glance. Preprinted room labels or large blank labels you can write on work best for visibility and quick sorting.
  • Permanent markers: Use bold, quick-drying markers like Sharpies. Chisel tips are great for big, visible labels. For darker-colored tape, go with metallic or paint markers so your writing stands out.
  • Clear Packing tape: Use this to securely seal your boxes. It also works well over labels and stickers to keep them from peeling or getting smudged during the move.

Step 2. Assign a Color to Each Room or Zone

Each color should indicate a zone or room in your new home. You can use tape, stickers, markers, or all three. If you’re using tape and have more rooms in your home than there are colors in the rainbow, don’t worry. Patterned tape works well and can be found in many craft stores. Look for bold patterns that are easy to identify, like stripes or polka dots.


“Let your moving team know about your color-coding system ahead of your move. You could share a hard copy or photo of your legend along with any additional instructions.”


Washi tape is also an option and comes in hundreds of colors and patterns, but you may need to use more than one “row” of it to get the same thickness as other kinds of tape.

Step 3. Use Numbers for Boxes in Each Category

Take the color-coding process to another level by adding numbers and the contents to each box with a marker or sticker. This helps you create a detailed legend that streamlines your move and doubles as inventory.

A cardboard box has a piece of blue tape on its side labeled clearly "shower stuff"
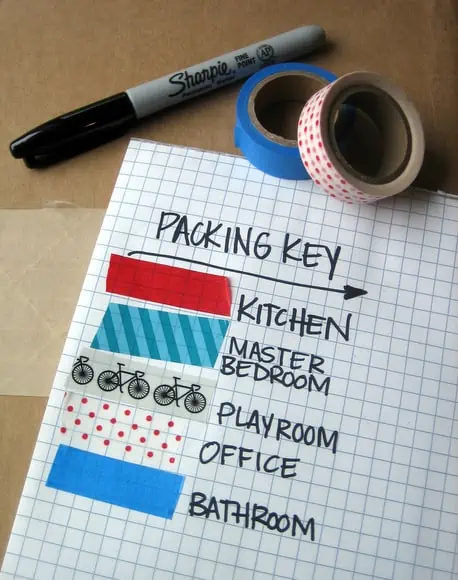
For example, if the kitchen is labeled yellow, you might number your boxes Yellow 1 through Yellow 6. Yellow 1 could contain dishes, while Yellow 2 holds pantry items. This way, you’ll know exactly what’s in each box at a glance, and it’ll be easier to notice if a box is missing during unpacking.

Step 4. Mark Your Boxes

Once you’ve assigned each room or zone a color, you can start packing and marking your boxes room by room. To clearly label each box with its designated color, add a piece of duct tape on each side, or label it with a colored marker or sticker. Avoid marking the tops of boxes, as the labels will be hard to see when boxes are stacked in the moving truck.

To stay extra organized, include a short list of contents on each box or add an additional label with item details. This helps during unpacking and makes it easier to spot missing items.

Step 5. Create a Legend for Your Movers

Create a clear legend to explain your color-coding and numbering system to your movers. If you’ve assigned numbers to boxes, be sure to include them in the legend alongside the color-codes. Place the legend in a visible spot, such as near the front door, so everyone can easily reference it on moving day. Keep it simple and easy to understand for a smooth moving process.

Here’s an example:

Color Room Boxes
Yellow Kitchen 1-6
Blue Bathroom 7-10
Green Living Room 11-19
Orange Bedroom 1 20-24

Step 6. Inform Your Crew

Let your moving team know about your color-coding system ahead of your move. You could share a hard copy or photo of your legend along with any additional instructions. Providing this information in advance helps ensure everyone is on the same page and increases efficiency. If friends and family are helping you with the move, send them a copy, too. Even better, get them to help with the packing!

See prices for local moving labor. Read real customer reviews. Easily book your help online.

Step 7. Create Signs to Guide Your Crew

Provide coordinated signs around your home to help your movers place your belongings in the right place in your new home. For example, if you’ve assigned the kitchen the color yellow, write “kitchen” in yellow marker on a piece of paper and tape it above the kitchen door. Visual cues like this can help streamline your move by reducing confusion and speeding up the unpacking process.

Step 8. Dedicate a Zone for Unloading or Furniture Building

Assigning an unloading and furniture-building zone prevents clutter, keeps walkways clear, and speeds up assembly. It protects your space and helps everyone know where to focus their efforts. Having a dedicated area makes the move-in process safer, faster, and way more efficient.


Benefits of Using a Color-Coded Moving System

Color-coding moving boxes streamlines the move-in process by visually indicating the contents and destination of each box, leading to faster and easier unloading and organization.

Here are some of the benefits of color-coding your move:

  • Faster loading and unloading
  • Fewer misplaced boxes
  • Less confusion for everyone involved
  • Easier unpacking (you know where things are and where they go)
  • Built-in inventory system if you number your boxes
  • Less stress on moving day

It’s also a win for your moving team. Instead of constantly asking where each box belongs, they can follow your signs and focus on getting the job done.

Whether you’re moving across town or the country, learning how to color-code when moving is one of the easiest ways to take control of your move and make the whole process smoother.

Do you need help packing, too? Hire packing help through HireAHelper, and let vetted local pros take care of it for you. We can connect you with the ideal moving company that fits your needs and budget.

How to Pack a Moving Box Like a Pro: The Basics

Author:

Publish Date:

Last Modified Date:

Category: How To Pack

Tags: Tags: , , , ,

Packing is arguably the biggest part of any move. Learning how to do it like a pro saves time, reduces stress, and lowers the risk of damage to your belongings. Here’s the process broken down into six simple steps:

  1. Gather your supplies
  2. Tape the bottom of the box
  3. Wrap fragile items
  4. Completely fill the box (no empty spaces!)
  5. Close the box with tape
  6. Label your boxes

Of course, there’s a lot more to it than this overview. Keep reading for the ultimate guide on packing moving boxes—from finding the right supplies to knowing when to start—so you can get your move off to the right start.


How Long Before a Move Should I Start Packing?

Packing is the single most time-consuming part of moving, so starting early is the easiest way to cut out the stress and hassle. Most households should start packing at least one to two months before the planned move.

That sounds like a long time, but once you start, you’ll realize how much time the whole process really takes.


“…it’s a good idea to construct [boxes] from the bottom up, especially if [they] came pre-printed with ‘THIS SIDE UP’ messages. This way, people helping you move don’t unintentionally flip your items over and damage them during the move.”


Two months before your move, it’s a good idea to start gathering supplies and decluttering. Gather the things you don’t want or need anymore and either sell, donate, give away, or dispose of them. Then, prioritize what you pack based on how often you use each item. Start packing non-essentials like books, seasonal items, or rarely-used goods. In the last few weeks before your move, start packing up more frequently used items, leaving daily-use items for the last few days.


Gather Your Supplies

stacked boxes are in the background behind a chair wrapped in shrink wrap and tape

While you can make do with just a few basics in a pinch, having everything you need while packing tends to make the process quicker and easier. Check out and stock up on these commonly used packing supplies.

  • Moving boxes (opt for various sizes and consider specialty sizes like TV boxes or wardrobe boxes)
  • Moving blankets
  • Permanent markers (choose oversized tips so any writing is easy to see at a glance)
  • Labels
  • Packing tape (with a packing tape dispenser for easy use)
  • Packing paper
  • Bubble wrap for fragile items
  • Shrink wrap for your upholstered furniture (if needed)
  • Scissors and box cutters
  • Tools to disassemble furniture or items

1. Choose the Right Moving Boxes

You can often get your hands on free boxes through community forums or at various retailers.

However, new, high-quality boxes also provide you with peace of mind, knowing they’re structurally sound and ready to live up to the job.

While shopping, think beyond the usual small, medium, and large boxes. Commonly used specialty boxes include:

  • Flat panel TV boxes: TV boxes protect your flat-screen television from damage. They include inserts to cushion the device and come in a range of sizes for a snug fit
  • Bankers’ boxes: Books and paper can get heavy quickly. Bankers’ boxes are small, stackable, and easily organized. Plus, they feature handles and lids for easy moving
  • Wardrobe boxes: Skip folding and wrinkling all your hanging clothes by putting them into a wardrobe box. They have a bar across the top, allowing your clothes to hang just like they would in a closet
  • Dish boxes: While you could use regular boxes for your plates and glasses, dish and glassware boxes include cardboard dividers for extra protection while maximizing usable space
  • Mattress boxes: Mattress bags don’t provide the same degree of protection as boxes. A box helps keep your mattress clean while in a moving truck or when it’s moved around outside

See prices for local moving labor. Read real customer reviews. Easily book your help online.

2. Get LOTS of Packing Tape

Packing tape is just as important as boxes when moving, and you’ll likely need more than you initially estimated. Generally speaking, moving a small apartment tends to use up three to four rolls of tape. A larger house might use five to seven.

Pro tip: Duct tape is not nearly as good for moving boxes as packing tape. It doesn’t stick well to cardboard, resulting in a weaker seal, which means your belongings are in danger of damage from falling out of the boxes.

3. Select the Right Packing Material for the Job

various types of packing material like peanuts and paper in boxes

Packing materials come in so many varieties for a reason, and it’s likely you’ll need several different ones during your move. While you can get by with free or cheap materials in a pinch, like using towels to wrap your fragile items, there are plenty of reasons to have specialty moving supplies on hand.

  • Packing paper: Crumpled pieces of packing paper can be stuffed into tight gaps to immobilize items inside your box. While it’s more eco-friendly than plastic bubble wrap, it’s generally not as cushioning
  • Bubble wrap: Bubble wrap surrounds your fragile items to prevent scratching or breaking. Choose larger bubbles for items you’re worried will bang around and smaller bubbles if your main concern is scratching
  • Foam sheets: Placing foam sheets between your dishes is a great way to protect them. When held in place and padded, dishes are less likely to get broken in a move
  • Packing peanuts: Packing peanuts are fantastic for electronics, glass figurines, and other delicate items. They fill empty spaces well, and their rigid structure keeps them from compressing like paper does. However, unless you specifically get the biodegradable kind, they are one of the least eco-friendly options

4. Invest in Labels

Unless you like surprises, it’s highly recommended that you label your boxes as you pack them so you can find and place items quickly after a relocation. At a bare minimum, have some large-tipped permanent markers on hand so you can write down what’s in each box and which room it should go to.

For a more streamlined experience, color-code your boxes with tape in different shades. You can designate a color to a corresponding room—for example, red for the kitchen, blue for the bathroom, etc. Then, on the strip of tape, write down what’s inside with a permanent marker.

5. Have Cutting Tools on Hand

You need a way to cut through tape as you build boxes and while unpacking. Scissors work fine to cut tape, but a packing tape dispenser often speeds up the process. Avoid using scissors for re-opening a closed box, though! They’re inefficient and increase your likelihood of injury. Opt for a box cutter instead.


Tape the Bottom of the Box

A person tapes the bottom of a box with tan colored packing tape on a roll

While there’s rarely a structural difference between the top and bottom of a moving box, it’s a good idea to construct them from the bottom up, especially if your boxes came pre-printed with “THIS SIDE UP” messages. This way, people helping you move don’t unintentionally flip your items over and damage them during the move. While you can fold the box into shape, taping the bottom is what actually keeps it secure. Follow these four easy steps for constructing your boxes:

  1. Unfold your box into a cube and flip it upside down. The bottom flaps should be at the top
  2. Fold the bottom flaps down flat, starting with the shorter flaps first, then the longer ones
  3. Apply packing tape down the middle seam. Make sure each end extends 2 to 3 inches along the side of the boxes for extra security
  4. Apply tape across the edges perpendicular to the middle strip. This step helps reinforce the corners and improves overall stability. For heavier boxes, include extra tape to better reinforce the box’s seams

Wrap Fragile Items

A woman wraps a mug in thin packing foam before putting it in a box

Fragile and valuable items should be carefully wrapped to improve their chances of arriving in your new home safely. Jewelry like necklaces and dangly earrings, for example, can easily tangle in transit and create quite a hassle the next time you go to wear it.

Items That Benefit from Wrapping

Make sure you wrap fragile items like:

  • Glassware and glass figurines
  • Porcelain
  • Ceramic
  • Dishes
  • Heirlooms and prized items
  • Jewelry

Best Materials for Wrapping Fragile Items

Not sure if you can use the same packing materials for your fragile items and collectibles as you can for your appliances and books? In general, you can! Here are some to use to keep your delicate belongings safe:

  • Bubble wrap: Bubble wrap is ideal for cushioning irregular items. However, it can get expensive if you need a lot of it.
  • Plastic shopping bags: If you have a collection of plastic shopping bags, consider using them to wrap up items you’re concerned will get scratched in transit. However, several states and cities have banned free plastic bags, so you might not find them as readily as before
  • Newspaper: Newspapers and classified ads that come in the mail can be a low-cost way to pad your items. They’re also great for adding bulk in void spaces. However, the ink can sometimes rub off onto items in transit, so be careful what you choose to wrap with it
  • Foam sheets: Foam sheets are great for protecting dishes and other flat, fragile items that stack in boxes. However, they’re not particularly eco-friendly

Don’t forget to tape any wrapping down so it doesn’t unfold or fall off while packing or in transit.


Completely Fill the Boxes

The best way to pack boxes for moving is to avoid any empty spaces. Regardless of how heavy or light the items are, gaps inside the box let things shift around, increasing the likelihood of damage during the move. So how do you fill the space? You’ve got plenty of options!


“You can often get your hands on free boxes through community forums or at various retailers. However, new, high-quality boxes also provide you with peace of mind, knowing they’re structurally sound and ready to live up to the job.”


While you can always opt for packing materials, you can also get creative with other items you need to move. For example, if you have a fragile lamp that takes up most of the center of a box and doesn’t allow for many other rigid items to be added, you could stuff the empty spaces with your kid’s stuffed animal collection or your spare linens.

Just keep in mind that you should always avoid overstuffing the box. If it won’t close flat or if the sides are bulging, it’s probably too full. Likewise, if you have several small, heavy items like books, you also shouldn’t pack them all into one large box, even if they all fit. If the box is too heavy, the bottom won’t hold, and it’ll be harder to carry.


Close the Box with Tape

A woman sitting on the floor tapes a cardboard box closed. There are others already packed beside her

Once your box is full, it’s time to close it the same way you sealed the bottom during construction. Fold down the shorter flaps, then the longer ones. Apply packing tape (not duct tape!) across the middle seam, then reinforce along each edge.

However, if your box is too full or not full enough, it’s not going to close correctly. If the flaps won’t lie flat or the sides are bulging, it’s probably overfilled—and you’ll need to reconfigure or remove some items for a better fit.

Conversely, under-filled boxes can also be an issue. Items can shift around and bang into each other inside. If there’s anything fragile in there, it’s bound to get broken. It’s also not uncommon for half-filled boxes to cave in during loading or unloading because they can’t maintain their shape. Either find more to add to the box or fill the empty space with packing materials or padding supplies.

Is It Better to Tape or Fold Moving Boxes?

Taping your moving boxes gives them more structural security and minimizes the risk of the bottom collapsing. You should tape your boxes whenever possible to avoid this. There are plenty of videos online showing you how to fold boxes without tape, but it’s generally not recommended.

However, if you’re packing something lightweight, like a box full of your kid’s plushies or some pillows, you can probably get away with a quick fold method. Just keep in mind that the box might not stack as well and that you should be cautious about putting too much on top of it.

See prices for local moving labor. Read real customer reviews. Easily book your help online.

Label Your Boxes

Labeling your boxes as you pack helps you keep track of where all your items are. It also makes moving into your new home easier since you can take boxes directly to the room they belong in. Beyond just labeling with rooms, consider also marking down the general contents of a box. If you’ve got a kitchen full of moving boxes, for example, you’ll probably want to know which ones have your dishes so you’re not digging through all of them just to eat dinner.

Consider writing down the rooms on your boxes and have corresponding sticky notes on the doors for the rooms in your new home, especially if you’ve packed up several bedrooms. As mentioned before, another great labeling method is to color-code boxes to their proper rooms with tape.


As long as you start planning in advance and ensure you understand the best practices on how to pack boxes for moving, you should enjoy a more streamlined, frustration-free relocation.

How to Pack and Move a Grandfather Clock

Author:

Publish Date:

Last Modified Date:

Category: Pro Packing Guides

Tags: Tags: , , , ,

grandfather clock

A grandfather clock, also known as a longcase or a tall case clock, is the kind of item we might go for years without having to pack. It is also the kind of item that we simply can’t pretend to know how to pack. So for that day when we do finally find ourselves face to face with someone’s two century old Simon Willard we want to be armed with the necessary know-how.

Here are the 6 Major Points of the process. (more…)

×

I'm Moving

Moving? Thinking about moving? Whether your move is off in the distance or you already have one foot out the door, you'll learn about everything you should expect through our useful how-to's, cool articles and much more. It's all specially curated for you in our "I'm Moving" section.
Explore
×

I'm a Mover

For rookies or veterans alike, our "I'm a Mover" section is filled with extensive industry news, crucial protips and in-depth guides written by industry professionals. Sharing our decade of moving knowledge is just one way we help keep our professional movers at the top of their game.
Explore