How to Organize Your Move: A Complete Guide

Author:

Publish Date:

Last Modified Date:

Category: Moving Advice

Tags: Tags: , , , , , , , , ,

Moving is a notoriously stressful undertaking, with seemingly endless logistics, to-dos, and boxes, but a little organization can go a long way and turn the chaos into calm productivity. In the following guide, we’ll walk you through both the big-picture strategies and small-but-mighty tips for every stage of your move so you can keep everything under control from start to finish.


Step 1: Declutter Before You Do Anything Else

A woman organizes clothing into three boxes labeled discard, donate, and keep in order from left to right

When it comes to moving, less is, well, less — less to pack, less to lift, and (probably the best part) less to pay.

So before you even think about collecting moving quotes or picking up the packing tape, take the time to declutter. Get started with the usual suspects: expired pantry items, worn-out linens, duplicate kitchen tools, and clothes that haven’t seen the light of day in years. Then you can move on to seasonal and less-used items, until finally you’re packing up everything except the things you need immediately for moving day.

Pro tips:

  • Start early — ideally a month before your move for a local move, and two months before a long-distance move.
  • Use up perishable food and open household products before Moving Day.
  • Set up simple “donate,” “sell,” and “toss” zones to stay organized as you sort.

Need a hand deciding what should stay and what should go? Our decluttering guide has your back.


Step 2: Choose Your Packing Strategy

A woman kneels in the middle of a room filled with moving boxes. She's carrying a clipboard and there's a thoughtful expression on her face.

Before you start packing, take a moment to decide how you want to go about it. Picking a strategy upfront not only makes the packing process smoother, but it will make unpacking a lot easier.

You have two main options at your disposal:

Room-by-room packing: As the name suggests, this approach involves packing up everything in a room, one room at a time. As you go along, label your boxes with the room name (e.g., “Living Room,” “Master Bed”) as well as contents (e.g., “Office—Files”). It’s simple and intuitive, and makes it easier to unpack, especially if your next home will have the same number of rooms and you want to keep the same stuff in each room.

Category-based packing: Packing your items by category (e.g., “Electronics,” “Books,” “Toiletries”) usually involves a bit more planning as well as careful labeling during the process.


“If you’re moving long distance, take your first steps at least eight weeks prior to your moving date. For a local move, aim to get started at least six weeks in advance.”


It’s ideal for moves where a simple room-by-room translation isn’t possible because you’ll be downsizing, upsizing, or reconfiguring your layout.

Whichever method you choose, just make sure to stick with it and that everyone who’s helping is on the same page.

Pro Tips:

  • Create a shared packing checklist if multiple people are helping with the packing. This way, you can avoid double work or missed items.
  • Set aside essential items for the final days in your current home and the first days in your new place. Think: toiletries, toilet paper, a few days’ worth of clothes, linens, towels, shower curtain and rod, coffee maker and coffee, mugs, pet food and dishes, medications, laptop, and charger.

For more tips, check out our guide on how to organize packing for a move.


Step 3: Label Like a Pro

a woman labels the side of a box with a permanent marker

Labeling means less stress on moving day and in the weeks that follow as you unpack your things. While it may feel like a chore in the midst of all the packing chaos, your future self will thank you for taking a moment to clearly label your boxes.

Here are three labeling styles we recommend:

  • Color-coded labels by room: Assign a color to each room and use matching labels or tape for every box.
  • Numbered boxes with a master inventory: Keep a running list, in a notebook, spreadsheet, or app, of what’s in each numbered box. This makes it easier to track down specific items if you need to find something fast, and it can come in handy for insurance purposes.
  • Short written summaries on each box: Make quick notes on labels or directly on the box specifying both the room and items in the box (e.g., “Guest Bath—Toilettries”). This one can be combined with the techniques above.

Supplies you’ll need:

  • Lots of markers
  • Pre-printed labels or washi tape
  • A notebook and pen, or a mobile-friendly app (like Sortly, Google Sheets, or Notes) for inventory tracking

Pro tips:

  • Pick a labeling style and stick to it.
  • Label all sides of your boxes, as you never know which side will be facing out in the truck or in your new home.
  • Label as you pack (don’t save it for later)

For more details on how to label boxes for your move, check out How to Color Code Boxes for Moving.


Step 4: Appoint a Moving Day Coordinator (It’s Probably You)

A woman directs movers where to put some boxes

As with anything, moving runs smoothly when someone is in charge. Chances are, that someone is you.

Some of the duties of this Moving Coordinator include:

  • Directing movers or helpers to the items that need to be loaded on the truck, and letting them know where the bathroom and water can be found
  • Making sure everything goes into the right rooms upon arrival in your new home
  • Fielding last-minute questions and resolving any issues that may come up

Pro tips:

  • Tape signs/colored labels or tape to the doors of your new home. This way, everyone will know exactly where to go without having to ask.
  • Create a moving day kit, complete with a clipboard, extra markers and packing tape, water, snacks, phone chargers, and anything else you need to keep everyone energized and everything under control.

Step 5: Unpack Systematically

A couple happily unpacks a box labeled "kitchen" in their new home

With Moving Day behind you (finally!), it’s time to settle in and unpack.

Prioritize the areas you’ll need up and running first — the bedrooms and bathrooms, the kitchen, and if you work remotely, your home office or workstation.

While you may be tempted to tear into every box, it’s best to unpack one room at a time so you don’t end up overwhelmed by the disorder of half-unpacked spaces.

While there’s less finesse needed with unpacking than with packing your stuff, there’s still an art to it, so make sure to check out our guide on How to Unpack.


Bonus Tips: Best Way to Organize a Move

Before the to-dos and the boxes start piling up, here are a few extra tips from our pros to help save you some headaches and hassles down the road.

  • Make a “moving binder” to keep your checklist, moving quotes, receipts, travel maps, and other important documents in one central place.
  • Put reminders on your calendar for key tasks during the moving process, such as transferring your utilities and arranging mail forwarding.
  • Digitize your important documents and back up all your digital files.
  • Pack essential items in clear plastic moving bins to keep them easily visible and accessible.
  • Before unplugging, take photos of complex electronic setups.
  • Keep your essentials, valuables, and important documents (like birth certificates and Social Security cards) on you during the move.

Stay Organized with HireAHelper

No matter how much you prepare, no move is perfect. But by staying organized, you can keep stress levels minimal and make the entire experience a lot less overwhelming. While it may seem like a lot of time and energy, you can rest assured that all that effort will pay off in the long run with a smoother moving experience.


Create a shared packing checklist if multiple people are helping with the packing. This way, you can avoid double work or missed items.


At HireAHelper, we make it easy to stay organized with our moving resources and curated hub for vetted moving help that lets you compare movers with ease. Check out our moving blog or get a fast, easy quote today to get started.


FAQs

How do I organize myself for a move?

To stay organized for a move, start planning as early as possible. If you’re moving long distance, take your first steps at least eight weeks prior to your moving date. For a local move, aim to get started at least six weeks in advance.

A detailed moving checklist will serve as your primary guide. Make sure to declutter your home before you start packing so that you have less to pack and less to move (not to mention, less to pay). Begin the process as early as you can, and make sure the first things you store in boxes are your off-season and less-used belongings.

Continue to follow the steps on your moving checklist one at a time, and you’ll be sure to stay on track.

How to pack for a move efficiently?

To pack your belongings as efficiently as possible, make sure to start the process by donating, selling, recycling, or tossing items you don’t need to bring with you. This can significantly cut down on packing time and your final moving costs.

Then pack up your home room by room and label boxes clearly with the room name and a list of boxed items.

Finally, keep essentials in their own separate box (or boxes) so that you don’t have to dig through mountains of boxes to find your laptop charger or coffee maker on Moving Day.

How long before a move should I start packing?

For a local move, it’s best to get started 4–6 weeks ahead of time. For longer-distance moves, such as out-of-state or cross-country relocations, aim to start planning 8 weeks in advance. Get started by getting rid of stuff you don’t really need or want to bring along, then begin packing non-essentials. Gradually work your way toward daily-use items as Moving Day approaches.

See prices for local moving labor. Read real customer reviews. Easily book your help online.

How to Pack Fish Tanks and Aquariums

Author:

Publish Date:

Last Modified Date:

Category: Kids & Pets, Pro Packing Guides

Tags: Tags: , , , , , , , ,

Setting up a new aquarium is easy. Moving an established one, on the other hand, takes a lot more foresight. Fish tanks are fragile and prone to scratching and cracking. Likewise, many fish are extremely delicate and often don’t tolerate change or stress well.

With that said, it’s not hard to learn how to pack fish tanks and aquariums for a move. It just takes some planning, elbow grease, and patience. From explaining how to transport fish tanks to what to do with the fish during the move, we’ve got you covered in this guide.


Supplies Needed to Pack Fish Tanks and Aquariums Safely

Various aquarium tools like nets, filters, and a sponge cleaner are set up against a black wall

To minimize stress on your fish, it’s always best to be prepared before disassembling your aquarium. Make sure you have these supplies available and an extra person or two to help lift your tank if it’s particularly large.

  • Fish nets: For catching and moving fish into smaller containers. You probably already have one of these if you keep fish.
  • Siphon hose: For moving water quickly and efficiently. You probably already have one for water changes. If not, pick one up at your local fish store.
  • Containers: For storing fish, water, plants, and decor. Consider using fish bags, which most fish stores can provide, or 5-gallon buckets with lids.
  • Tarp: For protecting carpet from water damage. You can buy one at any hardware store.
  • Protective packing material: For keeping the tank from shifting in the box. In a pinch, you can use towels or small cloths you have sitting around your home, or purchase bubble wrap and packing paper from most department stores.
  • Extra cardboard: To reinforce the top of the box holding the tank. This can come from any old box.
  • Box or crate: To store the tank and protect it from scratching. If you still have it, use the box the aquarium initially came in for a good fit.

Step-By-Step Guide for Packing Fish Tanks and Aquariums

Since fish are delicate, your aquarium should be one of the last things you pack and move, and one of the first things you reassemble in your new home. If you’re moving with fish tanks or aquariums locally, try to get everything done within the same handful of hours to minimize stress.

1. Preparing the Tank

Stop feeding your fish 24 to 48 hours before moving. Since your fish will be in smaller containers during transportation, fasting them reduces their waste output.

On moving day, disconnect all the electrical components, including heaters, filters, and lights. Surround your working area with a tarp, especially if your aquarium is in a room with carpet, and gather all your supplies.

2. Packing Fish and Plants

A woman uses a net to catch fish swimming in a home aquarium

Transferring your fish and live plants should be a top priority. Determine whether your fish can be transported together or if you need to separate aggressive species. Also, choose an adequate container to move your fish.

For local moves and smaller fish and plants, a bag is probably fine. However, 5-gallon buckets may be necessary for larger fish, those with sharp fins, or large quantities of fish.


“You might be able to move a small aquarium (10 gallons or smaller) with some water remaining, but it’s generally not recommended. The sloshing of water as you move the tank can put additional strain on the seals, increasing the risk of damage.”


Make sure your fish have enough room to swim around. If they’re in a bag, fill it about one-third full with water, leaving the rest of the space filled with air. Use your current aquarium water to fill the containers.

If you’re transporting your fish in bags, consider placing them in a dark cooler with individual bags wrapped in bubble wrap to keep them from shifting around too much.

If you have to transport your fish for longer than a few hours, it can get complicated. Contact your local fish store for advice on how to keep fish safe for longer periods.

3. Removing and Storing Water

Before you can move your aquarium, it needs to be completely emptied. But don’t dump your aquarium water! It’s recommended to move 75% to 80% of the existing water if possible. Most people choose 5-gallon buckets to store aquarium water because they are readily available and easy to carry. Use a siphon to fill buckets, then seal them with a tight-fitting lid.

4. Packing Accessories and Substrate

A person lifts up rocks from an aquarium to dry and prepare them for storage

Remove any decorations and place them in buckets. Since they may be waterlogged or leak, keeping them in buckets helps minimize the mess. Alternatively, you can wash and dry them, then pack them in boxes.

Put the substrate in a 5-gallon bucket to avoid a watery mess. You may need more than one, depending on the size of your tank.

Pack electronics like heaters and pumps carefully, wrapping them in bubble wrap to prevent damage.

5. Cushioning and Boxing the Tank

Once the tank is completely empty, dry it with towels, then wrap the exterior with bubble wrap. Choose a durable box or crate large enough to accommodate the tank standing upright—they’re not meant to be placed on their sides. Carefully move the tank into the container, then pack the gaps between the tank and the container with paper.


“Since fish are delicate, your aquarium should be one of the last things you pack and move, and one of the first things you reassemble in your new home.”


Don’t worry about packing the inside of the tank—it’s a waste, especially for larger aquariums. Instead, place a large piece of cardboard over the top, then add more packing paper or bubble wrap between that layer and the top of the box.

6. Label and Transport

Label the box as fragile and include arrows on all sides that indicate which side is up. You don’t want the tank handled roughly, flipped, or turned too much during transportation.


How to Transport Fish Tanks and Aquariums Safely

Aquariums are fragile, but they absolutely can be moved safely. Keep these tips in mind:

  • Consider using a dolly or moving straps to move larger tanks.
  • Avoid putting anything heavy on top of the tank during transportation.
  • Keep the substrate and filter media wet during transportation to preserve as many beneficial bacteria as possible. This helps keep the fish healthy once you reassemble the tank.
  • For long-distance moves, you may need battery-operated air pumps to keep your fish oxygenated.

Unpacking and Reassembling Fish Tanks and Aquariums

A man refills an aquarium with water after it's unpacked

Reassembling your aquarium is similar to putting it together for the first time:

  1. Set the tank in its permanent location, ensuring it’s level.
  2. Add the substrate back in.
  3. Fill the tank with any water you kept, then top it off with tap water. Remember, if you’re filling it with mostly new water, you’ll need to condition and cycle the tank and watch your water parameters closely.
  4. Add plants and decor.
  5. Hook up heaters, filtration, lighting, and any other accessories.
  6. Acclimate your fish and release them into the tank.

Learn more on our How to Pack Hub.


FAQs About Moving Fish Tanks and Aquariums

What if I Have an Extra-Large Aquarium?

Larger, heavier aquariums take more planning and preparation to move. They may also require special equipment, such as a dolly or the assistance of several people to lift.

Can You Move Fish Tanks With Water in Them?

You might be able to move a small aquarium (10 gallons or smaller) with some water remaining, but it’s generally not recommended. The sloshing of water as you move the tank can put additional strain on the seals, increasing the risk of damage. Plus, as the water shifts, it can throw off your balance, making it harder to move the container the aquarium is in.

Can Professionals Help Move an Aquarium?

Some moving companies may have professionals with experience moving aquariums. However, many aquarium keepers prefer to move their tanks themselves to make absolutely sure no damage occurs and to protect their fish.

5 Tips for How to Organize Packing for a Move

Author:

Publish Date:

Last Modified Date:

Category: How To Pack, Organization

Tags: Tags: , , ,

While no move goes exactly as planned, a solid packing strategy helps protect your belongings, cut costs, and better prepare you for those inevitable surprises, from forgotten keys to sudden downpours.

Packing well isn’t just about putting things in boxes or moving bins, either. It’s about setting yourself up for a smoother transition. A good packing strategy includes:

  • Giving yourself enough time to pack everything
  • Downsizing where you can
  • Choosing the right supplies
  • Using packing techniques that work for different items
  • Protecting anything fragile or sensitive
  • Clearly labeling moving boxes
  • Helping others, including movers, understand your system

Starting early is one of the most important steps, but it’s never too late to make your packing more efficient. Even last-minute moves can go smoothly with the right guidance.

This collection of packing organization tips is compiled from years of experience and thousands of moves. It relies on practical, proven strategies that can transform a hectic moving day into one that feels (nearly) effortless.


Tip 1: Declutter & Condense

Two women look through clothing and other items to organize them into donation boxes

Before you even think about which box to start with, take a moment to declutter your space. Not only will this reduce the number of boxes you need (and lower moving costs), but it will also make unpacking in your new home easier.

Start by going room-to-room and sorting everything into five categories: keep, donate, recycle, sell, or toss. Focus on purging items you haven’t used in a while or no longer need.

Pro Tip: Do you have a half-used bottle of floor cleaner or a nearly empty tube of moisturizer? Now’s the time to use them up.


Tip 2: Choose Your Packing Strategy

A woman with her hands on her hips stands with her back to the camera looking over a room filled with boxes and furniture

Once you’ve lightened the load, it’s time to decide how you’ll pack. There are two main ways to go about it.

1. Pack Room-by-Room

If your new home will be set up similarly to your current one, this is often the most intuitive approach. Pack each room’s contents together, and label the boxes accordingly. This way, when you’re unpacking, you can go room by room without playing a guessing game about what’s in each box.

2. Pack Similar Items Together

If you’re putting things in storage, moving into a very different space, downsizing, or want to rearrange your decor and furniture in your new place, consider grouping similar items together, regardless of which room they’re coming from. For example, you might pack all your office supplies together or group all electronics in one set of boxes.

No matter which strategy you choose, sticking to one method will help everything stay consistent, trackable, and less likely to confuse you later on.


Tip 3: Label Early and Often

A woman writes a label in black marker on the side of a moving box

Labeling boxes keeps things organized and helps ensure everything ends up in the right place. This strategy is especially useful if you’re hiring a moving team to load and unload your stuff. Clear labels tell them where each box goes and which ones need extra care.

For best results, label the top and at least two sides of each box. If you’re following a room-by-room approach, try a format like: “Kitchen | Glassware & Mugs”. If you’re going the category route, you could label it: “Office Supplies | Cables & Chargers”.

However, for boxes that will go into storage or won’t be unpacked immediately, labels that have more itemization are better. You don’t want to be wondering what’s inside 6 months from now.

Try not to overthink it! Just label as early, clearly, and consistently as you can.


Tip 4: Create a Color Code for Unloading

Color coding is one of the easiest ways to speed up the unloading process and reduce confusion, especially if multiple people are helping with your move. It keeps everybody in the loop as to where everything needs to go and helps you when it comes to unpacking.


“[Decluttering] not only…reduce[s] the number of boxes you need (and lower moving costs), but it will also make unpacking in your new home easier.”


Use colorful packing tape, stickers, or labels to assign each space in your new home a color. Then, apply that same color to every box that belongs in that space. You can even hang a color chart near the front door so everyone helping knows where things should go.

Keep in mind that color coding only needs to indicate where a box should be unloaded, not where it will ultimately end up. For example, if your spare bedroom is getting painted, consider placing those boxes in the garage for now.


Tip 5: Get Your Packing Team on the Same Page

a group of young adults chats and laughs in a room full of moving boxes

Everyone has their own idea of how to organize packing during a move. One person might toss items in a box and tape it shut. Another might wrap every individual spoon in bubble wrap. And if you’re not clear about your expectations, chaos can creep in fast.

Whether it’s family, friends, or full-service movers, getting everyone aligned is one of the most overlooked parts of an organized move.

Here’s how to avoid that:

  • Explain your packing strategy (room-by-room or item groupings).
  • Share your labeling system so everyone follows the same format.
  • Assign roles (e.g., one person handles kitchen items, another tackles the garage).
  • Use a checklist to track what’s been packed and what’s left.

Pro Tip: Having a quick meeting or starting a group text thread before packing can make all the difference.

See prices for local moving labor. Read real customer reviews. Easily book your help online.

Final Thoughts

There’s no such thing as a perfect move. However, learning how to pack like a pro gives you peace of mind that your belongings are secure and organized. Plus, it’s another thing you can check off your moving checklist.

Here’s a quick recap of the 5 packing organization tips you’ll be glad you followed:

  1. Declutter and condense to cut down on clutter and moving costs.
  2. Choose a packing strategy that fits your needs and home setup.
  3. Label clearly and consistently, especially for storage-bound boxes.
  4. Use color coding to simplify unloading on move-in day.
  5. Get your team aligned to keep things efficient and low-stress.

Remember, organizing your move early is the single best thing you can do. But even if you’re short on time, using these packing organization tips will help bring order to the chaos and make your move smoother.

How Do I Pack Kitchen Utensils?

Author:

Publish Date:

Last Modified Date:

Category: Pro Packing Guides

Tags: Tags: , , , , , ,

Unlike your couch or dresser with four tiers of drawers, kitchen utensils and silverware might seem like they’re easy things to move to your new home. But, while you could toss everything into a big box and deal with it later, there’s a much easier (and tidier) way to do it.

Keep reading to learn how the pros pack kitchen utensils, including:

  • What supplies you need to complete the job
  • How to approach kitchen utensil packing with a logical strategy
  • How to protect utensils during a move
  • How to reduce unpacking time with thoughtful kitchen utensil packing

What Supplies Do I Need?

Every packing job is different, but some supplies you might need specifically for your kitchen utensils include:

  • Boxes
  • Packing tape
  • Packing paper
  • Markers for labeling boxes
  • Rubber bands
  • Zip ties
  • Cardboard strips/scraps

See prices for local moving labor. Read real customer reviews. Easily book your help online.

Strategies for Packing Kitchen Utensils

You should always pack with efficiency in mind. In other words, as you’re putting stuff into boxes, think about how much time it will take to unpack and sort everything later.

If possible, take the path of least resistance (as long as it won’t damage your things). For example, many people keep silverware organized in a tray that they then stick in a drawer. Typically, there’s no reason to take everything out of the tray when you pack.


“Don’t pack wet or dirty utensils…Trapped moisture can lead to mold or bacteria if items aren’t unpacked quickly.”


If it won’t damage anything, consider packing the entire tray — silverware and all — directly into a box. Then, remove the tray from the box and place it in a drawer in your new kitchen. You can do the same for other utensil trays and containers.


How to Pack Kitchen Utensils: Step-by-Step Walkthrough

Whether you’re an avid chef with a deluxe set or you only have a handful of spoons and forks, you can follow the steps below to safely pack kitchen utensils of all types.

Packing Silverware in a Tray

Let’s start by packing the easiest kitchen utensils: silverware that’s already in a tray.

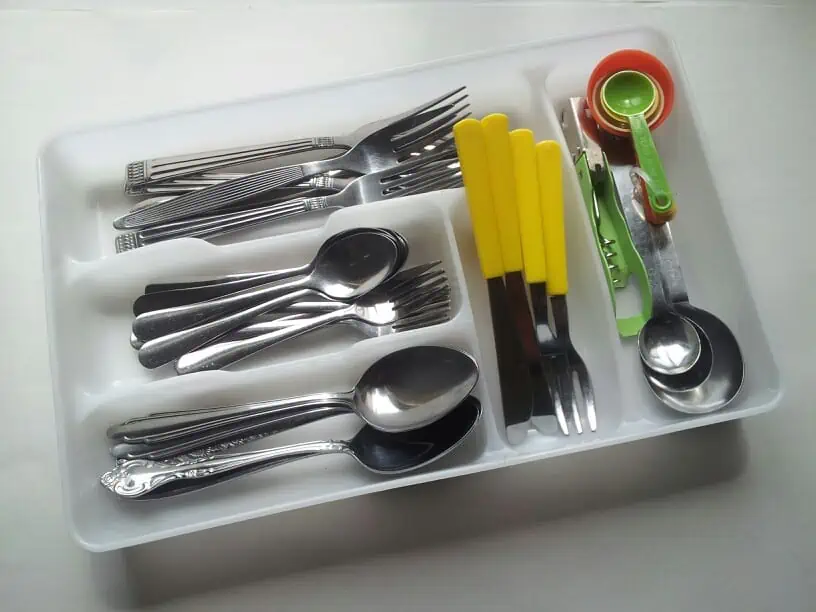
silverware is packed in a plastic tray

If you just put a tray into a larger box and send it off, your items may rattle around, which leads to an annoying clatter at best and serious damage at worst. Add some protection with one or more of the following methods:

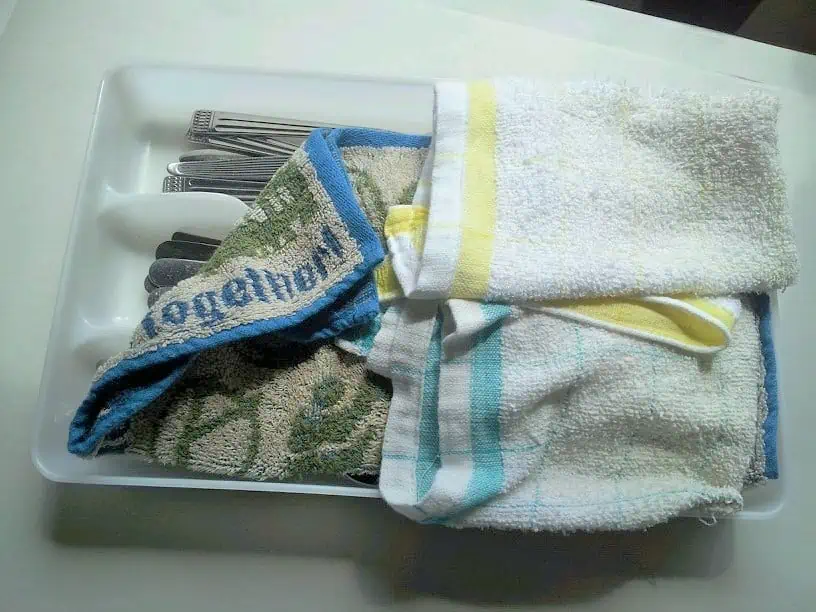
  • Place a couple of clean tea towels on top of the tray to keep everything in place
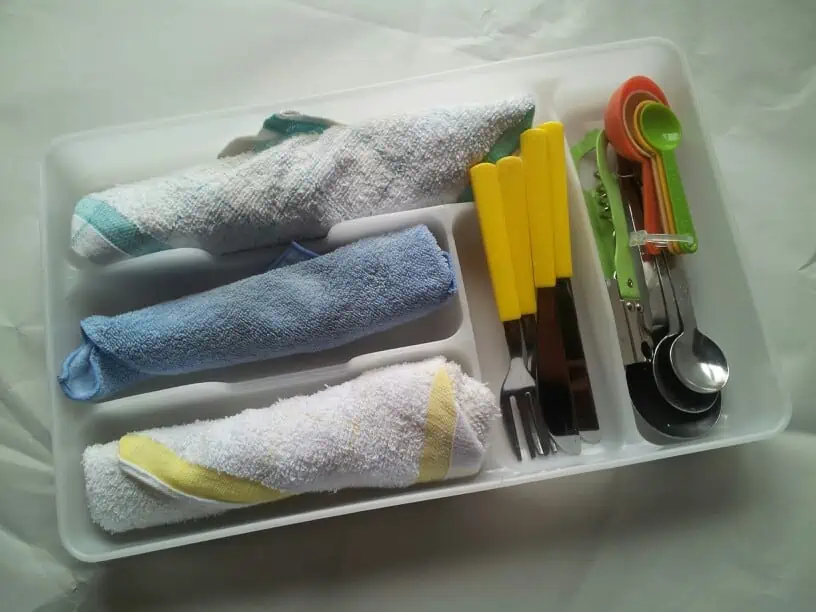
  • Wrap each set of silverware in packing paper or a clean dishcloth, then place it back in the tray
  • Wrap the entire thing in packing paper or newsprint and tape the paper in place, ensuring your silverware stays in the tray

Pack Utensils With Towels

Packing Silverware That’s Not in a Tray

If silverware isn’t in a tray, make bundles of similarly shaped and sized items. For example, you might have bundles of butter knives, salad forks, teaspoons, and serving spoons.

Follow the steps below to secure and pack each bundle:

  • Secure each bundle with a rubber band
  • Wrap the bundles with packing paper, newsprint, a dishcloth, or bubble wrap — use items you already have for an eco-friendly move
  • Tape or tie the wrapping on to secure it further
  • Carefully place the bundles of silverware into a box
an example of silverware wrapped in towels
Although these are in a tray, it’s a good example of how to wrap bundles of utensils together

To save space, you can pack silverware bundles in boxes with other kitchen items. Consider cushioning silverware with towels or oven mitts and packing it inside large bowls or pots.


“If possible, take the path of least resistance (as long as it won’t damage your things)…Typically, there’s no reason to take everything out of the tray when you pack.”


Just be sure to avoid stacking heavy silverware trays on top of fragile dishes like glass or ceramics — they can easily crack under the weight.

Packing Cooking Utensils

Pack your other cooking utensils the same way you would your silverware:

  • Secure and package utensils like cooking spoons, spatulas, and tongs in trays if that’s how they’re already stored
  • If utensils are stored in a canister, use a large zip tie to secure them together and wrap the entire canister in a dish towel or paper
  • Sort loose utensils by size and shape, securing them together and wrapping them in paper

Pack utensils in clearly labeled boxes. It’s fine to pack them with other kitchen items — just be sure to wrap them up well so they don’t scratch or break anything fragile.


Wrap It Up: Final Tips for Packing Kitchen Utensils

Now that you’ve learned how to pack kitchen utensils like a pro, here are some extra tips to make sure your silverware is in top shape when you unpack it at your new place.

  • Don’t pack wet or dirty utensils: Trapped moisture can lead to mold or bacteria if items aren’t unpacked quickly. Plus, if you ask someone what they’re looking forward to in their new home, running the dishwasher first thing probably isn’t it
  • Take special care with actual silver items: Genuine silver silverware is usually stored in a special velvet-lined box or other safe environment. Make sure the items are clean and dry, and then wrap the storage container and place it in a box
  • Label boxes clearly: Rather than just labeling a box “kitchen,” list what’s inside. A label like “coffee mugs and utensils” will make unpacking in your new kitchen much easier
  • Protect sharp edges and points: Fold cardboard over knife edges or sharp utensil points and tape them in place. This helps prevent damage to other items in the box and keeps your fingers safe when unpacking later

Don’t have time to pack your silverware or other items like a pro? Connect with professionals who can do it for you!

How To Load a Moving Pod

Author:

Publish Date:

Last Modified Date:

Category: Loading & Unloading Guides, Moving Containers

Tags: Tags: , , , , , , , , ,

Millions of people move every year. Around 25 million, at last count. And every year, more and more of them are using portable moving containers instead of trucks.

For good reasons, too! Moving containers offer a convenient, versatile, cost-effective way for you to move your stuff down the road or across the country.

If you’ve already booked a moving pod (or if you’re considering getting one), you can either hire a couple of pros to load it up for you or you can roll up your sleeves and try to fit everything in there by yourself.

We’ve got you covered if you want pros to handle your belongings. But if you’d rather DIY it, read on and see how to pack your moving container the safest and most efficient way possible.


Before You Start Loading

Like always, preparation is key. Here are some steps to take before you load the first box into your pod. It’ll help make the whole process even easier!

Disassemble what you can

two people disassemble a shelf with tools. A toolbox sits next to them.

Taking apart your furniture before loading makes everything lighter and easier to carry. It also saves valuable space in your container so you can fit more, and lessens the chance any delicate parts will break off in transit. Here’s what you should disassemble:

  • Take apart bed frames
  • Remove table legs
  • Take apart dining chairs if feasible
  • Take unattached shelves out of bookcases, curios, etc.
  • Remove anything else that sticks out of a piece of furniture or could fall out and break, like dresser mirrors or TV stands/bases

Pro Tip: Movers keep a small cardboard box called a “parts box” on hand to hold all the hardware from the items they disassemble. Use (and label) Ziploc bags to keep all the nuts and bolts and screws for each piece of furniture separated.

Wrap things up in furniture pads

Furniture pads keep your things (and the walls and floors) safe from damage as you haul it all out of your home. Pads also keep your furniture protected against the moving and shifting that will occur as your pod is taken to your new place.

You can usually rent them from your moving container company or buy them in stores or online — and possibly sell them online when you’re done.

Pro Tip: When wrapping furniture pads around your china hutch, curio, or any other item with a glass surface, add some extra protection by placing a piece of cardboard big enough to cover the glass over the part of the pad that is hiding the glass. Then, tape or shrink wrap the cardboard in place.

Clear the Way

For safety’s sake, you want to keep a clear path all the way to the door and out to your container. From rugs to stray rolls of tape, make sure there is nothing on the floor that can make you slip or trip.

Also, pay attention to what’s above you: the height of a doorway, the slope of the staircase ceiling, light fixtures, fuse boxes, smoke detectors, and anything else sticking out of the walls and ceilings. You don’t want to knock your couch or dresser into something important!


How to Load a Moving Pod: The Basics

Now that you’ve made preparations, it’s time to start loading up the container. There’s a definite method to the madness of trying to fit everything you own into a box — even a box as large as a pod. Here are some helpful terms and concepts that will give you the proper know-how to get started.

Tiers

These are vertical layers (basically walls) of furniture and boxes that reach clear up to the roof of your pod. Our aim is to build up tiers, one at a time, using a mix of furniture and boxes in each one.

Base

The foundation on which each tier is built. The pros always start their first tier with some base, which is usually made up of stout pieces of furniture like a dresser or a desk. On top of this will go boxes and items of medium size and weight. Then, you finish off each tier with light stuff.

See prices for local moving labor. Read real customer reviews. Easily book your help online.

Weight Distribution

This term refers to the balance in your load, both side to side and front to back. Remember that things in your pod will shift in transit, so too much heavy stuff in the back or on one side can mean your lighter stuff gets knocked into and broken.

Density

This refers to how much room is available and is crucial for safety. Just like a half-empty cardboard box will tend to get crushed, empty space in a loaded pod has room for everything to move around and, quite possibly, end up damaged.


“A great way to avoid [the door getting stuck] is to strap off your last tier…Better yet, use a mattress or a couple of large bookcases (or whatever other large items you have) for your final tier.”


Table legs and shelves (wrapped and padded, of course) can fill these spaces. In a pinch, stick sofa cushions, rolled-up blankets, and even sleeping bags into empty areas to make your tier more dense while adding extra protective padding. You’ll probably still have some space at the top of your load, and that’s okay. Just keep it tight side to side and front to back.


How to Load a Moving Pod: Expert Level

Now that you’ve got the basics down, let’s go through all you need to know to load your pod like a pro.

Start with some base

You may be tempted to begin by stacking a bunch of boxes neatly in the back corners of your container. But movers always build their first tier with a foundation of a large, solid base, using things like long dressers and stout desks. Stacking some boxes on top of that base, with some loose items to fill in up top, will make for a stable first tier.

Don’t build a wall of boxes

Stacking boxes is easy — until you run out of them. Then you’ll have to build tiers of furniture and garden tools and all that stuff in the garage. This is a recipe for disaster. Build each tier with a mix of furniture, boxes, and loose items.

Keep it loose up top

a moving pod packed with furniture and boxes. There is remaining space at the top.
The free space on top of the already-packed items is great for tools and chairs

All those items in the garage — folding chairs, garden tools, sports equipment, bicycles — have to go somewhere. The best place for such items is on top of your tiers, where density is least critical.

Add strength front to back

Tall bookcases, entertainment centers, refrigerators, and mattresses can serve as walls, placed between tiers throughout the pod, making your load more stable, safe, and secure. Mattresses can also be placed against glass surfaces common in items like china cabinets and curios.

Get creative with large, flat items

Headboards and padded dining table tops can be loaded against the side walls, perpendicular to your tiers. Mirrors and large picture frames (so long as they’re packed safely in flat cardboard cartons) can fill in spaces in tiers with items of varying widths.

Stand your sofa on end

You don’t want to start piling stuff on top of your sofa cushions or the frame underneath. So unless your couch is super light and you can put it on top of one of your tiers, stand it upright on one end. Use furniture pads to create a pillow underneath so that the end at the bottom doesn’t get crushed.

Tier down

two men load a washer into a moving truck
This example in a moving truck applies to moving pods as well

Remember that density is critical for a secure, safe load? You don’t want any empty floor space between your last tier and the door of your pod. If there is, everything will come crashing down into that empty space while in transit.

In all my years of moving, I’ve never had a load fit perfectly into a moving pod (or a truck for that matter), but we always had to make sure our last tier rested right up against the door to keep the load stable.

Furthermore, each tier needs to be tall enough to support the tier behind it. It takes some foresight, but the top of your load should slope gently downward towards the door, each tier a little shorter than the one behind it.

Pro Tip: Pods, like moving trucks, normally have vertical rows of cleats inside for attaching straps that can hold your load in place. If your belongings will not take up the entire pod, placing large items like mattresses and tall bookcases against your last tier and strapping them firmly in place is a great way to keep everything secure.


What To Do If Your Moving Pod’s Door Is Stuck

A moving pod will have a roll-up door that can get jammed if the load inside shifts and ends up leaning against it. If this happens, push on the door and try to edge the items inside away from the door. This may require some time and patience, not to mention a bit of elbow grease, but the alternative is to call your container company and hope they can come out and help.


“…the equipment and the trucks carrying loaded pods have weight limits for the combined weight of the pod and its contents. Since a larger pod weighs more, there is less leftover weight capacity for what is inside.”


A great way to avoid this scenario is to strap off your last tier to keep everything from shifting and falling against the door. Better yet, use a mattress or a couple of large bookcases (or whatever other large items you have) for your final tier. Large items are much easier to strap in place.


How Do You Pack a Couch in a Pod?

Two women put shrink wrap around a couch in preparation for moving it

As mentioned above, it is not advisable to set your couch flat on the floor of your pod. Stacking things on top of it will damage the cushions, the frame, or both. Instead, follow these steps to make sure your couch comes through the move in one piece.

  • Shrink Wrap Your Couch: Shrink wrap not only keeps your furniture pads firmly in place, but it also keeps dust and dirt off the upholstery. However, don’t use it on wood, leather, or vinyl — the shrink will damage those materials. And make sure you leave a few open spaces for ventilation to avoid mold.
  • Use furniture pads for support: Placing one on the floor underneath your sofa serves as a cushion. If the end of your couch is not flat, add extra pads so the entire end of your sofa is supported.
  • Orient your sofa properly: The back of your couch should rest against the tier behind it to keep everything back there in place, and the legs should be against the side wall.

What Cannot Be Moved in a Pod?

As with moving trucks, there are quite a few things that are prohibited from being transported in a moving pod. Most of these items present a fire hazard, but there are other potential problems involving things like mold, pests, and legality. To avoid these issues, refrain from loading up the following:

  • Matches
  • Oil and gasoline
  • Fireworks
  • Paint and paint thinner
  • Car batteries
  • Aerosol/pressurized cans/containers
  • Propane
  • Perishable foods
  • Plants and/or soil
  • Firewood and untreated wood
  • Animals, alive or dead
  • Household cleaning products
  • Lawn chemicals and fertilizer
  • Explosives and ammunition

Your moving pod company may have additional items on their “no-go” list. Check if you have any uncertainty about anything you are thinking of loading.

See prices for local moving labor. Read real customer reviews. Easily book your help online.

How Much Weight Can a Moving Pod Hold?

Good question! Moving pods are built to carry a heavy load, but they do have their limits, and so does the equipment used to drop off and pick up moving pods.

The weight limits for a common moving pod company’s pod sizes are:

  • 5,200 pounds for an 8-foot pod
  • 4,700 pounds for a 12-foot pod
  • 4,200 pounds for a 16-foot pod

Looking at these numbers, you might think something is wrong. Why do the larger pods have lower weight limits? Because the equipment and the trucks carrying loaded pods have weight limits for the combined weight of the pod and its contents. Since a larger pod weighs more, there is less leftover weight capacity for what is inside.

Inquire about specific weight restrictions with your chosen moving pod company.

What Happens if My Pod is Overweight?

Maybe nothing. At least one moving pod company out there does not charge any extra fees if you go over the weight limit for your pod. However, there is a chance that if you are over the weight limit, you’ll have to rent a second pod.

If you are concerned your load might go over the weight limit, rent another pod.

What Fits in an 8-Foot Pod?


An 8-foot pod is generally large enough to accommodate a studio apartment or a lightly-furnished one-bedroom apartment. The interior dimensions of an 8-foot pod are roughly eight feet high, eight feet long, and seven feet wide, which is typically enough for:

  • Large bed
  • Dresser
  • Small sofa and coffee table
  • Dining table and chairs
  • TV/entertainment center
  • Bookcase
  • Smaller household items
  • 10-20 boxes

For a clear visual of how much space your belongings will take up, use masking tape to mark a seven-foot by eight-foot square on your floor. Then, try to fit some of your larger pieces of furniture inside that square. If it starts getting tight, you might consider getting a larger pod.

What Fits in a 16-Foot Pod?

A 16-footer will hold three or four rooms of furniture and belongings. Of course, everyone’s home is different. But here is an average breakdown of what will fit:

  • King or queen-size bed
  • Two twin beds
  • Two dressers
  • Sofa with coffee table and end tables
  • Dining room table and chairs
  • Washer/dryer
  • TV/entertainment center
  • Two bookcases
  • Various small items
  • Several dozen boxes

Place Your Container In the Right Spot

a PODS container sitting on a level street

When you call to reserve a container, you’ll need to be able to assure the container company you have a suitable place for them to drop it. Check the following before you call.

  • Level surface: It’s imperative to have your portable container placed on a flat, level surface. If a slight incline is unavoidable, like in a driveway, have the back of the container (the side furthest from the door) sit lower so your tiers lean toward the back wall and not your head.
  • Solid ground: Empty containers are heavy, and loaded containers can sink into the dirt or mud. Secure a spot on a paved or cement surface.
  • Room to move: It’s not just your container that needs some space. The truck that will come to drop it off and pick it up will need room to maneuver, too. When you call the container company, ask them how much space they’ll need to get your pod in and out. While you’re at it, take note of any wires and tree branches that might get in the way.
  • Check the rule book: Contact your municipality or HOA head for any rules and restrictions on placing a temporary container, whether on your property or the street. If you rent, check with your landlord before putting your container on the premises.

The Best Way to Load Your Pod

Success in loading your pod means fitting everything in at the start and getting everything back intact at the end. It means using base, building solid tiers, and keeping all that weight distributed — just like the pros.

And if it all seems like too much, HireAHelper has your back. We can connect you with professional movers who can get the job gets done right, leaving you with a successful start in your new home.

How to Pack and Move a Grandfather Clock

Author:

Publish Date:

Last Modified Date:

Category: Pro Packing Guides

Tags: Tags: , , , ,

grandfather clock

A grandfather clock, also known as a longcase or a tall case clock, is the kind of item we might go for years without having to pack. It is also the kind of item that we simply can’t pretend to know how to pack. So for that day when we do finally find ourselves face to face with someone’s two century old Simon Willard we want to be armed with the necessary know-how.

Here are the 6 Major Points of the process. (more…)

How Do I Pack Glass Plates?

Author:

Publish Date:

Last Modified Date:

Category: Pro Packing Guides

Tags: Tags: , , , , , , , , , ,

One Plate, One Sheet of Paper

“Use plenty of packing paper” is one of the first rules of packing a kitchen. Pad the bottom of the carton.  Cushion the sides. Pad the top with more paper.

“And make sure you wrap those breakables up good!”

Of course. That means lots of paper in between all those plates and everything, right?

Nope. Not necessarily. (more…)

How to Pack up your Kitchen: Pantry, Fridge, and Freezer

Author:

Publish Date:

Last Modified Date:

Category: HireAHelper News

Tags: Tags: , , , , ,

Moving day is fast approaching and you’ve done a great job packing up every nook and cranny of your home. We’re impressed with your progress (keep it up!), but we’re guessing you’ve left a few dreaded areas for your final days of packing… your pantry, refrigerator, and freezer.

Book Cheap Movers Fast - So you can go shopping!We suggest taking all of the leftover food, throw it in a big pot, mix it up, and eat it for dinner every single night for a week.

Okay…we’re kidding. We have a much better (& more appetizing) solution so you don’t waste all of the contents of your kitchen.

If you have lots of food you’d like to keep, then here are our tips on how to pack up your kitchen to safely move your food from one home to another. (more…)

×

I'm Moving

Moving? Thinking about moving? Whether your move is off in the distance or you already have one foot out the door, you'll learn about everything you should expect through our useful how-to's, cool articles and much more. It's all specially curated for you in our "I'm Moving" section.
Explore
×

I'm a Mover

For rookies or veterans alike, our "I'm a Mover" section is filled with extensive industry news, crucial protips and in-depth guides written by industry professionals. Sharing our decade of moving knowledge is just one way we help keep our professional movers at the top of their game.
Explore