The correct way to use bubble wrap for moving is to wrap your items with the bubbles facing inward. This simple trick ensures those little air pockets press right up against your fragile belongings to cushion them properly and prevent breakage.
Knowing exactly how to handle this popular packing material is a brilliant skill to have when you prep for a big move, since it’s invaluable when it comes to protecting breakables. But, while plastic wrap is amazing, professional movers know a secret: Sometimes packing paper or crumpled newspapers actually work better. This guide explains exactly how to protect your favorite things with bubble wrap, how to reuse and recycle it when you’re done, and when to choose alternatives.
How to Use Bubble Wrap the Right Way
Quick Answer: Bubbles face the item.
You want the flat side of the bubble wrap facing outward because the bubbles form around your item to protect it better, and it makes taping the plastic firmly in place much easier. The smooth exterior also gives you a great spot to write a quick label with a marker.
To make the most of your bubble wrap, create a simple plan for packing each item correctly. Not every item in your home needs bubble wrap, and you may need different types of bubble wrap for different things. Our packing hub can help you organize all the necessary supplies for a move.
Choosing the Right Type of Bubble Wrap
For uploader: This is an image that’s part of the current version of this blog post. To insert it into the updated version, click the “add media” tab in WordPress, use the dropdown menu to find the date the post was first published (July 2025) and find this image. Then insert it into the new copy.
Before you start, you need to get the right size and type of bubble wrap. You can find everything from rolls with small, fingertip-sized bubbles up to sheets with bubbles measuring an inch or more. Keep in mind that if you’re packing circuit boards, hard drives, or other sensitive electronic components, you’ll need antistatic bubble wrap that keeps static charges from building up during transport.
If you’re trying to be more eco-conscious with your move, regular bubble wrap is often recyclable, but your curbside recycling service might not accept it. The good news is that there’s biodegradable bubble wrap for an eco-friendly alternative.
Check the chart below to get an idea of what size bubble wrap works for different items.
Bubble Wrap Size Guide
| Bubble Size | What It’s Best For |
| Small Bubble (3/16 inch) | Wrapping small or delicate items like glassware, electronics, and dishes |
| Medium Bubble (5/16 inch) | General household items like lamps, decor, or kitchenware |
| Large Bubble (1/2 inch) | Heavier or bulkier items like furniture, TVs, and large appliances |
| Extra-Large Bubble (1 inch or more) | Industrial equipment, long-term storage, or odd-shaped items |
Thankfully, stocking up on bubble wrap is pretty easy. Most packing supply stores and hardware stores carry multiple kinds, or you can order it online before your move.
Make Sure You Choose the Right Kind of Box
There’s no point wrapping carefully if you use the wrong box for your stuff. Moving boxes come in specific shapes and sizes, so make sure you choose the proper kind for the job. In general, smaller boxes are for items that are portable but heavy, like books, while larger boxes are for bulky but light items, like bedding and stuffed animals. Finish the job right by packing each bubble-wrapped item properly, surrounded by plenty of crumpled packing paper.
You might also need a particular box for certain items. Some specialty box types include:
- Mirror cartons
- Double-walled dish pack cartons
- Cardboard dividers for glasses
- Wardrobe boxes
How Much Bubble Wrap Do I Need?
When deciding how much bubble wrap to buy, 10 meters per room is a great starting point. Of course, this is just a general estimate. If you’ve got lots of delicate items, have a collection of something you want especially protected, or several oversized pieces, you may need more. To make your planning super easy, we broke this down into a quick guide based on the size of your home:
How Much Bubble Wrap Is Required Based on Home Size
| Home Size | Estimated Bubble Wrap Needed |
| Studio / 1BR | 20 to 30 meters |
| 2-3BR | 50 to 70 meters |
| 4BR+ | 80 to 100+ meters |
Step-by-Step Guide for Packing With Bubble Wrap
Getting your most fragile belongings ready for the moving truck is easy. Just grab your supplies, clear off the kitchen table, and follow this simple guide to wrap your items perfectly:
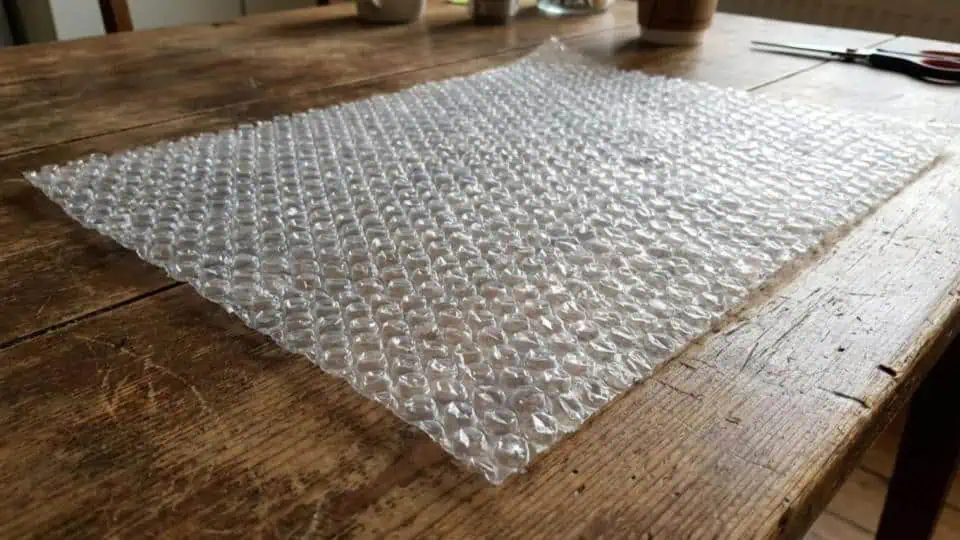
1. Clear a flat surface.
Lay out a square of bubble wrap with the bubbles facing up.
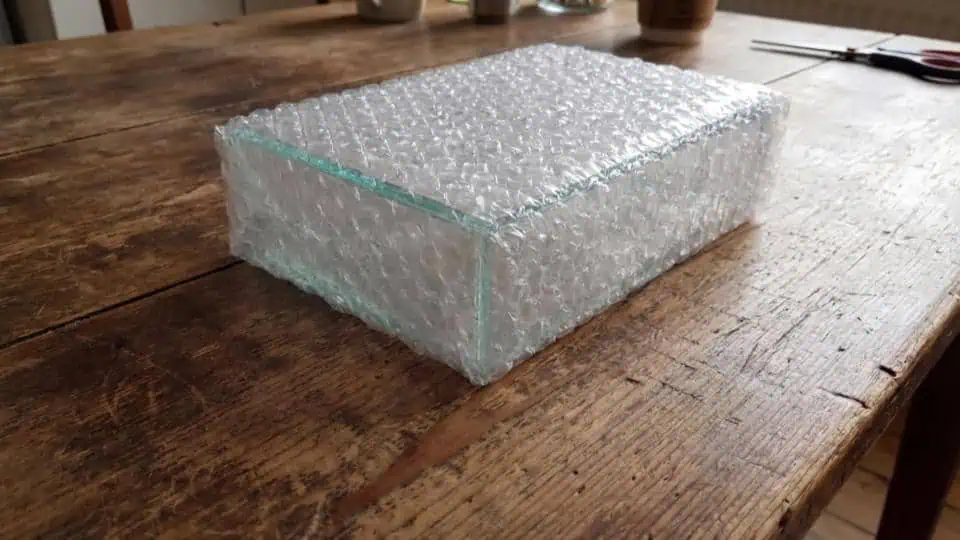
2. Set the item on the wrap.
Fold up the sides to cover your item with the bubbles facing inward.
3. Tuck the edges.
Push the extra wrap into empty spaces, like the interior of a teacup or mug.
4. Secure the wrapped item.
Grab your packing tape or stretch wrap and secure the plastic tightly.
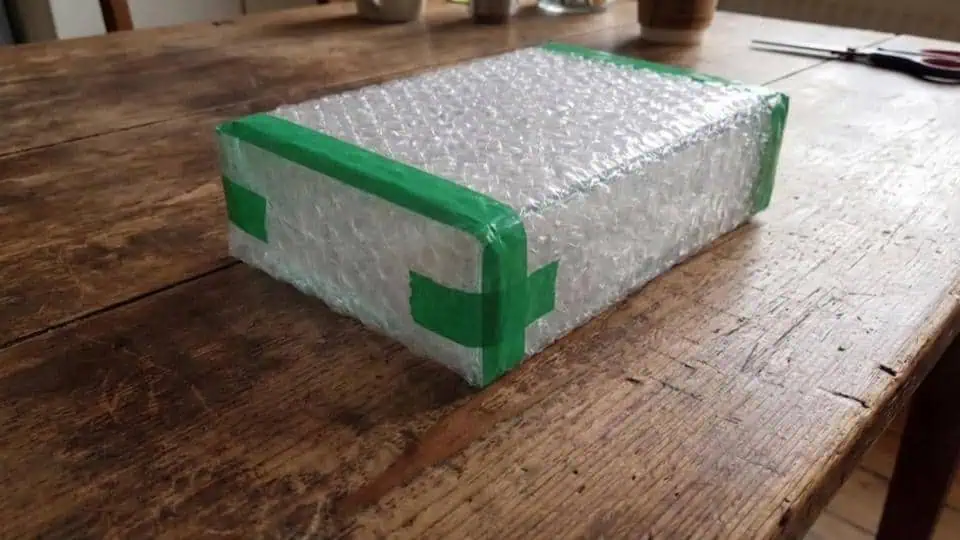
5. Cut the edges of the tape.
Trim off any extra bubble wrap with sharp scissors. Please do not try to tear it with your hands or your teeth.
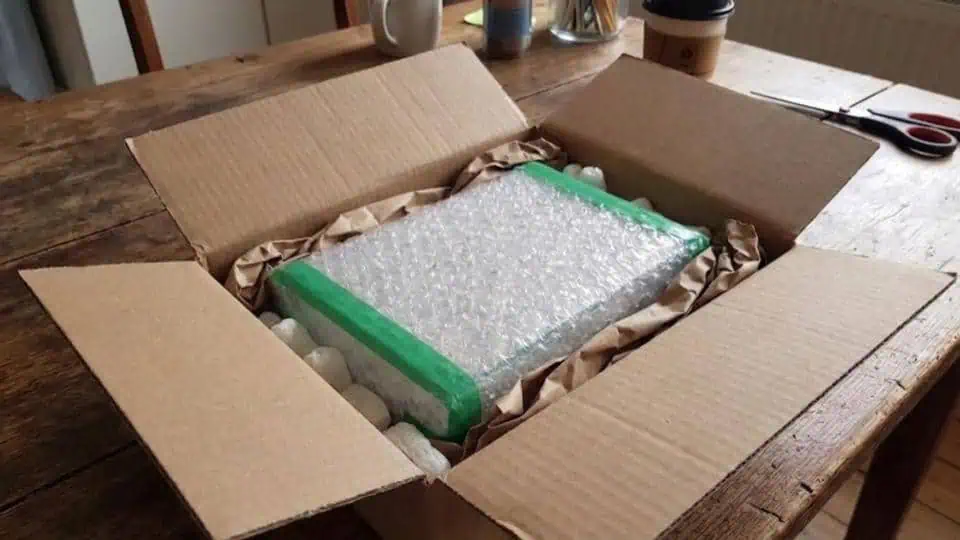
6. Layer wrapped items.
Place the items inside your packing box. Put more bubble wrap between each item, and stuff wadded-up bubble wrap around the sides for extra cushion.
7. Avoid overstuffing the box.
You should be able to easily close the box without pressing down on the items inside.
8. Test your packing job.
Gently shake the box once you close it. If you hear items shifting or rattling inside, you probably need to open it back up and add more padding.
Tips for Bubble Wrapping Like a Pro
You’ve got the basics down, so here are a few more secrets and tricks to help make sure your things are protected during a move. Follow these pro tips to securely wrap your precious cargo:
- Have a pair of scissors on hand when you’re unpacking. It would be a real bummer to break something while trying to tear that bubble wrap off using only your hands.
- Put a layer of packing paper between your TV and that bubble wrap. Plastic can leave marks on your screen, particularly in extreme temperatures, and this goes for anything you wrap in bubbles. For items with sharp edges or corners, some extra paper can help keep those pointed areas from poking right through the plastic.
- Wrap your items with the bubbles facing inward for better protection against exterior pressure and accidental impact. The flat side is easier to write on (in case you want to identify each item quickly) and will hold the tape in place much more effectively.
- Don’t bank on one layer of bubble wrap. Two layers might be enough for a piece of stemware or glass, as long as you’ve got plenty of packing paper. For extra peace of mind, stick glasses into individual cells inside your cardboard box. If you’re using bigger bubbles for heavier items like a large framed mirror or your CPU, one layer may suffice. Of course, you still need some crumpled packing paper for extra cushioning on all sides.
- Keep that bubble wrap firmly in place by taping not just along the edges but all the way around the item. This keeps everything more secure, and you won’t risk the bubble wrap falling off mid-move.
How to Bubble Wrap Common Moving Items
You might think you can just toss bubble wrap around everything and call it a day. However, some items require specific wrapping techniques for the bubble wrap to be fully effective. To make sure your most precious items arrive at your new home without a scratch, follow these tips on how to pack some of the most common household items with bubble wrap.
How to Wrap Dishes and Plates
Packing your kitchen involves a lot of fragile items. To protect these, first, always add plenty of bottom padding to your box before you start packing. Next, wrap each dish individually to prevent them from clanking together. Finally, always stand your plates upright in the box rather than stacking them flat to prevent too much pressure centered in one spot. If you need more detailed advice, check out our full guide on how to pack dishes.
How to Wrap Glasses and Stemware
Glasses and delicate stemware need a little extra love because of how easily they can break. When you wrap these, be sure to extend the bubble wrap right into the opening of the glass for extra interior support. We highly recommend you double wrap your most fragile items for ultimate peace of mind. Above all, completely avoid stacking your glasses unprotected. Check out our extra tips on how to pack mugs and teacups for more help.
How to Wrap Picture Frames and Mirrors
For uploader: This is an image that’s part of the current version of this blog post. To insert it into the updated version, click the “add media” tab in WordPress, use the dropdown menu to find the date the post was first published (July 2025) and find this image. Then insert it into the new copy.
Beautiful frames and large mirrors are highly prone to shattered glass and chipped edges. Keep them safe by adding specialized corner protectors before you start wrapping. Once you secure the plastic padding, slide them safely into specialty cartons for maximum protection during the bumpy ride.
How to Wrap a TV or Monitor
Screens can be tricky because plastic can actually leave strange marks on the glass. To avoid this, always add a soft paper or cardboard layer directly between the screen and your bubble wrap. Make sure you firmly protect the corners with extra padding. Whenever possible, use the original box your TV or monitor came in since it is literally built for the job.
When to Use or Avoid Bubble Wrap
While you might be tempted to cover everything you own in bubble wrap, sometimes it is just not the best packing material. Bubble wrap perfectly protects delicate and breakable items, so you definitely want to save it for belongings that might easily get scratched or cracked.
However, heavier and bulkier items can easily crush the little air pockets and make them pretty useless as protection. Plus, anything with a surface that might stick to plastic, like your beautiful varnished wood furniture, is a bad candidate for bubble wrap. Fabrics and materials that need airflow to breathe, including leather, always travel better wrapped in lightweight packing paper.
Here is a quick cheat sheet to help you decide exactly which material to choose:
Best Use Cases for Bubble Wrap vs. Other Materials
Use bubble wrap when:
- You need to protect large picture frames and mirrors.
- You are moving flat screen TVs and computers.
- You want to keep glass tabletops and shelving safe.
- You are packing stemware, fine china, or fragile decor.
Use packing paper when:
- You are packing heavy, bulky items that will crush bubbles.
- You have varnished wood furniture that sticks to plastic.
- You are packing leather or fabrics that need to breathe.
- You need a lightweight option to protect against scratches.
Common Bubble Wrap Mistakes to Avoid
Even the most careful packers can run into trouble if they fall for a few common traps. Avoiding these simple errors will keep your belongings safe and give you total peace of mind during your move. You can easily master the art of packing by watching out for these frequent slipups:
- Wrapping bubbles facing outward: Always put the bubbles against the item to provide the best cushion.
- Using too-small bubbles for heavy items: Large bubbles are much better for bulky furniture or appliances.
- Only wrapping once: Most fragile items like stemware need at least two layers to stay safe.
- Not filling void space in the box: Use crumpled paper to stop items from shifting around inside the box.
- Overpacking boxes: You should never have to force a box closed or press down on the items inside.
- Taping too loosely: Wrap your tape all the way around the item so the protection stays firmly in place.
Alternatives to Bubble Wrap
If you’re not going to use bubble wrap, what’s the alternative? Here are a few popular options, most of which can be found in your home or at a local hardware store:
- Packing paper. This is the standard for packing things prone to scratches, and you can use it to wrap items or fill spaces between things in a box.
- Towels. Wrapping your household goods in bath and kitchen towels is a time-honored way to move on the cheap. This one is best saved for things that aren’t especially breakable or fragile.
- Crumpled newspaper. Crumpled newspaper is an inexpensive option and an easy-to-obtain packing material that works especially well as cushioning between items in a box. One caveat — the ink could rub off on your stuff, so don’t put newspaper directly on anything that might stain.
- Air pillows. Air pillows are the sophisticated big cousin of bubble wrap, and they’re particularly good for filling voids in larger packing boxes.
- Packing peanuts and cornstarch peanuts. Their small size and lightweight structure make packing peanuts a viable option for filling gaps in a box or container. They don’t provide as much shock resistance as bubble wrap, so you probably shouldn’t rely on packing peanuts alone.
Kevin the Mover has this to say about packing peanuts:
“You may like the idea of those Styrofoam nuggets, but in general, they are bulky, costly, and non-biodegradable. The eco-friendly alternative, cornstarch peanuts, are even more expensive and don’t make for a very satisfying snack, no matter how hungry you are at the end of your move. Plus, they end up getting scattered all over the floor and clinging to your clothes. In short, use (and eat) them if you like, but I don’t recommend them.”
How to Reuse or Recycle Bubble Wrap
While bubble wrap is technically recyclable, there are practical issues in finding recyclers that actually accept it. Check your local area for locations that allow the drop-off of soft plastics. You might find these in local supermarkets that encourage customers to return and recycle plastic shopping bags.
“… [Anything] with a surface that might stick to plastic, like your beautiful varnished wood furniture, is a bad candidate for bubble wrap. [In addition, fabrics] and materials that need airflow to breathe…always travel better wrapped in lightweight packing paper.”
Reusing bubble wrap might be a better option. Unless you’ve already succumbed to the temptation of popping all those little bubbles with your fingers, your bubble wrap can be saved and reused. If you’re searching for used bubble wrap, check local businesses that get lots of product shipments, like furniture and electronics stores.
You can also hit up local community reuse groups for anyone who has some available from their last move. You might score a few sheets or an entire house’s worth of gently used bubble wrap.
Frequently Asked Questions About Bubble Wrap
How many layers of bubble wrap do I need?
For most fragile items like stemware or glass, you should use at least two layers of bubble wrap for proper protection. If you are using larger bubbles for heavy items like mirrors, one layer may be enough as long as you use plenty of packing paper for extra cushioning.
Can bubble wrap damage a TV screen?
Yes, plastic can leave marks on your screen, especially in extreme temperatures. To prevent damage, always place a layer of packing paper between the TV screen and the bubble wrap. This keeps your screen safe and smudge-free during transport.
What bubble size is best for dishes?
Small bubble wrap (3/16 inch) is the best choice for wrapping dishes and glassware. These smaller bubbles easily conform to the shape of your plates and bowls, providing a snug layer of protection against chips and cracks.
How do you keep items from shifting inside the box?
The best way to keep items still is to fill all empty spaces with crumpled packing paper or wadded-up bubble wrap. Once the box is full, give it a gentle shake. If you hear anything moving, simply add more padding until everything stays firmly in place.


 #1. The nicer the furniture, the more likely you’ll damage it.

