The Best Way to Unpack After Moving

Author:

Publish Date:

Last Modified Date:

Category: Loading & Unloading Guides, Organization

Tags: Tags: , , , , , , , , , , , , , , , , , , , , , , , , , , ,

Unpacking should be the best part of the entire moving process. No, really!

You’ve already coordinated all of the logistics of renting a truck and hiring Helpers, you’ve packed everything up, moved, and unloaded your rental truck. Now all that’s left to do is go through all of your boxes and get everything in its place so you can enjoy your new home!

So why do some people still dread unpacking? Well, imagine sitting amongst a mountain of boxes with no clue what’s inside any of them or where everything is going to go. Okay … yeah, that does sound pretty dreadful. But it doesn’t have to be that way! By planning your unpack, you can save time, money and headaches.

How to Make Unpacking Easier Before Moving Day Happens

We all know the quote, “If you fail to plan, you plan to fail.” The most important step to a smooth unpacking experience is proper planning before your move. 

Of course, you’ll have some planning to do if you’re booking movers and renting a truck … but you still need to spend some time packing. And no, we’re not talking about randomly throwing items into boxes and calling it a day.

Here are some things you should do before moving day to make unpacking easier.

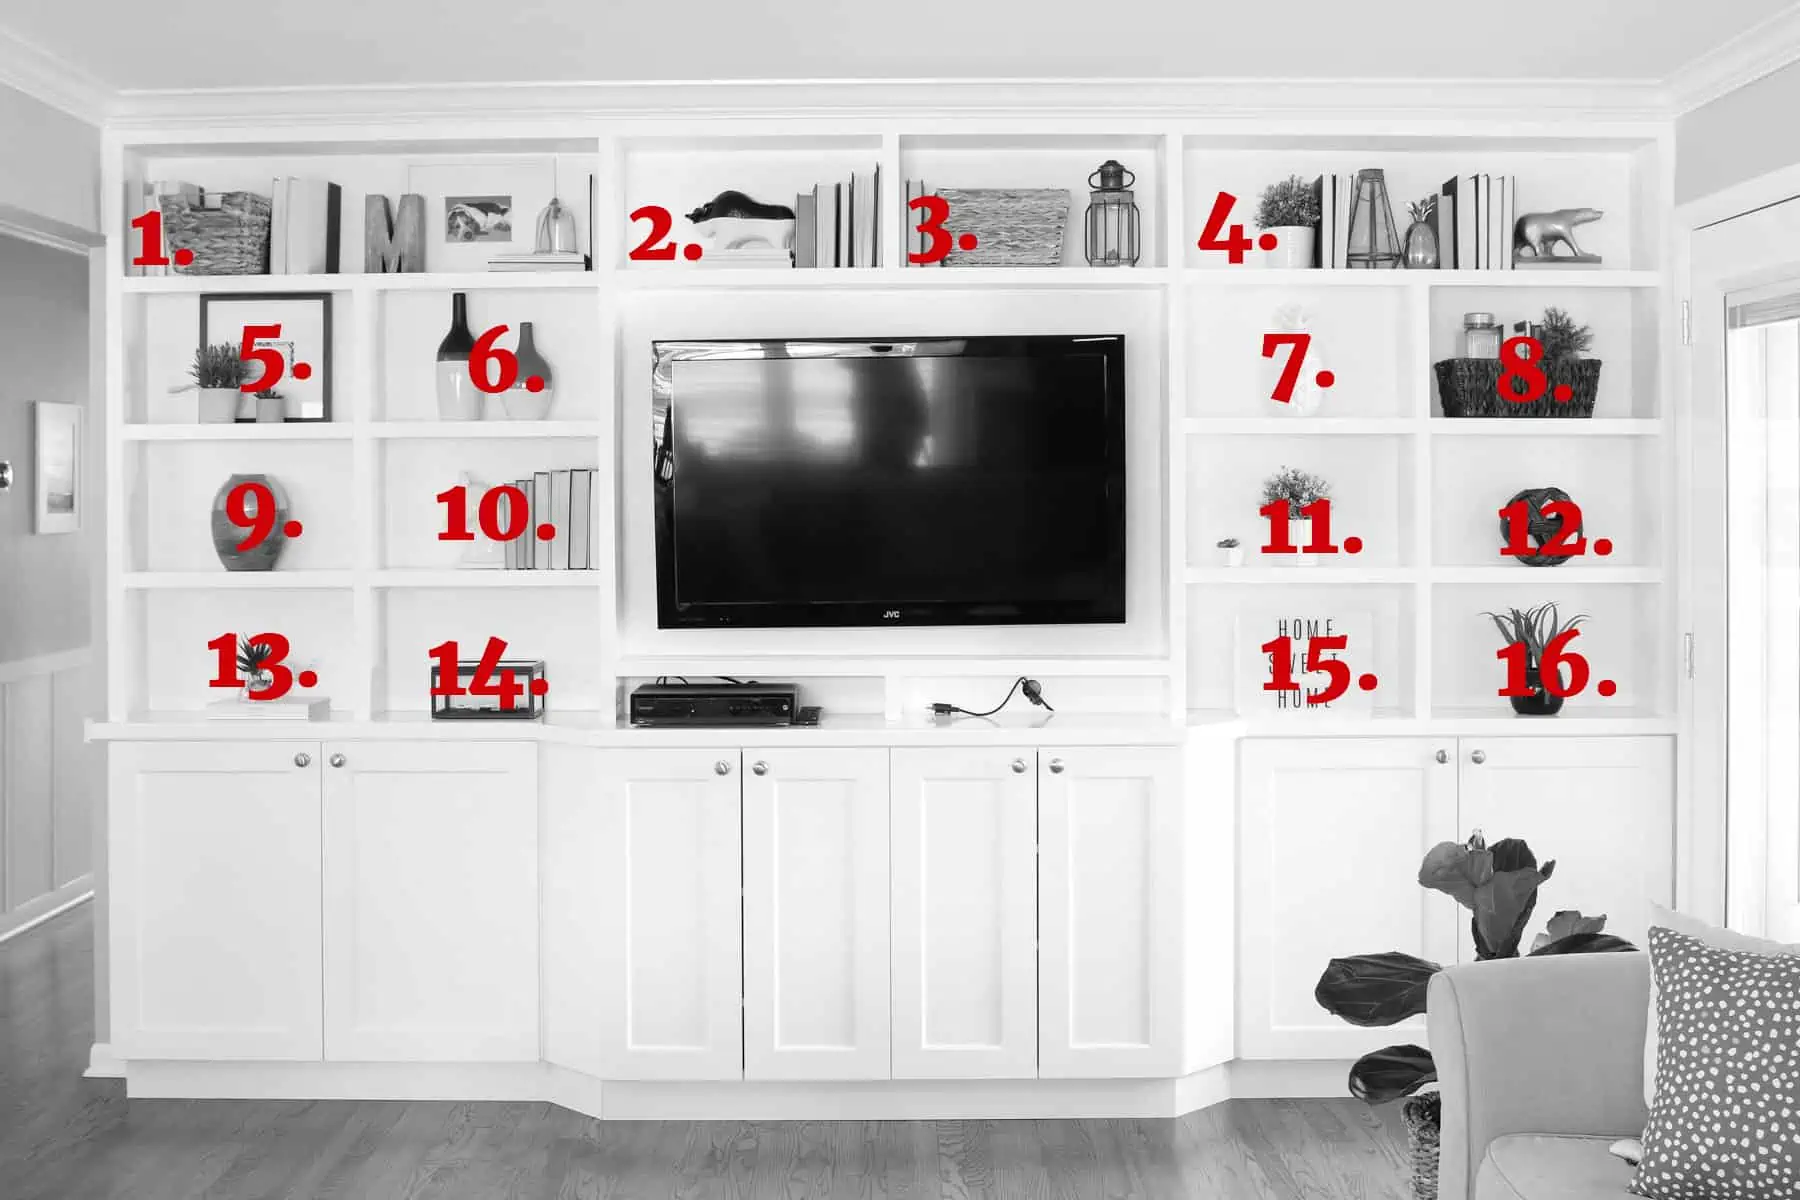
Take Photos Before You Start Packing

Before you touch anything, we want you to take out your phone and have a little home photo shoot. 

Here are things you especially need photos of:

  • Bookshelves
  • The back of your TV
  • Kitchen drawers
  • Desk area
  • Tool shed

We urge you to snap pics of the areas in your home that you love! We know all too well how long it can take to get a shelfie looking just the way you want it. By snapping some reference pics now, you’ll be able to replicate that new look in your home in no time.

Create a Number and Color-Coded System For Your Boxes
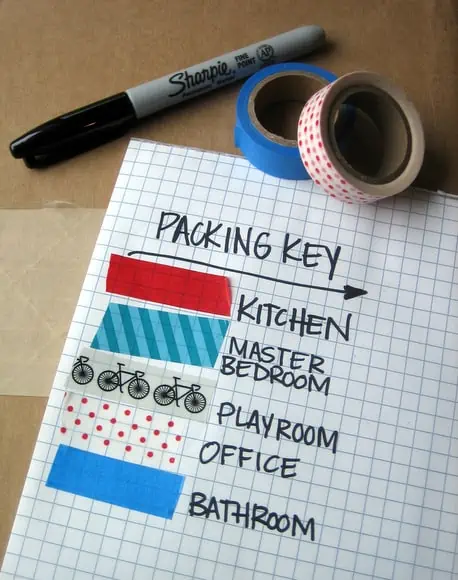
After the photo shoot, gather all of your packing supplies (boxes, paper, tape, scissors, markers … the works!) and start packing boxes like a pro.

Try to only pack up items from one to two rooms inside every box. This will make your life much easier when it’s time to unpack later.

Got a bunch of stuff on shelves? Create a numbered system to remember where everything goes. That way it’s easier to get them unpacked and into their new permanent spots.

And we can’t forget our favorite tip of all … our color-coded box systemWith this technique, you get to use our most beloved crafting tool—washi tape! Get the full instructions from this post, but the short version is that you need to separate your boxes by the room, marked with bright washi tape so your movers know exactly where to deliver them. Genius and oh so colorful!

Make it Much Easier to Unpack Essentials

There are 7 items you’ll want to have on hand for moving day, but we also think you should create a box of moving day essentials. Because imagine the night of moving day when you’re tearing open boxes trying to find pajamas, your toothbrush, and your medication for the night. Sounds like a disaster to us.

This is what should go in your “Moving Day Box” so you don’t have to tear through your moving truck:

  • A change of clothes
  • Utensils
  • Toiletries
  • Prescriptions
  • Phone charger

Be sure to label this box and keep it near you!

Get Help Unloading Your Rental Truck

See prices for movers by the hour—instantly.

Read real customer reviews.

Easily book your help online.


Clean The 5 Most Important Things

We know you have approximately 10,000 things to do to get your rental deposit back. But trust us, now is the time to give your new place a thorough cleaning because it’s empty. You simply put items in place rather than cleaning and unpacking at the same time. Want to know the five most essential things to clean?

  • Kitchen cabinets
  • The Refrigerator (and refrigerator fan)
  • Bathtub and any tub jets
  • Outside (and Inside) the stove
  • Washing machine

Unpacking Tips

You’ve done the prep work (even the cleaning, you rockstar, you!), and now moving day is here! Even if you hired help for your unload (great call), there are still things you can do to make unpacking time a little easier. 

Place Your Boxes in Rooms by Color
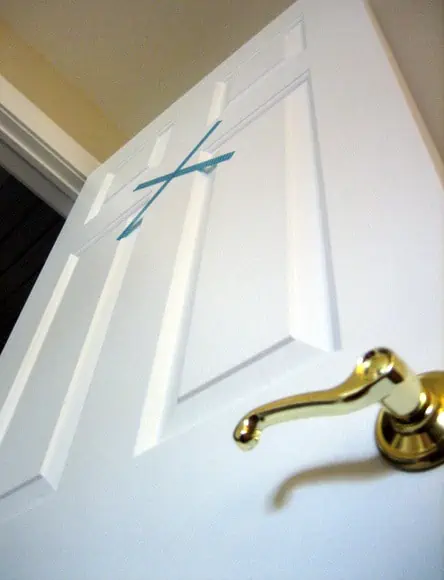
It may sound easier to just have your Helpers pile up all of the boxes in one spot of your new place, but unpacking will be a lot easier if you follow your color-coded box system to get each box in the correct room. If you followed our washi tape tips, you should have each door in your new place marked so the Helpers can easily drop the box in the right spot!

Protip: Get your “Moving Day Essentials Box” opened right away so you have everything you need to make it through the next day or two.

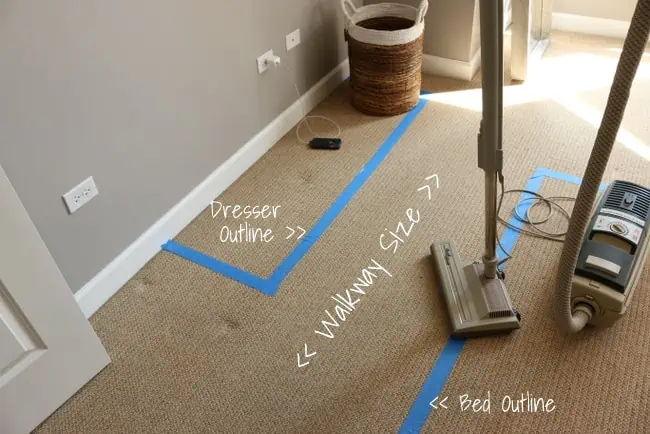
Use Washi Tape to Figure out Your Furniture Layout

As long as your movers are there, have them get your furniture in the spot where you want it! We love the idea of using painter’s tape to mark out the layout of furniture right on the floor.

Before you move (or even while your movers are bringing things in and out),  go around your place and put tape on the ground to outline your furniture. That way the movers will know exactly which wall to put your bed on and where that long dresser goes. You can always move things later on, but getting items in the correct space will make your life a lot easier in the coming days.

Unpack the Bathrooms and Bedrooms First

Moving day will be exhausting, so if you’re going to unpack anything immediately, make sure it’s your bed and bedding. Once your movers get the mattress into place, find the sheets, comforter and pillow and make your bed. If you have kids, do theirs too. Having a comfy spot to sleep at the end of the long day will feel amazing!

Unpack your bathroom boxes too. That way you’ll have all of the toiletries and medications on hand for the night and morning. A fresh shower after a long day of moving will be heavenly, trust us!

Save the Kitchen for Tomorrow

The kitchen is the most time intensive room to unpack, due to the amount of tiny and heavy items, so don’t unpack it on moving day. Your brain will be tired by the end of moving day, and you’ll want to be refreshed and recharged before you tackle this space. Save the kitchen until morning when you can make a fresh pot of coffee.

How to Stay Organized After Moving Day

You’re into your new home and you’re surrounded by all of your possessions. First, take a deep breath. You’ve made it this far! Now it’s time for the actual fun part … making your house a home.

Avoid Distractions, Don’t Unpack Games or TV

We might suggest making a playlist of music to entertain you, but we don’t think you should get your TV setup and turned on right away. You may find yourself sitting on the couch instead of unpacking if you have a TV show or movie on. So much temptation…

Another distraction? Little ones. You’ll additionally want to make a plan for your pets when you’re moving and unpacking, so they don’t get in the way. The same goes for kids. Have a plan to keep them occupied or if you can, drop them off at grandma’s house so you have uninterrupted time to unpack. It’s all about keeping the distractions to a minimum so you can devote enough hours to get your house in tip-top shape!

Unpack Only One Room at a Time

Instead of hopping from space to space, we suggest making a list of your rooms in order of importance. Then, don’t move onto another space until the one you’re on is done.

The kitchen, bedrooms and kids’ rooms should be up high on the priority list, while the guest room and garage may not need TLC right away. Also, make sure you have furniture and appliances setup before you get too carried away going through boxes. Did you clean your counters first? You’ll want to have spots to put all of the items as you whip them out of the boxes, so having dressers and cabinets ready to go is a must!

Break Down Boxes as You Go, in Real Time

As you unpack boxes, it may be easy to just throw empty ones in a big corner. But trust us, that pile will quickly get out of control and soon you won’t be able to walk around your house without an empty box tumbling down on you. Take one box and make it the designated paper box. As you unpack boxes, crumple up the paper and shove it into that box. Then, be sure to break down boxes as you unpack. You’ll want to have a utility knife on hand so you can do this quickly.

(And Don’t Unpack Everything)

There may be some boxes that don’t actually need to be unpacked. We’re looking at you, Christmas decorations. Make a large pile of items that may be heading to storage or the garage. Then be sure to get those items to that space in the coming days.

What to Do After You’re Unpacked

You’ve made it! You survived moving day and every box in your place is unpacked. You should be feeling pretty darn good about yourself right about now, but the fun isn’t over just yet. There are still a few things you can do to really get your unloading and packing done.

Make Use of Those Moving Boxes

If you will be moving again soon, then you may want to hang onto some of the boxes that are still in good condition. Organize your boxes and find a spot to neatly tuck them away. Are you thinking, “What the heck do I do with all of that cardboard?!” Don’t fret! Instead, try out some of the cardboard hacks.

If getting creative with cardboard isn’t your speed, you can recycle your moving boxes. Check out this searchable database that’ll let you know the closest place to recycle anything (including moving boxes!). Just be sure to set a deadline for yourself to get those moving boxes out of your new place, so they don’t stay piled in the garage forever.

Use These Organization Protips

We’re all guilty of just shoving random items into a cabinet or closet and calling it a day. But to really feel settled in your new home,  be intentional with what goes where. Check out this post on how to organize house keys:

Whenever we’re on an organization spree, we go room by room with a notepad and write down areas that need our attention. Then we’ll spend 30 minutes each night giving those spots some TLC. Those short increments of time seem much more doable than an entire day spent organizing an entire home.

Let the Decorating Begin! (In a Month)

We always say that you need to live in your home for a while in order to decorate it well. So many people quickly buy furniture and accessories for their place without ever giving each room a test run, and they end up with design regret. Yep, don’t paint the walls until you’ve spent a little time in your new place!

We promise that you’ll make much smarter decor decisions after 2-3 months.

Here’s how to get started when it’s time to begin: 

It may not seem like it, but unpacking can be the best part of the moving experience! We promise that these tips will make your unpacking experience easier and more efficient.

The sooner you unpack, the sooner you can enjoy your new life!

A Pro’s Guide to Moving Heavy Furniture Without Hurting Yourself

Author:

Publish Date:

Last Modified Date:

Category: Loading & Unloading Guides

Tags: Tags: , , , , , , , , , , , , , , , , , , , ,

Chances are, there are near by movers who can help you move that fridge, bed, or whatever else makes your back ache by the mere thought of picking it up. But if you can’t find the right help, or if you and your back feel up to the task, then keep reading—we’ve got you covered!

The First Step to Moving Heavy Furniture

Abraham Lincoln once said, “Give me six hours to chop down a tree and I will spend the first four sharpening the axe.” Okay, that’s a little weird, but moving heavy furniture is the same idea. You gotta really, really prepare.

Before you roll up your sleeves and start picking stuff up, you’ll want to do a few things:

  • Clear as wide of a pathway as you can
  • Measure that your furniture isn’t too big to go through that path
  • Mark a clear, physical end point where you will drop the item

The last one will probably be near your moving truck or storage container or, if you’re particularly strategic, a staging area (meaning your driveway, sidewalk, or the garage during sketchy weather) in order to better “Tetris” your stuff.

Disassembling Furniture

The great news is that many movers across the country will offer to disassemble any furniture that might need it in order to be moved. All you have to do is ask if your local mover offers the service.

If you’re disassembling furniture all yourself, there are plenty of basics to know when taking off table legs, moving desks, or detaching a flat screen tv.

The Most Important Basics When it Comes to Disassembly

  • When removing table legs, immediately reattach whatever nuts and bolts were holding the leg in place after the leg is off. This keeps screws from disappearing 
  • Always use a screwdriver with a magnetic head when unscrewing flat-screen tv mounts, as losing important screws is extremely easy to do
  • Dresser mirrors always get removed and properly packed up. Any undetachable dresser mirrors require tons of special attention to move
  • Dining room chairs aren’t often designed to be taken apart easily, if at all. But if you have chairs with exposed bolts or screws, you may be able to disassemble them

The above just scratches the surface of what professional movers with experience know about moving furniture and disassembling furniture. You’ll learn plenty, just like I did, by trying to do it yourself.

Get Help Unloading Your Rental Truck

See prices for movers by the hour—instantly.

Read real customer reviews.

Easily book your help online.


“The IKEA-Exception”

The furniture in your home didn’t just grow there, right? It had to have been carried in.

But the one exception to the “furniture doesn’t grow there” concept is IKEA-like furniture, or in other words, most anything you had to assemble yourself.

Full-Service moving companies will generally refuse to move customer-assembled furniture made of pressboard. This is because such furniture was designed to be assembled, put in place, and never ever moved again. Any customer requesting their pressboard bookcase (or pressboard anything) be professionally moved usually has to sign a waiver stating they understand it will very likely get destroyed and the movers will assume zero responsibility for the destruction.

If you have any pressboard furniture or any furniture that – be honest with yourself – is generally cheap and flimsy, consider selling it or giving it away. Moving it costs time and money and will more than likely turn it into an unusable piece (or pieces) of trash.

Wrapping Furniture

how to move heavy furniture

At some point during the move-out process, you’ll need to wrap your furniture so it doesn’t get scratched, gouged and cracked into oblivion.

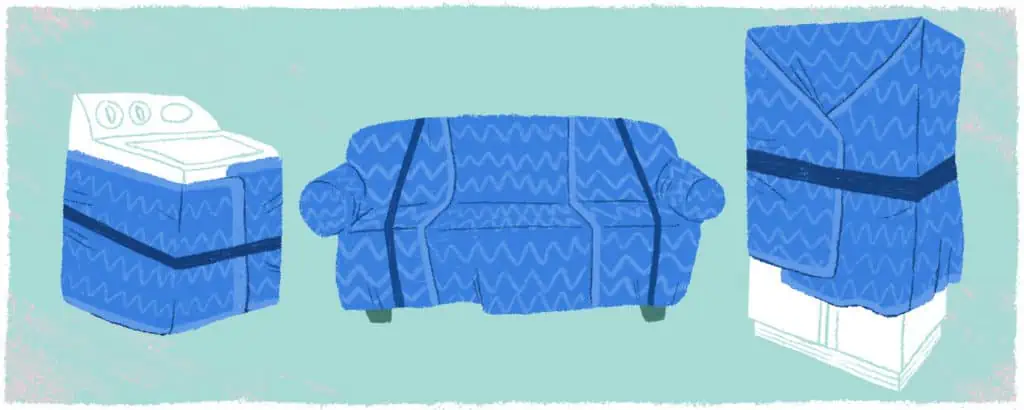
Cloth furniture pads (also known as “moving blankets”) are what movers use, and we highly recommend them. Wrapping your furniture before you carry it through your home and out the door can help protect it against incidental dings in the doorway and, quite possibly, holes in your walls.

No true professional mover will ever dream of transporting heavy furniture without furniture pads.

Protip: Moving pads can make it hard to keep a firm grip on your furniture. I always preferred to wrap everything in the staging area, or right there on the truck.

The Most Important Basics When it Comes to Wrapping Furniture

Wrapping a refrigerator or a bookcase is pretty straightforward. Wrapping a non-rectangular item like a sofa or a chair can be a challenge.

  • The key is to secure your furniture pads neatly and tightly, covering every surface except, in general, the bottom side
  • You mostly need to just make sure the pads don’t come off. Some movers use shipping tape to keep their pads in place, while others use shrink wrap. Both are effective but costly (not to mention a little wasteful). That’s why other movers use big rubber bands called “mover’s bands”. They are versatile and reusable for applications far beyond moving furniture (like, say, wrapping an office chair)
  • To secure those pads, whether you use tape, shrink wrap or those big rubber bands, just remember: avoid putting tape or shrink wrap directly on your furniture’s surfaces

How Many Furniture Pads Do I Need?

For reference, furniture pads the pros use measure 72” x 80”, give or take.

End tables, small bookcases, and dining room chairs usually only need one (1) pad; most furniture needs two (2), while things like sofas, really large dressers, even some big headboards need three (3) apiece.

How many furniture pads do you need, then? Your best bet is to go from room to room, check how many things you have that need to be wrapped, note how many pads each item will require to cover their surface, then tally it all up. (To be safe, you might want to tack on a half dozen more!)

How Do Pros Move Furniture Through Doorways?

how to move heavy furniture

Angling

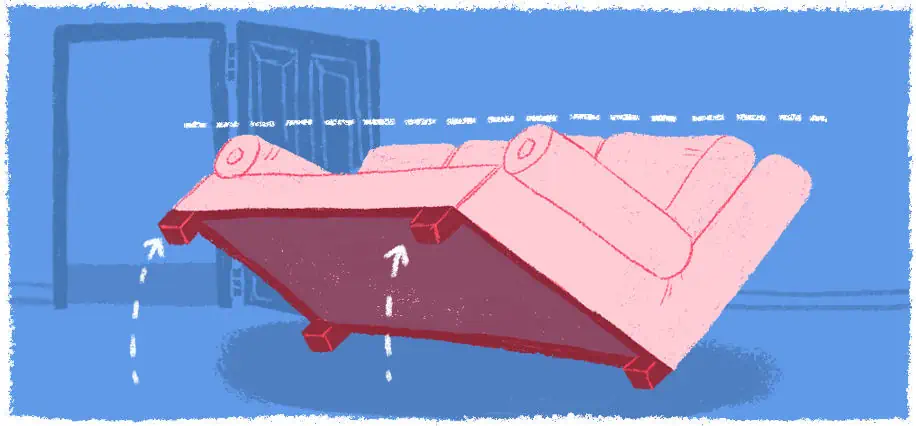
If your sofa is too wide to fit through a doorway in your home, there are a few things you can do.

The simplest is to tilt it 45 degrees (more or less) so the front edge of the seat cushions and the top of the back of the couch are aligned vertically. This will make the bottom rear edge of the couch look like it is sticking further out, but all you geometry lovers out there will appreciate how this actually makes the couch narrower.

Curling

If your couch is still too wide, try standing it on end and curling it through.

Laying down a blanket first will help you smoothly and safely slide your couch through the doorway. Ease the top back edge through first, then curl the sofa around the side of the doorway closer to the seat cushions as you slip the rest of the couch through. (You can also push it through seat cushion edge first.) This same strategy can be used when trying to get oversized easy chairs through a seemingly too-narrow door.

Detaching

If you find you need a few extra inches of clearance before your sofa will pop through that doorway, try removing the legs or feet.

Even though they are sometimes nothing but short squares of wood, I’ve found on many occasions that taking them off is the difference between success and a damaged door jamb. On occasion, I’ve had to actually remove a door from its hinges in order to get a couch out the door. While not difficult, you will need a flat head screwdriver and a hammer to coax those hinge pins out, and a couple of extra sets of hands to keep the door in place until those pins pop free.

Moving Furniture Up and Down Stairs

how to move heavy furniture

Hauling large pieces of furniture – more importantly, heavy pieces of furniture – down a flight of stairs is a dangerous proposition if you don’t take it slow (and smart).

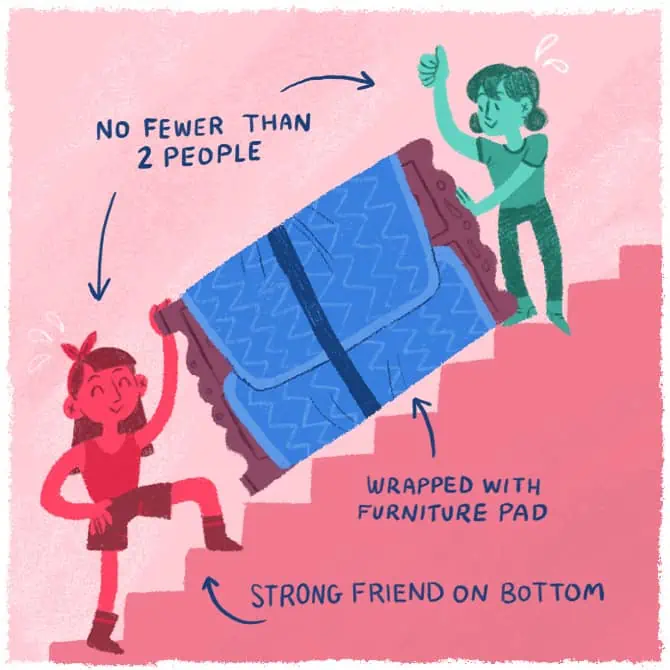
  • Make sure you have a strong friend (if not two) on the lower end as you go down (or up) the stairs. Take those steps one at a time. Rest as often as need be, simply by laying that dresser or bookcase down, right on the stairs. Just make sure it doesn’t start sliding!
  • Watch for walls, banisters, and hanging light fixtures
  • It’s easy when you’re watching your feet to forget about everything else. And that, I can tell you, includes your knuckles!
  • When sliding items around corners on landings, use a blanket underneath
    • When doing so, put a blanket down to make the sliding process easier and to avoid damaging that dresser and/or the floor. If the floor is carpeted, the item is really heavy, or if the surface it is resting on is uneven, try walking that thing forward – using small, slow, easy steps

Using Wheels to Move Your Furniture

how to move heavy furniture

If you aren’t The Hulk, a little extra help in the form of wheels can make a huge difference. Here are what the pros use:

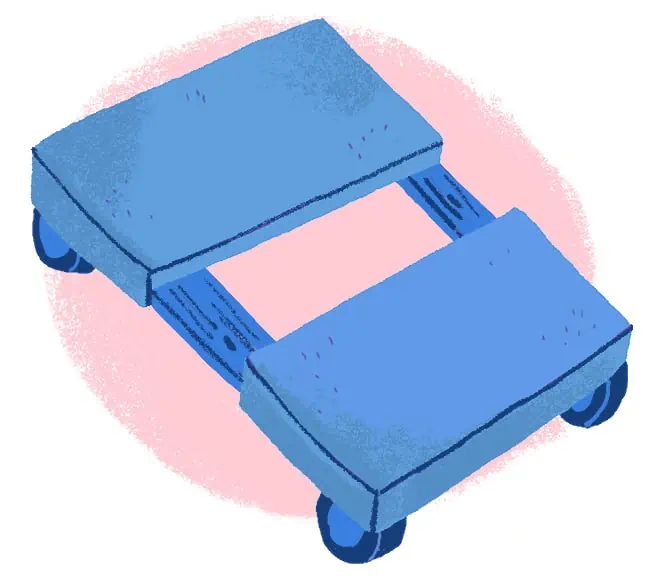
  1. 4-wheeler: A 4-wheeler is great for moving large, heavy items over long flat distances. Two main things to watch for: your piece of furniture is resting firm and balanced, and that the wheels, usually black rubber, aren’t marking or scuffing your floors.
  2. Hand truck: A hand truck has two wheels and a metal plate on which to rest your furniture, and a long upright surface with handles. Their soft-ish wheels let you move heavy items up and down stairs and across uneven surfaces all by yourself. However, we highly recommend having a second set of hands at the lower (bottom) end of that piece of furniture any time you are negotiating stairs.
  3. Appliance dolly: An appliance dolly is basically a heavy-duty hand truck with a strap to secure in place the refrigerator, washing machine, dryer or whatever. Despite its name, an appliance dolly can absolutely be used to haul furniture.

This All Seems Hard. Are There Furniture Movers Near Me, Just In Case?

Most likely, yes!

See prices for local moving labor. Read real customer reviews. Easily book your help online.

Start by searching HireAHelper’s massive network of local movers to find movers near you to tackle the big stuff. You don’t necessarily need to hire an entire moving crew if you just need to move your heaviest items.

Normal moving rates will apply, usually starting at a couple hundred bucks for two experienced professionals for two hours. They will usually bring all the necessary equipment, too!

If you just aren’t sure you want to move heavy furniture yourself, relax. Professionals know how to do everything in this article. If you’re doing a long distance move, our sister company Moving Place can provide you with movers, transportation and everything you might expect from a full service move at a fraction of the price.


Illustrations by Marlowe Dobbe
×

I'm Moving

Moving? Thinking about moving? Whether your move is off in the distance or you already have one foot out the door, you'll learn about everything you should expect through our useful how-to's, cool articles and much more. It's all specially curated for you in our "I'm Moving" section.
Explore
×

I'm a Mover

For rookies or veterans alike, our "I'm a Mover" section is filled with extensive industry news, crucial protips and in-depth guides written by industry professionals. Sharing our decade of moving knowledge is just one way we help keep our professional movers at the top of their game.
Explore