7 Places Landlords Always Check When You Move Out

Author:

Publish Date:

Last Modified Date:

Category: Apartment Life, Moving Advice

Tags: Tags: , , , , , , , , , , , , , , , , , , , , , ,

So your old apartment is empty. The last box, the last chair, and the last potted plant are on the moving truck. You’ve swept the floors, vacuumed the carpets, and taken out the trash. The place looks just like it did when you moved in.

Or does it?

Before your landlord gives you your security deposit back they’re going to give your old pad a thorough inspection. And there are places tenants tend to overlook that landlords always check. Here are 7 of those areas you’ll need to look over — and clean — to make sure you get that deposit money back.


1. Refrigerator

a woman wearing pink rubber gloves uses a sponge to clean out the interior of a fridge

While you might have eaten, thrown out, or put all the salvageable food into a cooler already, there are some places in your fridge you might not think to clean — but your landlord will absolutely check. 

First, defrost it. Ice can build up over time, and it’s good to let it melt to really clean the inside. Make sure to wipe down the back, front, handles, and top of the fridge. 


“If you live in a place with hard water, baking soda sprinkled on the stains and then sprayed with a 1:1 mixture of vinegar and water will make scrubbing easier once it sits for 15 minutes.”


You’ll also need to pull it away from the wall and clean all the dust and gunk and unidentifiable bits of food that have been festering underneath. And remember to clean the wall back there too!

Protip: All this applies to the washer and dryer too (except maybe the defrosting part).

2. Cabinets  

a woman reaches into the back of an open kitchen cabinet

Wiping and cleaning all the cabinet doors and handles is only the beginning. The top edges of your cabinet doors have a bad habit of collecting dust and grime. Same with the insides of the doors (though we’re not sure how!). 

One place the landlords will look over that you might not notice are the hinges. Be sure to give those a wipe-down, too. And finally, stick your head and your hands right into those cabinets to make sure they are as clean on the inside as they are on the outside. 

3. Sinks 

someone scrubbing a sink's faucet, which is covered in suds

Both in the kitchen and the bathrooms. While you can get the basin sparkling like the sun, if you haven’t dipped your cleaning brush down into the drain (as far as reasonably possible) you risk losing your deposit

Shine up the faucet too, making sure you scrub away all the gunk that tends to grow around the base of the faucet — especially in the back. You need to make sure the stopper/plug is free of scum, hair, and rust, so you might have to do some minor plumbing to remove it for an inspection.  

4. Toilets

a woman scrubs under the lip of a toilet bowl with a bristled brush

Just flushing won’t do the trick. You’ll need to grab that toilet brush and get rid of all the stains on the inside of the bowl. 

Once you’ve gotten that out of the way, it’s time to wipe down and clean up the outside — including the back side, one place that many a renter will miss. And if you can, take the cover off the tank (carefully) and ensure the underside of that cover and the top edge of the tank looks good. (If it’s any consolation, you probably won’t have to clean the inside of the tank.)

5. Showers 

a person out of frame holds and points at a shower head with hard water stains on it

Possibly the toughest part to clean, and it’s also immediately obvious to your landlord whether they’ll have to penalize you here.

Get a strong cleaner and a stiff brush and give it some elbow grease. If you live in a place with hard water, baking soda sprinkled on the stains and then sprayed with a 1:1 mixture of vinegar and water will make scrubbing easier once it sits for 15 minutes.  

Like the sinks, you’ll need to pay attention to the water fixtures, including where they meet the shower tiles and the shower head itself. The grout will also need to be scrubbed, especially in the corners.   

6. Door Knobs 

a toddler turns a light off and opens a door as they exit a room

We touch them more than anything else in the house, but they often get overlooked. The front door, the bathroom door, the bedroom doors, and the back door, not to mention the handles on all the drawers and appliances; they may not be filthy and covered with gunk, but they need to be wiped down.

Now, think about how often we push a door closed without touching the handle or knob. This means a slow build-up of residue from our fingers and hands that can easily go unnoticed by a tenant, but certainly not by a landlord who hasn’t been desensitized to seeing it every day. This “print” on door handles and frames will need to be cleaned as well.  

This also applies to light switches, switch plates, and the walls around them. 

7. Dust magnets 

a yellow dust cleaner is wiped along the top of the blades of a ceiling fan

There are countless places where dust and yuck can collect: the top edges of doors and window frames; on curtain and closet rods; on the upper sides of light fixtures; along baseboards and on windowsills; on air vents and window blinds; and on the top edge of the bathroom mirror. 

Try looking around a room and wondering where dust might collect, but not be wiped off, or places where you rarely look.  

Now Show Your Landlord Your Work

Even if you get the old pad looking perfectly spotless, your work is not quite over. Get with your landlord and do a final walk-through together. If there are any issues that would keep you from getting your security deposit back, your landlord will be obliged to tell you on the spot. 


“…a slow build-up of residue from our fingers and hands that can easily go unnoticed [on doors and light switches] by a tenant, but certainly not by a landlord…”


If the place indeed looks just as good as it did when you moved in, you can either ask for your deposit back or get a signed letter or form stating you’ve fulfilled your obligations as a renter and will be getting your deposit returned to you.

Hey, your landlord is going to be thorough. So should you.

See prices for local moving labor. Read real customer reviews. Easily book your help online.


The Best Way to Unpack After Moving

Author:

Publish Date:

Last Modified Date:

Category: Loading & Unloading Guides, Organization

Tags: Tags: , , , , , , , , , , , , , , , , , , , , , , , , , , ,

Unpacking should be the best part of the entire moving process. No, really!

You’ve already coordinated all of the logistics of renting a truck and hiring Helpers, you’ve packed everything up, moved, and unloaded your rental truck. Now all that’s left to do is go through all of your boxes and get everything in its place so you can enjoy your new home!

So why do some people still dread unpacking? Well, imagine sitting amongst a mountain of boxes with no clue what’s inside any of them or where everything is going to go. Okay … yeah, that does sound pretty dreadful. But it doesn’t have to be that way! By planning your unpack, you can save time, money and headaches.

How to Make Unpacking Easier Before Moving Day Happens

We all know the quote, “If you fail to plan, you plan to fail.” The most important step to a smooth unpacking experience is proper planning before your move. 

Of course, you’ll have some planning to do if you’re booking movers and renting a truck … but you still need to spend some time packing. And no, we’re not talking about randomly throwing items into boxes and calling it a day.

Here are some things you should do before moving day to make unpacking easier.

Take Photos Before You Start Packing

Before you touch anything, we want you to take out your phone and have a little home photo shoot. 

Here are things you especially need photos of:

  • Bookshelves
  • The back of your TV
  • Kitchen drawers
  • Desk area
  • Tool shed

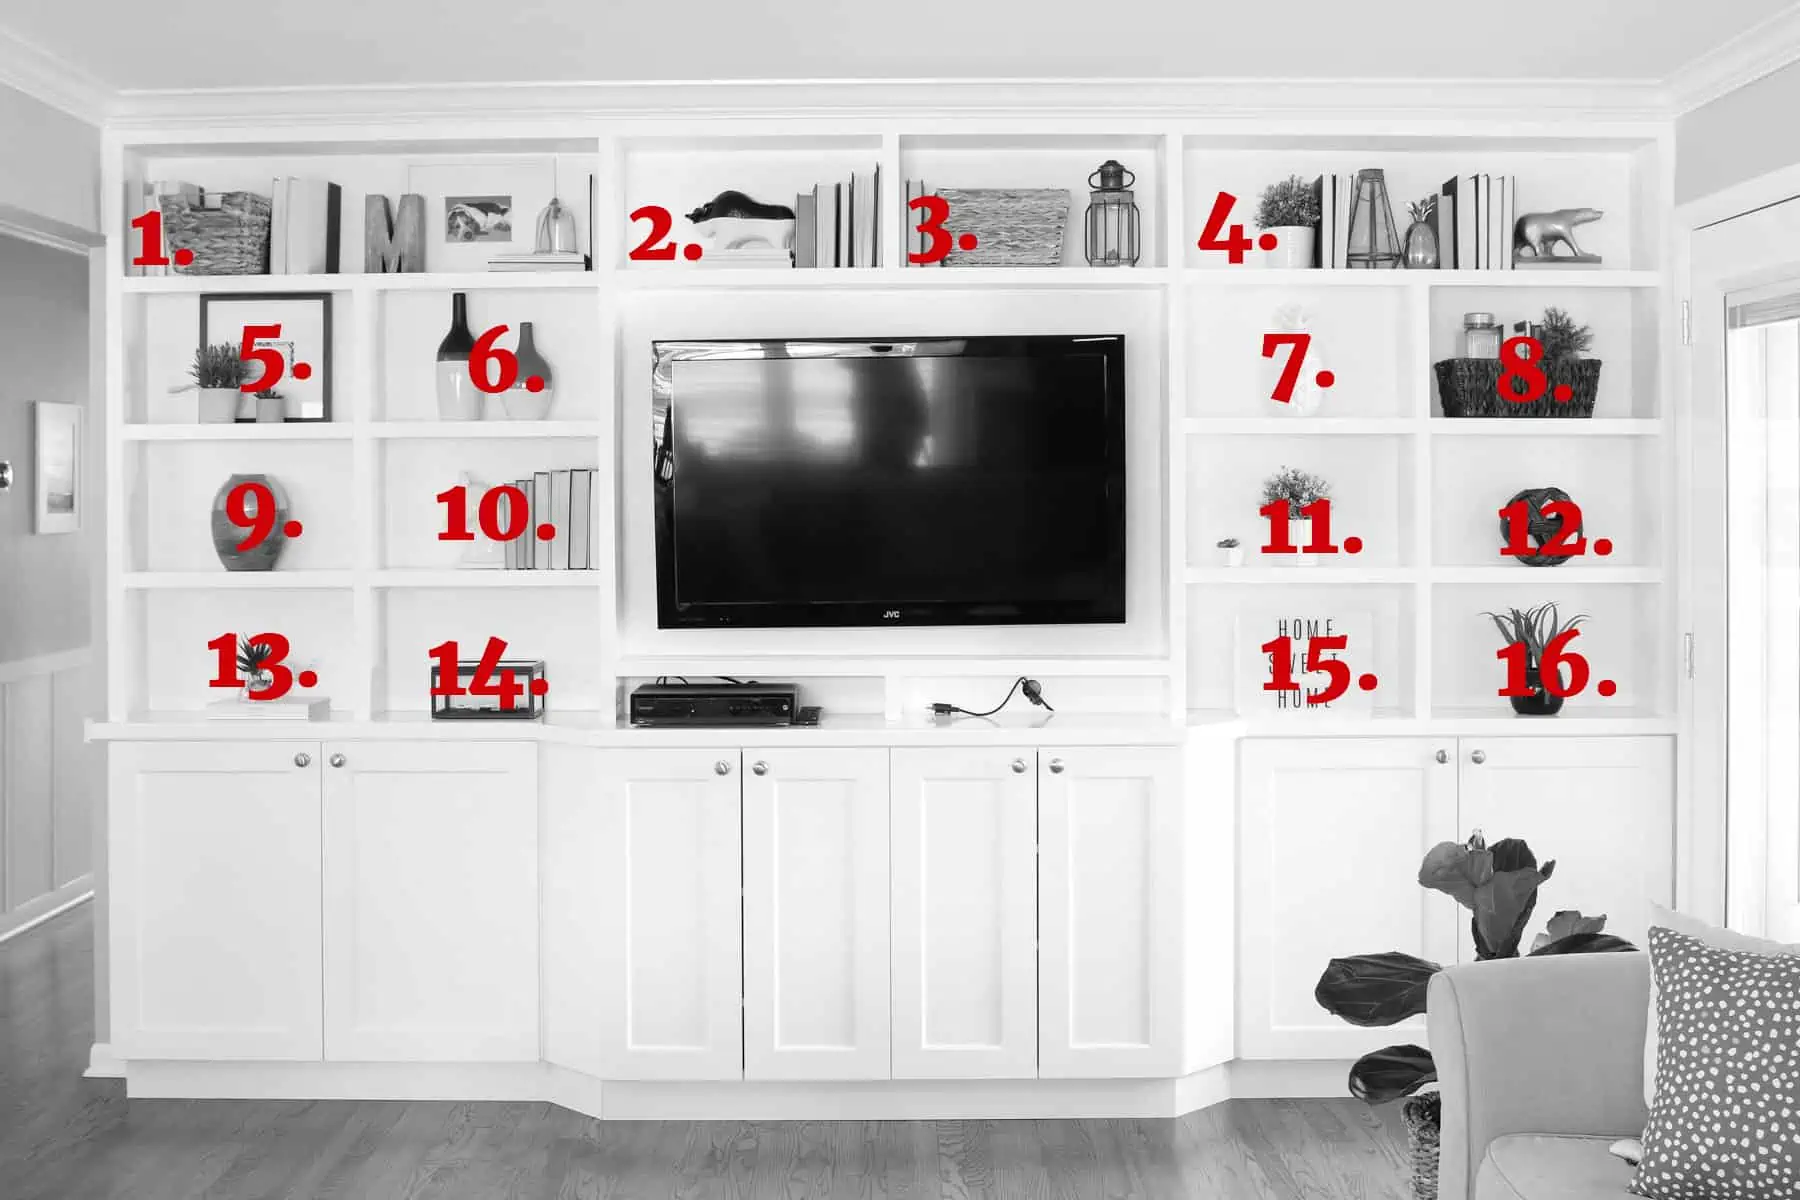
We urge you to snap pics of the areas in your home that you love! We know all too well how long it can take to get a shelfie looking just the way you want it. By snapping some reference pics now, you’ll be able to replicate that new look in your home in no time.

Create a Number and Color-Coded System For Your Boxes

After the photo shoot, gather all of your packing supplies (boxes, paper, tape, scissors, markers … the works!) and start packing boxes like a pro.

Try to only pack up items from one to two rooms inside every box. This will make your life much easier when it’s time to unpack later.

Got a bunch of stuff on shelves? Create a numbered system to remember where everything goes. That way it’s easier to get them unpacked and into their new permanent spots.

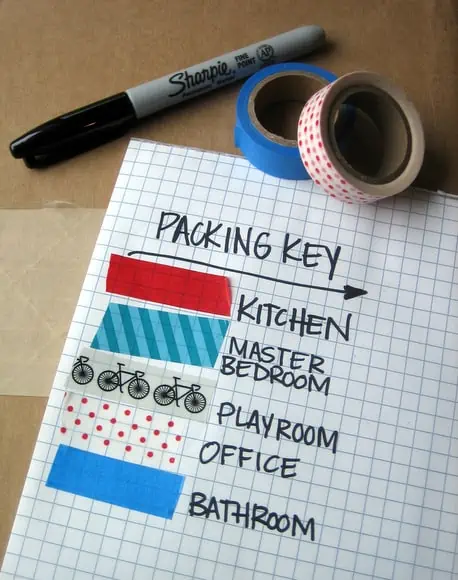
And we can’t forget our favorite tip of all … our color-coded box systemWith this technique, you get to use our most beloved crafting tool—washi tape! Get the full instructions from this post, but the short version is that you need to separate your boxes by the room, marked with bright washi tape so your movers know exactly where to deliver them. Genius and oh so colorful!

Make it Much Easier to Unpack Essentials

There are 7 items you’ll want to have on hand for moving day, but we also think you should create a box of moving day essentials. Because imagine the night of moving day when you’re tearing open boxes trying to find pajamas, your toothbrush, and your medication for the night. Sounds like a disaster to us.

This is what should go in your “Moving Day Box” so you don’t have to tear through your moving truck:

  • A change of clothes
  • Utensils
  • Toiletries
  • Prescriptions
  • Phone charger

Be sure to label this box and keep it near you!

Get Help Unloading Your Rental Truck

See prices for movers by the hour—instantly.

Read real customer reviews.

Easily book your help online.


Clean The 5 Most Important Things

We know you have approximately 10,000 things to do to get your rental deposit back. But trust us, now is the time to give your new place a thorough cleaning because it’s empty. You simply put items in place rather than cleaning and unpacking at the same time. Want to know the five most essential things to clean?

  • Kitchen cabinets
  • The Refrigerator (and refrigerator fan)
  • Bathtub and any tub jets
  • Outside (and Inside) the stove
  • Washing machine

Unpacking Tips

You’ve done the prep work (even the cleaning, you rockstar, you!), and now moving day is here! Even if you hired help for your unload (great call), there are still things you can do to make unpacking time a little easier. 

Place Your Boxes in Rooms by Color

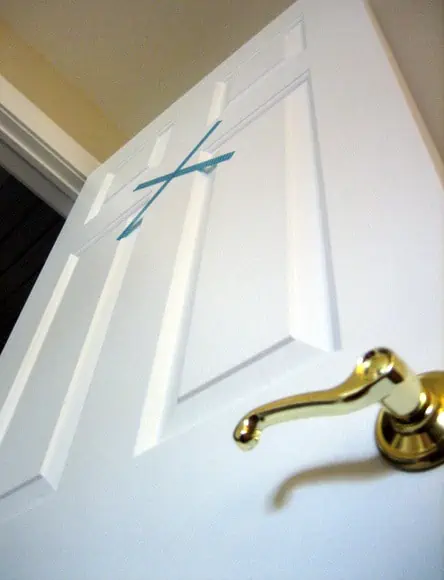
It may sound easier to just have your Helpers pile up all of the boxes in one spot of your new place, but unpacking will be a lot easier if you follow your color-coded box system to get each box in the correct room. If you followed our washi tape tips, you should have each door in your new place marked so the Helpers can easily drop the box in the right spot!

Protip: Get your “Moving Day Essentials Box” opened right away so you have everything you need to make it through the next day or two.

Use Washi Tape to Figure out Your Furniture Layout

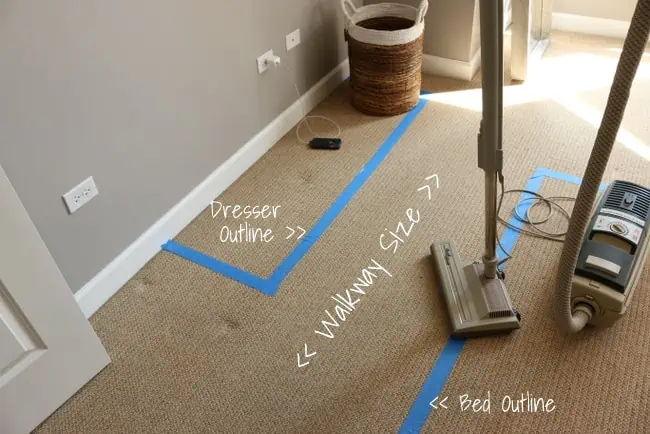
As long as your movers are there, have them get your furniture in the spot where you want it! We love the idea of using painter’s tape to mark out the layout of furniture right on the floor.

Before you move (or even while your movers are bringing things in and out),  go around your place and put tape on the ground to outline your furniture. That way the movers will know exactly which wall to put your bed on and where that long dresser goes. You can always move things later on, but getting items in the correct space will make your life a lot easier in the coming days.

Unpack the Bathrooms and Bedrooms First

Moving day will be exhausting, so if you’re going to unpack anything immediately, make sure it’s your bed and bedding. Once your movers get the mattress into place, find the sheets, comforter and pillow and make your bed. If you have kids, do theirs too. Having a comfy spot to sleep at the end of the long day will feel amazing!

Unpack your bathroom boxes too. That way you’ll have all of the toiletries and medications on hand for the night and morning. A fresh shower after a long day of moving will be heavenly, trust us!

Save the Kitchen for Tomorrow

The kitchen is the most time intensive room to unpack, due to the amount of tiny and heavy items, so don’t unpack it on moving day. Your brain will be tired by the end of moving day, and you’ll want to be refreshed and recharged before you tackle this space. Save the kitchen until morning when you can make a fresh pot of coffee.

How to Stay Organized After Moving Day

You’re into your new home and you’re surrounded by all of your possessions. First, take a deep breath. You’ve made it this far! Now it’s time for the actual fun part … making your house a home.

Avoid Distractions, Don’t Unpack Games or TV

We might suggest making a playlist of music to entertain you, but we don’t think you should get your TV setup and turned on right away. You may find yourself sitting on the couch instead of unpacking if you have a TV show or movie on. So much temptation…

Another distraction? Little ones. You’ll additionally want to make a plan for your pets when you’re moving and unpacking, so they don’t get in the way. The same goes for kids. Have a plan to keep them occupied or if you can, drop them off at grandma’s house so you have uninterrupted time to unpack. It’s all about keeping the distractions to a minimum so you can devote enough hours to get your house in tip-top shape!

Unpack Only One Room at a Time

Instead of hopping from space to space, we suggest making a list of your rooms in order of importance. Then, don’t move onto another space until the one you’re on is done.

The kitchen, bedrooms and kids’ rooms should be up high on the priority list, while the guest room and garage may not need TLC right away. Also, make sure you have furniture and appliances setup before you get too carried away going through boxes. Did you clean your counters first? You’ll want to have spots to put all of the items as you whip them out of the boxes, so having dressers and cabinets ready to go is a must!

Break Down Boxes as You Go, in Real Time

As you unpack boxes, it may be easy to just throw empty ones in a big corner. But trust us, that pile will quickly get out of control and soon you won’t be able to walk around your house without an empty box tumbling down on you. Take one box and make it the designated paper box. As you unpack boxes, crumple up the paper and shove it into that box. Then, be sure to break down boxes as you unpack. You’ll want to have a utility knife on hand so you can do this quickly.

(And Don’t Unpack Everything)

There may be some boxes that don’t actually need to be unpacked. We’re looking at you, Christmas decorations. Make a large pile of items that may be heading to storage or the garage. Then be sure to get those items to that space in the coming days.

What to Do After You’re Unpacked

You’ve made it! You survived moving day and every box in your place is unpacked. You should be feeling pretty darn good about yourself right about now, but the fun isn’t over just yet. There are still a few things you can do to really get your unloading and packing done.

Make Use of Those Moving Boxes

If you will be moving again soon, then you may want to hang onto some of the boxes that are still in good condition. Organize your boxes and find a spot to neatly tuck them away. Are you thinking, “What the heck do I do with all of that cardboard?!” Don’t fret! Instead, try out some of the cardboard hacks.

If getting creative with cardboard isn’t your speed, you can recycle your moving boxes. Check out this searchable database that’ll let you know the closest place to recycle anything (including moving boxes!). Just be sure to set a deadline for yourself to get those moving boxes out of your new place, so they don’t stay piled in the garage forever.

Use These Organization Protips

We’re all guilty of just shoving random items into a cabinet or closet and calling it a day. But to really feel settled in your new home,  be intentional with what goes where. Check out this post on how to organize house keys:

Whenever we’re on an organization spree, we go room by room with a notepad and write down areas that need our attention. Then we’ll spend 30 minutes each night giving those spots some TLC. Those short increments of time seem much more doable than an entire day spent organizing an entire home.

Let the Decorating Begin! (In a Month)

We always say that you need to live in your home for a while in order to decorate it well. So many people quickly buy furniture and accessories for their place without ever giving each room a test run, and they end up with design regret. Yep, don’t paint the walls until you’ve spent a little time in your new place!

We promise that you’ll make much smarter decor decisions after 2-3 months.

Here’s how to get started when it’s time to begin: 

It may not seem like it, but unpacking can be the best part of the moving experience! We promise that these tips will make your unpacking experience easier and more efficient.

The sooner you unpack, the sooner you can enjoy your new life!

How Often Should You Clean These 20 Household Items?

Author:

Publish Date:

Last Modified Date:

Category: Home Improvement, Organization

Tags: Tags: , , , , , , , , , , , , , , ,

Cleaning the house is one of those things that most people just don’t like to do. Getting out the rubber gloves, smelling all of the chemicals and spot cleaning with a toothbrush isn’t exactly the most appealing activity.

However, different areas in your house can be a breeding ground for bacteria, mold and fungus. Places you didn’t know were hazardous like your kitchen and bathroom sinks can become some of the most disgusting places.

So how often, exactly, should you clean each area of the home? We’ve got your answers!


[SEE FULL INFOGRAPHIC]


How Often Should You Clean Your Living Room

Living Rooms

Your living rooms are naturally some of the cleanest parts of the home. However, we can track dirt in or kids and pets can make spills, so it’s best to keep up with this area fairly often. Here’s how often you should clean things in your living room.

Carpet

Once a week: Your carpet is a place where dust, dirt and allergens tend to hide. Giving your floors a weekly clean with a good-quality vacuum cleaner is super important. In places with constant foot traffic, you may want to vacuum more than once a week.

Protip: If you need to spot clean a stain, you can mix a teaspoon of liquid dish detergent with a quart of warm water and ¼ teaspoon of white vinegar. Apply this mixture on the spot and then rinse and blot dry!

Couch

Once every two weeks: Most people don’t realize how much dirt, dust, fur and oils your furniture absorbs. It can host allergens and other nasty things if left unattended. Regular cleaning can help extend the life of your furniture, which means a surface cleaning every couple of weeks using the upholstery attachment on your vacuum.

Protip: You should also plan to have a professional clean the upholstery about once a year, depending on how much you use the piece of furniture. If you develop a stain in between cleanings, put your iron on the “steam” setting and wave it back and forth over the problem spot.

Windows and Blinds

Once a month: The windows and blinds in your house can accumulate dust and dirt. To keep the mess at bay, you should try to wipe down your windows and blinds at least once a month.

Protip: When cleaning your blinds, you can use an old sock dipped in a 50/50 solution of vinegar and water. Stick your hand inside the sock and swipe it over each blind for a quick and easy clean.

Ceiling Fans

Once a month: Have you ever had dust accumulate on the blades of your ceiling fan? Since it’s so high up, many people forget that it’s up there until the dust bunnies have already taken over. To prevent the dust buildup, dust the top of your blinds once a week.

Protip: You can prevent the dust from falling everywhere if you use a pillowcase to dust your fan blades. Simply slide each fan blade into the pillowcase and enclose the case around it, then slide it off. The dust will stay inside the pillowcase and you can easily throw it in the wash when you’re done!

Baseboards

Once a month: Your baseboards can collect dust and dirt, but most homeowners don’t see cleaning the baseboards as a priority. If you keep up with cleaning them once a month the task won’t be too time-consuming.

Protip: Use the brush attachment on your vacuum to swipe the top edge where the dust settles. If there are scuffs or spills, wipe them away with an erasing sponge.

How Often Should You Clean Your Bedrooms

Bedrooms

Your bedroom may accumulate more germs than you realize. Since you spend a good amount of time here (approximately one-third of your life), it tends to accumulate germs. How often exactly should you clean your sleeping quarters? We explain here.

Bed Linens

Once a week: Bed sheets can accumulate a serious collection of sweat, body oils, dirt from outside and more. When they get too dirty they can become a breeding ground for bacteria and fungi. Those are not things you want sharing a bed with you! While most people wash their sheets only every four weeks, experts recommend washing them once a week.

Protip: If you have white sheets, toss a squeeze of lemon juice in the washer. It’s a natural brightener without the chemicals in bleach products.

Duvet Cover

Once a month: If you use a top sheet you can get away with washing your duvet cover once a month. If you don’t, you may want to wash it every two weeks just to be safe. Like pillows and bed linens, duvet covers can be a breeding ground for bacteria, fungus and dust mites.

Protip: Changing a duvet cover is on most people’s list of top annoying things, but did you know there is a simple hack to make the job easier? Use the burrito method for an easy switcharoo. Turn your duvet cover inside out and place comforter on top. Roll it up, tuck it in, and unroll it—it’s magically on!

Bed Pillows

Every three months: While you should be washing your sheets (and pillowcases) once a week, you should be washing the pillows themselves once every three months. Pillows can play host to critters and debris like dirt, oil, skin cells and even dust mites.

Protip: Most down-alternative pillows can go in the washing machine, while feather pillows need to be dry cleaned. Buy down-alternative to ensure cleaning is easy and frequent.

Mattress

Every three months: Your mattress is another thing that can accumulate sweat, dust, dust mites and allergens quite easily. To keep the bacteria and fungi at bay, clean your mattress with the seasons. You can use the upholstery attachment to vacuum the mattress, and clean its cover (if it has one).

Protip: Spot clean oil stains or food spills with a mix of baking soda, salt and water. Cover the stain, let it sit for 30 minutes then wipe it away with a damp cloth.

Closets

Twice a year: It’s usually a best practice to do a full-closet cleaning and purge twice a year. While it can seem like a daunting task, having a clean closet full of clothes you actually wear can be a game changer for your morning routine.

Protip: When purging, keep basic, classic items and toss anything trendy you haven’t worn in over a year. You can also ditch duplicate items or things you don’t feel comfortable in. Your closet should be full of only things that make you happy!

How Often Should You Clean Your Bathroom

Bathrooms

We all know the bathrooms can get pretty gross, but most people probably still don’t clean them as often as they should. Things like bath towels and bath mats can accumulate mold, while your toilet and sink can be a bacteria breeding ground. Here’s how often you should clean the things in your bathroom.

Toilet

Every day: Toilets have a reputation for being the dirtiest place in the house, but the average toilet is cleaner than you think. To make sure your toilet stays sanitary, it’s best to give it a light clean every day, then give it a deep clean once a week.

Protip: Want to keep toilet stains at bay? Pour vinegar in the top of your toilet and let that sit while you spray vinegar around the seat and clean.

Bathroom Sinks

Every day: Did you know that your bathroom sink is even dirtier than your toilet seat? The bacteria travel from your hands onto the sink every time you wash your hands, so it’s incredibly important to disinfect your bathroom sinks every day.

Protip: You can use disposable disinfecting wipes daily to make sure the area stays sanitized. It’s easy, and you can throw the whole mess away afterward!

Bath Towels

Every three or four uses: Towels are tricky, because the more you use them, the more often you will need to change them. If you take more than one shower a day, or if you have multiple family members using a towel, it may need to be cleaned once every couple of days.

Protip: On the other hand, if you’re the only one using it and you shower at the gym three times a week, you may be able to get away with washing it weekly. Be sure to wash your towels in water that is at least 140 degrees Fahrenheit (60 degrees Celsius) so that you kill all of the bacteria that’s inevitably breeding them.

Shower Grout

Once a week: Your grout can be one of the most annoying things to clean in your bathroom. However, it can also make the most impact on how clean your bathroom looks. Nobody likes a shower with dirty grout, so keep up with cleaning it weekly.

Protip: To clean, dip a toothbrush in bleach and scrub any discolored areas. Every once in a while you will need to seal your grout so that water and mold can’t seep in.

Bath Mats

Once a month: Bath mats that have rubber backing can wear out faster if they are washed more than once a month. However, mats that don’t have a rubber backing, or that are in a frequently used or extra-dirty space like the kids’ bathroom can be washed more often.

Protip: If a rug doesn’t have time to dry out it can harbor all kinds of mold and fungi. To kill all signs of life, wash the rug on high heat. Rugs with rubber backing should be air-dried.

How Often Should You Clean Your Kitchen

Kitchens

Believe it or not, your kitchen is the dirtiest place in your house. This is pretty unsettling considering we cook our food here. But, that’s precisely why it’s so dirty! Germs like e.coli can stick on cutting boards, hide in your fridge and set up camp in your sink. Here’s how often you’ll need to clean to maintain a safe and sanitary cooking environment.

Kitchen Counters/Sink

Every day: The kitchen sink and counters can be another place that germs accumulate. Since you’re often cutting meat and dealing with food products, the kitchen sink can actually end up being one of the dirtiest places in the whole house.

Protip: To keep your eating area sanitary, use one tablespoon bleach in one quart of water and spray down the sink daily. You can also use disposable disinfecting wipes here.

Sponges

Every week: Unfortunately, the trend is to keep your kitchen sponges until they smell and fall apart. Letting them get this bad means that they’re teeming with bacteria, funguses and things that can potentially make you sick. You should be cleaning your sponge weekly, and replacing them every two to three weeks.

Protip: For their weekly cleanings, mix ¾ cups bleach in one gallon of water and let your sponges soak for several minutes. Then just rinse and you’re done!

Oven

Once a month: Many people think that cleaning their oven is something to save for a special occasion, but the longer you wait to clean it, the harder it will be. Keeping up with monthly cleanings is the best way to make sure your oven stays in good working order.

Protip: A trick to making the process easier is to put a bowl of water in the oven and turn it up to high for 20 minutes. This will help loosen some of the dried dirt and grease. Then, wait for the oven to cool before wiping it clean!

Dishwasher

Once a month: Most people don’t realize that their dishwasher can accumulate all sorts of gunk and grime. It cleans the dishes you eat off of so you will want to make sure you give it a routine cleaning once a month (and a deep cleaning once or twice a year).

Protip: Place a cup of vinegar inside the dishwasher and run it on a hot water cycle. This is a great way to routinely clean your dishwasher and keep it in tip-top shape.

Refrigerator

Four times a year: A clean fridge is a safe fridge, yet nobody likes to deep clean it. While it’s best to give it a wipe down daily, you should only need to give it a deep clean about four times a year.

Protip: When you’re getting ready to clean the fridge, purge it of any ingredients that are past their “use by” date. Remove and soak the drawers in warm water while you wipe down the rest of the fridge. It’s best to work in sections so that all of your food doesn’t get too warm!

How Often Should You Clean These Household Items

7 Things I Learned When Downsizing From a House in California to a Shoebox in NYC

Author:

Publish Date:

Last Modified Date:

Category: Organization

Tags: Tags: , , , , , , , , , , , , ,

Full disclosure: I’m a child of the suburbs. I grew up in sprawling northern California, where trips to used bookstores and the mall are practically pastimes. There wasn’t much spatial constraint when it came to accumulating things. If I picked up a tchotchke, there would definitely be a place for it somewhere in my home.

(more…)

If You Only Clean 5 Things When You Move in, Just Make Sure It’s These Things

Author:

Publish Date:

Last Modified Date:

Category: Home Improvement

Tags: Tags: , , , , , , , , , , , , , , , , , , , ,

Moving into a new house is SUCH an exciting time! There are so many fun memories that lie ahead, including everything about unpacking, getting settled in and decorating your gorgeous new home. But before totally settling in and getting cozy, we think it’s important to do that super important deep clean.

(more…)

×

I'm Moving

Moving? Thinking about moving? Whether your move is off in the distance or you already have one foot out the door, you'll learn about everything you should expect through our useful how-to's, cool articles and much more. It's all specially curated for you in our "I'm Moving" section.
Explore
×

I'm a Mover

For rookies or veterans alike, our "I'm a Mover" section is filled with extensive industry news, crucial protips and in-depth guides written by industry professionals. Sharing our decade of moving knowledge is just one way we help keep our professional movers at the top of their game.
Explore