The 5 Best Free Apps for Virtually Designing Your Room

Author:

Publish Date:

Last Modified Date:

Category: Buying & Selling a Home, Home Decorating

Tags: Tags: , , , , , , , , , , , , , , , , , , , , , ,

Designing a room isn’t rocket science, right?

That is, until you realize your brand new couch is too big and you need to return it. Or all your new paint colors end up clashing. Or heck, maybe you put all your new furniture down and suddenly realize you needed a rug to tie everything together.

Lucky for you, as usual, there’s an app for that. Virtual room designer apps let you set up and measure any kind of room ahead of time, so you can see what your imagination actually looks like (plus figure out what it might cost to make it).

And if you’re planning to relocate, they’re super handy for bringing your designs with you to your home inspection or walkthrough, so you can accurately design even before you move!

In This Article

Because there are dozens of virtual room design apps, we did the hard part and tried them all to see which ones actually get the job done.

Our research mostly focused on free virtual room designer tools (because remodeling and moving can be expensive enough as it is). Each app was used to create the same downstairs basement room to more objectively compare user experience. We separated our findings by smart device and desktop experiences, as we realize that not all people are comfortable with or have access to both. Some apps appear on both lists because they’re available for smartphones and desktops. We intentionally treated them as separate options because the functionality and UX can be incredibly different between platforms.

5 Best Free Virtual Room Designer Apps for Smartphones and Tablets

  1. Planner 5D | ⭐⭐⭐⭐

App Store Rating: 4.3
Google Play Rating: 3.5
Pricing: 3-day free trial if you preapprove the $59.99 annual subscription, or $9.99 30-day subscription.

At the top of our list, Planner 5D is one of the best apps to design a floorplan, place furniture, and experiment with a new aesthetic. A necessary note is that it’s not the most straightforward home design app in the world, but can still be hobby-level simple once you get the basics down.
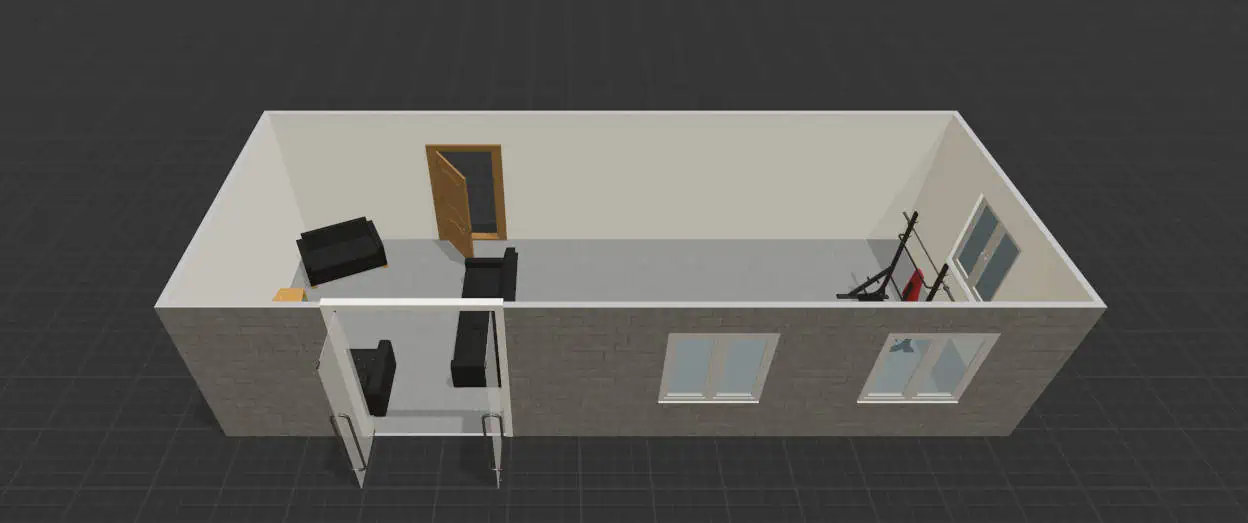
2D and 3D mockups are fast and easy in Planner 5D

Why it’s good: Those willing to potentially spend a little money for an app that truly is a one-stop shop for floor plans, design options, and visual “inspo” (spoilers: most apps don’t do all three well).

What it’s not good for: Those who are short on cash or aren’t looking for the complexity of a fully-loaded app experience.

User-friendliness: Difficulty-wise, Planner 5D is on par with the other apps – a bit confusing, but doable. We found its room scanner function to be inaccurate and difficult to edit. Of all apps reviewed, this one was hardest on phone storage, requiring a photo dump before it could be downloaded. Lastly, a credit card is required to use the free trial, so it’s not totally free.

  1. Room Planner | ⭐⭐⭐⭐

Room Planner comes with a variety of quick-start options
App Store Rating: 4.6
Google Play Rating: 4.2
Pricing: Free, $5.99/week for the PRO version to gain access to more items and functionality.

This is the best option if you want to draw your floorplan and design a room all in one app without putting in your credit card info. Room Planner has much of what you get from Planner 5D listed above, minus the more extensive catalog of furniture and 3D viewing options.

Why it’s good: Most users will find Room Planner a great fit for their needs, especially given that it’s free and your floor plans are saved in the account you create.

What it’s not good for: Those wanting more furniture options to cultivate a more unique look may not love it. Generally, while it’s a great planning tool, it does fall a bit short of what most users are looking for in the design department.

User-friendliness: Room Planner could do with fewer interruptions asking you to upgrade to the PRO version and to rate the app. Additionally, the tool layout is very detailed for the limited room smartphones generally have on a small screen, so placing and turning furniture is a bit difficult.

  1. Home Design 3D | ⭐⭐⭐⭐

App Store Rating: 4.3
Google Play Rating: 3.5
Pricing: Free with in-app upgrades and purchases

The free version gives you the tools you need to draw a room to scale, although you’ll ultimately choose from a fairly limited furniture library to decorate.

Why it’s good: People who are mostly looking for floor planning with only some light interior design abilities.

What it’s not good for: Those who want a single app to make all of their design dreams come true. Home Design does an okay job, but you won’t be able to easily change colors and designs to achieve a specific aesthetic unless you choose the paid version.

User-friendliness: Home Design is surprisingly intuitive. You’ll use drag-and-drop motions to draw rooms, place furniture, and arrange items. Those familiar with other basic design tools like Canva would likely be able to use this. However, it is difficult to scale items up or down, meaning you won’t be able to perfectly mock up your existing furniture. Lastly, the free version of this app doesn’t allow you to save your designs, so plan ahead if you want to keep your project.

See prices for movers by the hour – instantly.

Read real customer reviews.

Easily book your help online.


  1. Homestyler | ⭐⭐⭐

App Store Rating: 4.5
Google Play Rating: 3.6
Pricing: Free with in-app upgrades and purchases

This is one of few design apps that allow users to really explore more specific design styles and trends. The free version allows you to design blank rooms for fun, or take a photo of your space to place virtual decor in for inspiration. 
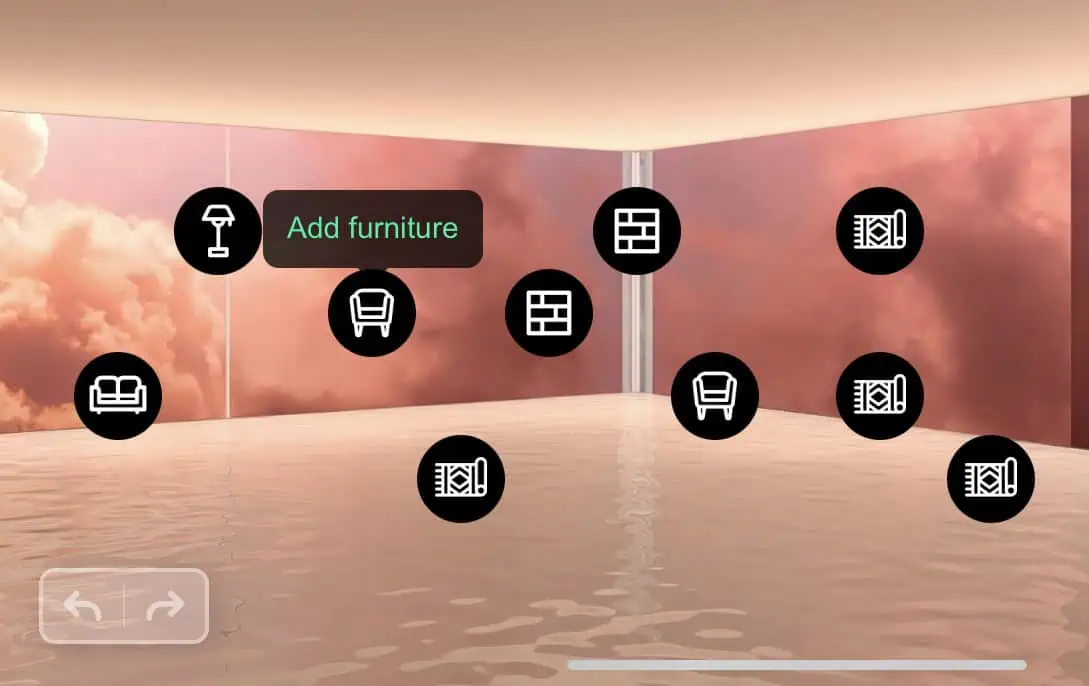
Homestyler has built-in templates if you like to design for practice or fun

Why it’s good: Those looking to test-drive cool new aesthetics in their current space layout (or those who just like to design just to pass the time).

What it’s not good for: Planning where your current furniture will go in your new space, or anything that requires size and space coordination. The app simply doesn’t have these capabilities.

User-friendliness: It couldn’t be easier to drag and drop furniture into your space on the app. However,  advanced functions like turning an item were very difficult to get the hang of. This app works best if you have an empty space to place virtual furniture in; otherwise, it’s challenging to work around your existing furniture.

  1. MagicPlan | ⭐⭐

App Store Rating: 4.7
Google Play Rating: 4.1
Pricing: Free trial, then $9.99 for additional projects

Lower on our list is Magicplan. The app was made to create floorplans, reports, and estimates, so expect it to be geared more toward home professionals than DIY designers. That said, it’s still on this list because it’s a  pretty powerful program if you only need floorplanning.
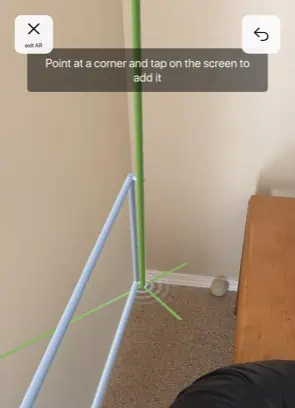
MagicPlan uses VR to scan the dimensions of your room, detecting the corners as you go

Why it’s good: Virtually planning where your furniture will go in 3D space. Think planning for a medium- or long-distance move, or even just furniture shopping.

What it’s not good for: Those looking to flex their design muscles. Its design capabilities are almost nil compared to other apps, meaning that you’ll only be able to add placeholder furniture to your room. You won’t be able to design colors, patterns, or add specific furniture models.

User-friendliness: MagicPlan is relatively easy to get started with, especially with the on-screen prompts and its ability to scan through items on the floor. That said, it can be hard to understand when the room scan should end and the planning phase begins.

5 Best Free Virtual Room Designer Apps for Computers

  1. Sweet Home 3D | ⭐⭐⭐⭐⭐

(Web access or download for Windows/macOS/Linux)
Pricing: Free

At the top of our list is Sweet Home 3D, a free and fairly easy-to-use platform that allows you to customize virtually everything about your hopeful designs. Beginners often love this app enough to spring for the premium version, thanks to how easy it is to use and the ability to import from photos.
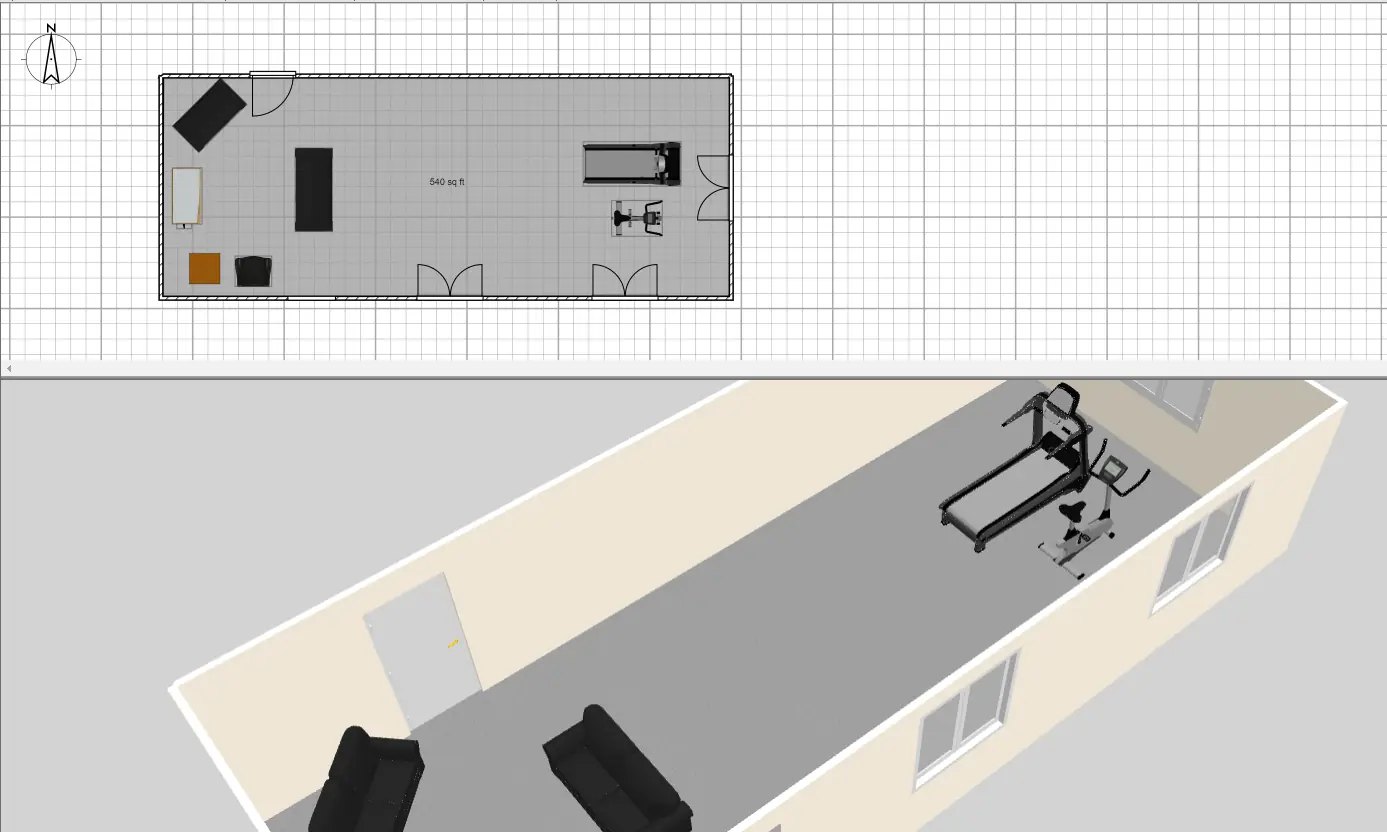
Sweet Home 3D provides both floorplan and 3D rendering views at the same time, unlike other tools

Why it’s good: Those with highly specific space and detail needs who are comfortable with a powerful tool that provides lots of options and customization.

What it’s not good for: Someone looking for a quickstart tool that provides lots of design aesthetic inspo. Sweet Home 3D doesn’t provide that for you.

User-friendliness: Sweet Home 3D isn’t as intuitive as other options… however, it is still fairly easy to use, as long as you’re comfortable with design programs. (And if not, you can easily Google help if you get stuck.) This app earns bonus points for having one of the only user-friendly search functions in its furniture library, meaning more time designing and less time scrolling.

  1. Homestyler | ⭐⭐⭐⭐⭐

(Web access only)
Pricing: Free with account creation

An excellent professional quality app with an easy-to-learn and use interface for people just starting out. Homestyler currently boasts the design genre’s biggest catalog of design aesthetic furniture in its free category, which makes it especially good for those doing renovations.
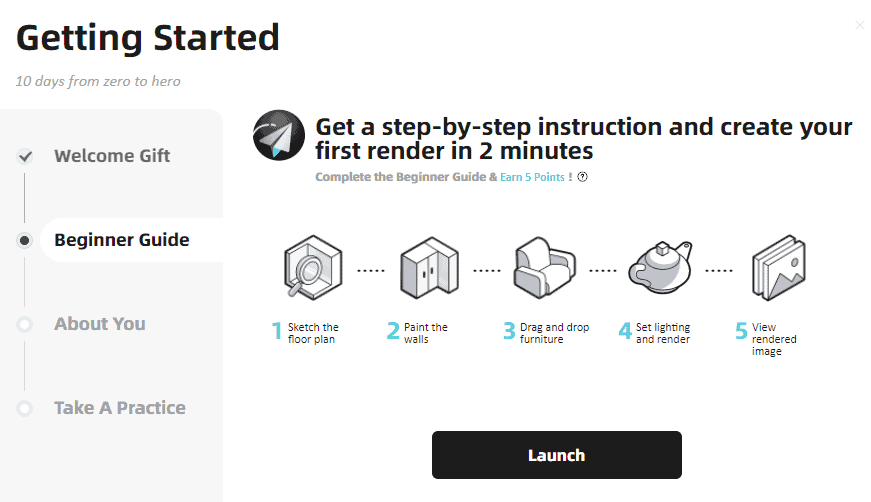
Homestyler is one of the only computer apps to provide a tutorial

Why it’s good: It’s a free and fully-loaded design experience that can easily transition onto the app version. Also great for those planning renovations who want a large catalog of trendy furniture and accessories.

What it’s not good for: There aren’t many drawbacks to Homestyler, except for its inability to fully customize doors and windows. If for whatever reason those are an important part of your design plan, this may not be the tool for you.

User-friendliness: For most features, Homestyler is a big thumbs up. It’s easy to draw your room and place openings and furniture in it. However, the tool for adjusting flooring does needs some work. Getting started may take you some extra time because you do have to create an account and click through tutorial prompts before you can design.

With that said, having the option to use the paired app is a big plus if you’re on the go, or house-hunting in a different city or state.

  1. Roomstyler | ⭐⭐⭐⭐

(Web access only)
Pricing: Free with account creation

Another PC app with a smartphone version, Roomstyler is also high on our list because of its relative ease of use and decently extensive library of free furniture and accessories. Users have reported that the import option is a breeze to use on your computer, plus you can access your finished designs on the smartphone app to reference away from your computer.
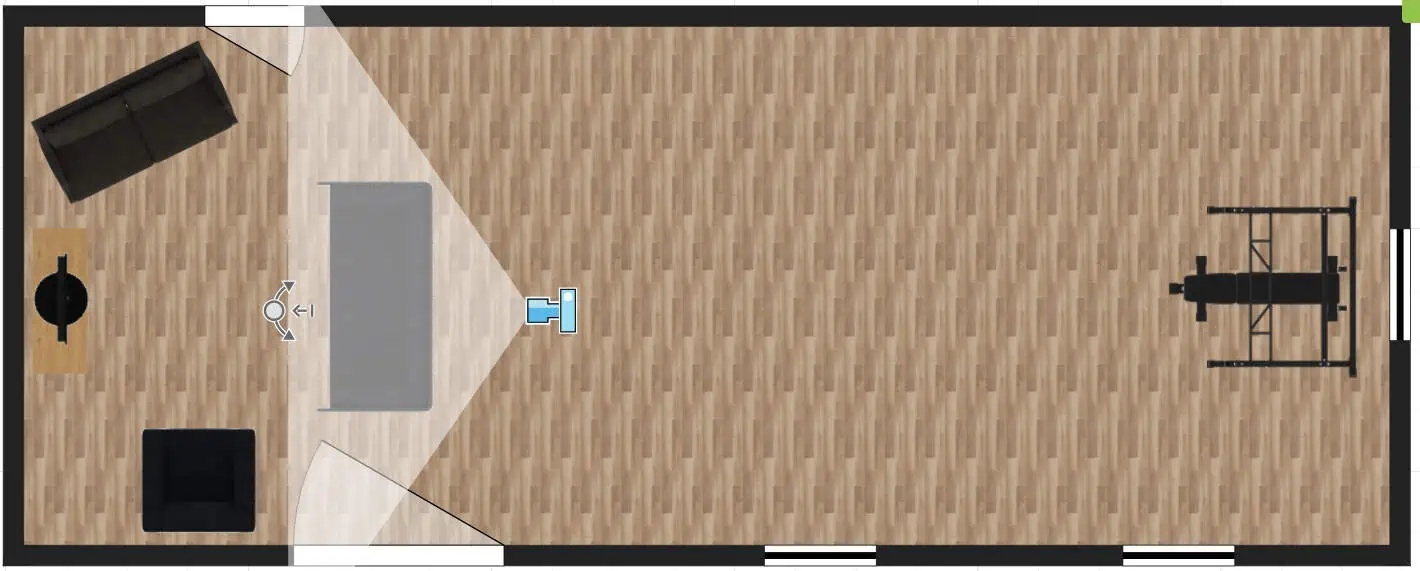
Pan the camera tool in Roomstyler to capture different 3D angles

Why it’s good: Most basic design needs are met, including just placing furniture in a room to check for fit. The Roomstyler site also provides plenty of design inspo.

What it’s not good for: This is another slightly complex tool. Those who aren’t tech-savvy may have some difficulty (though all design tools seemingly share this critique to a certain extent).

User-friendliness: Generally this is a very intuitive platform with the only downside being that the search function for different types of furniture doesn’t operate that well. Also, options for window and door styles are limited.

  1. Planner 5D | ⭐⭐⭐

(Web or download for macOS)
Pricing: Free with account creation

Planner 5D’s desktop tool is also a fairly solid option if you’re not loving the others for whatever reason. This program toes the line between serving hobbyists versus professionals, so it can be a little complicated, but it’s plently learnable for most tech-savvy people. (Users have reported that larger files can be slow to load on phones supporting lower RAM, so keep that in mind.)

Why it’s good: Those looking for a tool with a ton of design capability.

What it’s not good for: Those who need maximum customizability for their designs should look elsewhere. Planner 5D comes with a lot of furniture and design options, but most of them are only available in the paid version… and even then, it’s not a full assortment.

User-friendliness: The free web version of Planner 5D is seriously limited in terms of doors, windows, and furniture you can add to your design. The free option simply won’t work if you’re really looking to design your home. 

When we tested it, we found the web version of Planner 5D to be a little slow. Pro tip: don’t use the smart wizard to start if you know your room dimensions, as it’s easier to just dive right in by drawing your room.

  1. Ikea Home Planner | ⭐⭐

ikea app(Web only)
Pricing: Free

Arguably the most straightforward design app out there, Ikea has made its own program available on its website so you can test out its products before you buy. Unfortunately, you can only use Ikea items, earning this a lower spot on our list.

Why it’s good: People who exclusively want to design their home with Ikea furniture. (Look, we know that’s a lot of you, so here we are.) It’s worth a spin when you’re IKEA shopping.

What it’s not good for: Literally any other use-case is non-existent. You won’t find design inspo in this web app, nor will you be able to resize items, change their colors, or take creative liberties in your room design.

User-friendliness: Of all of the apps and tools, Ikea home planner was the easiest to customize my doors and windows and to make sure they were centered/in the right place. Ultimately, anyone serious about designing will be disappointed with the lack of carpet and furniture options.

See prices for movers by the hour – instantly.

Read real customer reviews.

Easily book your help online.


Tips for Newbies Using Design Apps

design apps moving

Smartphone vs. computer: honestly, use whichever you’re most comfortable with. If you’re a professional, chances are you already know what your needs are. For amateur designers, you’ll get the most out of your design experience on the tech you’re most proficient at. Keep in mind though that benefits of a computer include more space and freeing up your phone from having to run sometimes heavy software.

Make sure your phone has enough storage to save your pictures. Your phone needs room for the app and any saved photos and designs. I started my reviews with a pretty full phone, so I couldn’t download more than one app a time. I had to do an impromptu app and video purge when some of the downloads stalled.


“…decide if you’re capable of painting, coordinating new flooring, and finding and transporting décor. If you’re extremely not confident, it’s actually not that hard to hire an interior decorator.”


You don’t necessarily need a new smartphone to use a virtual design app, but your old phone might have problems. A newer smartphone is likely to be most compatible with the complexity of virtual design. The Apple iPhone 13 has up to 256 GB of storage for iOS users, or maybe opt for the Samsung Galaxy Note 20 Ultra.

Similarly, computers are only really better if they’re new enough. Of course, compared to phones, computers can show higher-quality mockups, render images instantly and load multiple files at a time. But this all relies on the ability of your laptop’s CPU and RAM (without sufficient RAM, your computer won’t be able to run the app while doing anything else). I recommended that you use a Macbook Pro on the newer side, or for PC users, something in the neighborhood of the Acer Nitro 5, both with at least 16 GB of RAM.

How To Actually Finish Your Room Design Projectdesign apps

Just getting started on your design project? A little prep can really upgrade your chances of success.

  1. Start with one room, not the whole house. It can be tempting to renovate the entire house at once. For most of us, this is a huge financial and logistical feat. Consider trying to fit your designing into a day or two, instead of starting a huge project that may take weeks or months to complete.
  2. Agree on a budget and stick to it! Your costs will vary depending on your personal style, quality preferences, and whether or not you hire professional help. (For context, a basic bedroom costs between $880 and $2,300 to furnish, while a living room will run you $2,050 – $3,150.)
  3. Capture design inspo from everyday life. Great design inspiration can come from anywhere. That said, it’s usually easiest to use sites like Pinterest, Modsy, or Havenly that let yoy save your inspiration (don’t forget to screenshot photos from your Instagram and TikTok feeds).
  4. Pick your color scheme BEFORE you start buying. Color scheme is a highly personal choice, so talk with those you live with ahead of time before picking paint colors and upholstery. When it comes to mood, bright, energetic colors stimulate energy, so choose oranges and yellows for exercise rooms or play areas, not bedrooms. Conversely, cool colors are typically calming and great for bedrooms and bathrooms (plus great for resale value).
  5. Incorporate your personality. It’s surprisingly easy to lose your personal touch when redecorating. To avoid this, design around your values by opting for décor that aligns with causes you agree with, like unique taste, sustainability, or even businesses led by minorities. You can also try centering the room around a sentimental piece of furniture or décor.
  6. Think about future needs. Your design requirements should take into account your style inspiration and any future needs (think: pets, children, future moves). 
  7. Decide on DIY or hiring a pro. Now that you know what you want, decide if you’re capable of painting, coordinating new flooring, and finding and transporting décor. If you’re extremely not confident, it’s actually not that hard to hire an interior decorator.

A Pro’s Guide to Moving Heavy Furniture Without Hurting Yourself

Author:

Publish Date:

Last Modified Date:

Category: Loading & Unloading Guides

Tags: Tags: , , , , , , , , , , , , , , , , , , , ,

Chances are, there are near by movers who can help you move that fridge, bed, or whatever else makes your back ache by the mere thought of picking it up. But if you can’t find the right help, or if you and your back feel up to the task, then keep reading—we’ve got you covered!

The First Step to Moving Heavy Furniture

Abraham Lincoln once said, “Give me six hours to chop down a tree and I will spend the first four sharpening the axe.” Okay, that’s a little weird, but moving heavy furniture is the same idea. You gotta really, really prepare.

Before you roll up your sleeves and start picking stuff up, you’ll want to do a few things:

  • Clear as wide of a pathway as you can
  • Measure that your furniture isn’t too big to go through that path
  • Mark a clear, physical end point where you will drop the item

The last one will probably be near your moving truck or storage container or, if you’re particularly strategic, a staging area (meaning your driveway, sidewalk, or the garage during sketchy weather) in order to better “Tetris” your stuff.

Disassembling Furniture

The great news is that many movers across the country will offer to disassemble any furniture that might need it in order to be moved. All you have to do is ask if your local mover offers the service.

If you’re disassembling furniture all yourself, there are plenty of basics to know when taking off table legs, moving desks, or detaching a flat screen tv.

The Most Important Basics When it Comes to Disassembly

  • When removing table legs, immediately reattach whatever nuts and bolts were holding the leg in place after the leg is off. This keeps screws from disappearing 
  • Always use a screwdriver with a magnetic head when unscrewing flat-screen tv mounts, as losing important screws is extremely easy to do
  • Dresser mirrors always get removed and properly packed up. Any undetachable dresser mirrors require tons of special attention to move
  • Dining room chairs aren’t often designed to be taken apart easily, if at all. But if you have chairs with exposed bolts or screws, you may be able to disassemble them

The above just scratches the surface of what professional movers with experience know about moving furniture and disassembling furniture. You’ll learn plenty, just like I did, by trying to do it yourself.

Get Help Unloading Your Rental Truck

See prices for movers by the hour—instantly.

Read real customer reviews.

Easily book your help online.


“The IKEA-Exception”

The furniture in your home didn’t just grow there, right? It had to have been carried in.

But the one exception to the “furniture doesn’t grow there” concept is IKEA-like furniture, or in other words, most anything you had to assemble yourself.

Full-Service moving companies will generally refuse to move customer-assembled furniture made of pressboard. This is because such furniture was designed to be assembled, put in place, and never ever moved again. Any customer requesting their pressboard bookcase (or pressboard anything) be professionally moved usually has to sign a waiver stating they understand it will very likely get destroyed and the movers will assume zero responsibility for the destruction.

If you have any pressboard furniture or any furniture that – be honest with yourself – is generally cheap and flimsy, consider selling it or giving it away. Moving it costs time and money and will more than likely turn it into an unusable piece (or pieces) of trash.

Wrapping Furniture

how to move heavy furniture

At some point during the move-out process, you’ll need to wrap your furniture so it doesn’t get scratched, gouged and cracked into oblivion.

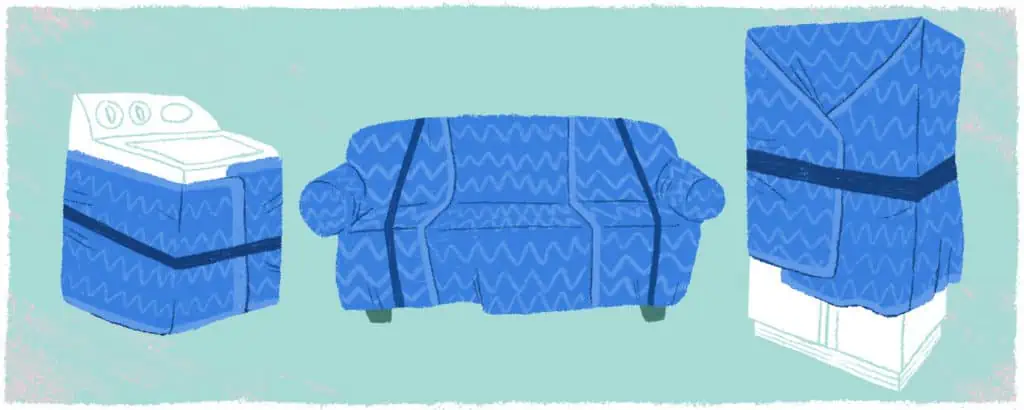
Cloth furniture pads (also known as “moving blankets”) are what movers use, and we highly recommend them. Wrapping your furniture before you carry it through your home and out the door can help protect it against incidental dings in the doorway and, quite possibly, holes in your walls.

No true professional mover will ever dream of transporting heavy furniture without furniture pads.

Protip: Moving pads can make it hard to keep a firm grip on your furniture. I always preferred to wrap everything in the staging area, or right there on the truck.

The Most Important Basics When it Comes to Wrapping Furniture

Wrapping a refrigerator or a bookcase is pretty straightforward. Wrapping a non-rectangular item like a sofa or a chair can be a challenge.

  • The key is to secure your furniture pads neatly and tightly, covering every surface except, in general, the bottom side
  • You mostly need to just make sure the pads don’t come off. Some movers use shipping tape to keep their pads in place, while others use shrink wrap. Both are effective but costly (not to mention a little wasteful). That’s why other movers use big rubber bands called “mover’s bands”. They are versatile and reusable for applications far beyond moving furniture (like, say, wrapping an office chair)
  • To secure those pads, whether you use tape, shrink wrap or those big rubber bands, just remember: avoid putting tape or shrink wrap directly on your furniture’s surfaces

How Many Furniture Pads Do I Need?

For reference, furniture pads the pros use measure 72” x 80”, give or take.

End tables, small bookcases, and dining room chairs usually only need one (1) pad; most furniture needs two (2), while things like sofas, really large dressers, even some big headboards need three (3) apiece.

How many furniture pads do you need, then? Your best bet is to go from room to room, check how many things you have that need to be wrapped, note how many pads each item will require to cover their surface, then tally it all up. (To be safe, you might want to tack on a half dozen more!)

How Do Pros Move Furniture Through Doorways?

how to move heavy furniture

Angling

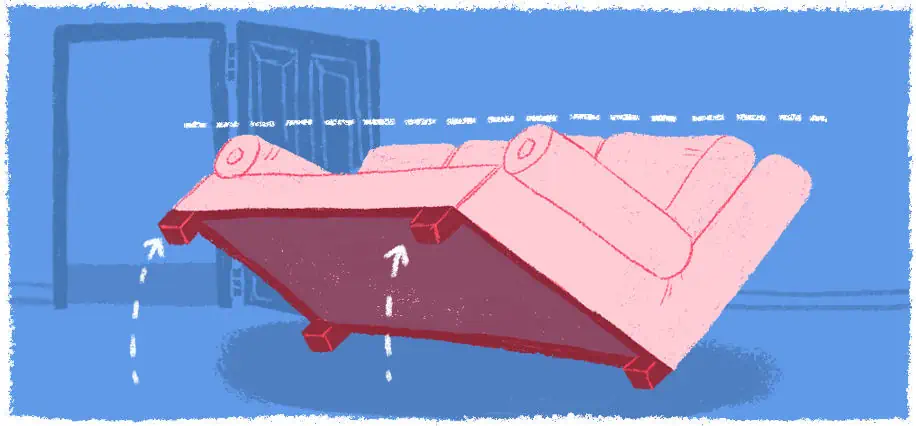
If your sofa is too wide to fit through a doorway in your home, there are a few things you can do.

The simplest is to tilt it 45 degrees (more or less) so the front edge of the seat cushions and the top of the back of the couch are aligned vertically. This will make the bottom rear edge of the couch look like it is sticking further out, but all you geometry lovers out there will appreciate how this actually makes the couch narrower.

Curling

If your couch is still too wide, try standing it on end and curling it through.

Laying down a blanket first will help you smoothly and safely slide your couch through the doorway. Ease the top back edge through first, then curl the sofa around the side of the doorway closer to the seat cushions as you slip the rest of the couch through. (You can also push it through seat cushion edge first.) This same strategy can be used when trying to get oversized easy chairs through a seemingly too-narrow door.

Detaching

If you find you need a few extra inches of clearance before your sofa will pop through that doorway, try removing the legs or feet.

Even though they are sometimes nothing but short squares of wood, I’ve found on many occasions that taking them off is the difference between success and a damaged door jamb. On occasion, I’ve had to actually remove a door from its hinges in order to get a couch out the door. While not difficult, you will need a flat head screwdriver and a hammer to coax those hinge pins out, and a couple of extra sets of hands to keep the door in place until those pins pop free.

Moving Furniture Up and Down Stairs

how to move heavy furniture

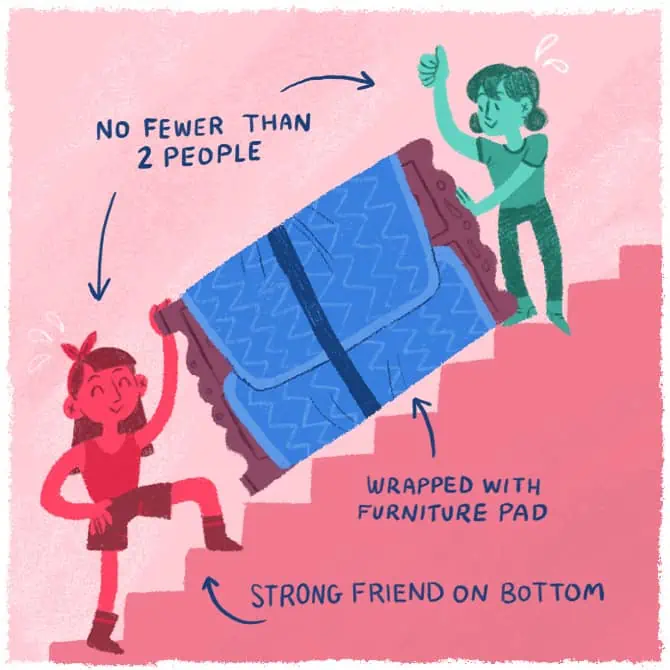
Hauling large pieces of furniture – more importantly, heavy pieces of furniture – down a flight of stairs is a dangerous proposition if you don’t take it slow (and smart).

  • Make sure you have a strong friend (if not two) on the lower end as you go down (or up) the stairs. Take those steps one at a time. Rest as often as need be, simply by laying that dresser or bookcase down, right on the stairs. Just make sure it doesn’t start sliding!
  • Watch for walls, banisters, and hanging light fixtures
  • It’s easy when you’re watching your feet to forget about everything else. And that, I can tell you, includes your knuckles!
  • When sliding items around corners on landings, use a blanket underneath
    • When doing so, put a blanket down to make the sliding process easier and to avoid damaging that dresser and/or the floor. If the floor is carpeted, the item is really heavy, or if the surface it is resting on is uneven, try walking that thing forward – using small, slow, easy steps

Using Wheels to Move Your Furniture

how to move heavy furniture

If you aren’t The Hulk, a little extra help in the form of wheels can make a huge difference. Here are what the pros use:

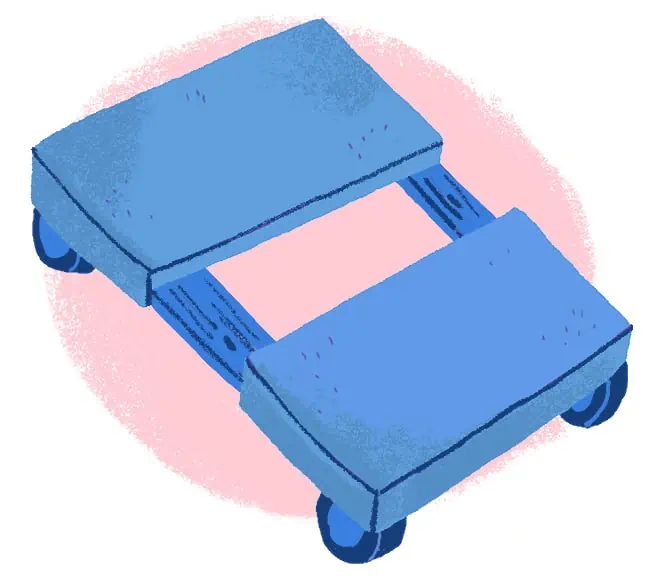
  1. 4-wheeler: A 4-wheeler is great for moving large, heavy items over long flat distances. Two main things to watch for: your piece of furniture is resting firm and balanced, and that the wheels, usually black rubber, aren’t marking or scuffing your floors.
  2. Hand truck: A hand truck has two wheels and a metal plate on which to rest your furniture, and a long upright surface with handles. Their soft-ish wheels let you move heavy items up and down stairs and across uneven surfaces all by yourself. However, we highly recommend having a second set of hands at the lower (bottom) end of that piece of furniture any time you are negotiating stairs.
  3. Appliance dolly: An appliance dolly is basically a heavy-duty hand truck with a strap to secure in place the refrigerator, washing machine, dryer or whatever. Despite its name, an appliance dolly can absolutely be used to haul furniture.

This All Seems Hard. Are There Furniture Movers Near Me, Just In Case?

Most likely, yes!

See prices for local moving labor. Read real customer reviews. Easily book your help online.

Start by searching HireAHelper’s massive network of local movers to find movers near you to tackle the big stuff. You don’t necessarily need to hire an entire moving crew if you just need to move your heaviest items.

Normal moving rates will apply, usually starting at a couple hundred bucks for two experienced professionals for two hours. They will usually bring all the necessary equipment, too!

If you just aren’t sure you want to move heavy furniture yourself, relax. Professionals know how to do everything in this article. If you’re doing a long distance move, our sister company Moving Place can provide you with movers, transportation and everything you might expect from a full service move at a fraction of the price.


Illustrations by Marlowe Dobbe

5 Expenses I Didn’t Expect After Graduating

Author:

Publish Date:

Last Modified Date:

Category: College Moves

Tags: Tags: , , , , , , , , , , , , , , , , ,

Graduating is even harder than it looks.

I am one of the lucky ones who found my first job right out of school. But that secretly meant my living expenses suddenly skyrocketed after I had to buy a used car, move away from home and find and furnish an apartment.

Don’t get me wrong, I knew those purchases would be way more expensive than the usual trip to the grocery store. But there were so many details I didn’t even realize existed. It was a crash course.

Now I want to make sure that doesn’t happen to you. Here are the random expenses that hit me after graduation, plus how I survived a rocky first few months so that I remained intact before my first adult paychecks could make an impact.

1. Moving Costs More Than You’d Think (But There’s a Hack for That)

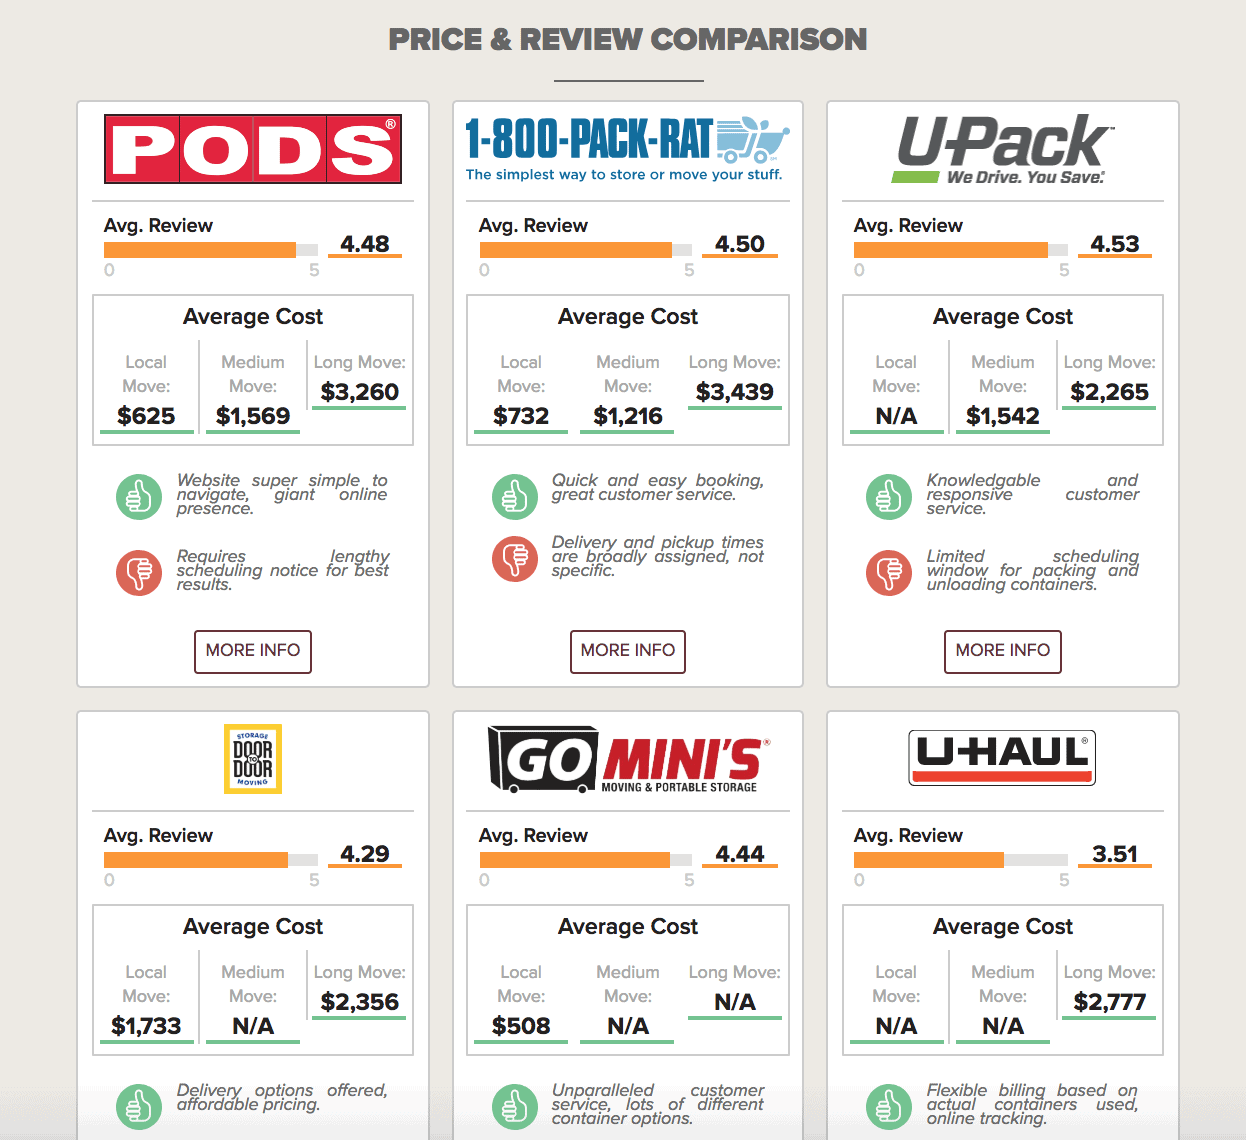
Moving101 Container Price Comparison

When I graduated I lived on campus, but I still somehow had a lot to move into my first apartment. The first thing I did was figure out if anyone could help me move. In return for snacks, my friends and family were happy to offer some manual labor. I got lucky!

But when I got a job, it ended up being located out of state. So to save money, I figured out I could rent a truck and tow my car behind it, and only hire movers to do the lifting. Getting your own vehicle and hiring labor separately for either end of your move (Hybrid Moving) costs less than Full Service moving and varies dramatically in price, but the average cost is around $660. It’s an added cost, but plenty of critical time saved, which I needed.

HireAHelper lets you compare the price of movers and customize everything, from how many people help you move to what arrival time window you’ll need. The more options you can compare for a moving process the better, as every move is going to be a little bit different.

See prices for movers by the hour – instantly.

Read real customer reviews.

Easily book your help online.


How can someone so young take on that expense? Well, I barely had enough to cover the move, but here’s another thing I learned — many employers offer reimbursement for moving expenses! Make a note to talk with your new employer and ask if they make a similar offer. It was a lifesaver when my company helped me out so that I could put my money toward the next round of expenses!

2. Crossing State Lines Can Mean More Fees

When you move to a new state, you’re going to have to get a new state license and plate for your car. The steps will be different depending on your move, but you can check out the process for your specific state online to know what prices you’re in for.

I had to fill out paperwork and pay fees for the process of:

  • Getting an updated title for my car
  • Printing a new plate
  • Creating a new license

All of it cost about $200! Plus, there was the time it took to go to the DMV, get my new emissions test and talk with my car insurance company about my new address and license information.

Call the DMV where you’ll be moving to ahead of time for clarification because it really is a lot to deal with when you’ve never done it before. It definitely was for me.

3. Even My Used Car Had a Major Price Tag

An approximation of how getting your first used car looks.

When I was in school, I used my parents’ old car to get around to my part-time jobs and the grocery store. But after college, I knew I had to get my own ride. I’d been saving up for a while and figured I could negotiate the price of the car down to what I had in my savings account, but it turns out there’s so much more to it than that.

The only thing I knew about buying a car before I walked into the first dealership was that you have to negotiate your final price, but fees and taxes can’t be worked down. The dealer had to explain things like document fees and dealer fees, plus the sales tax. (Again, every state will be a bit different, though some fees are the same across the board.)

It’s smart to save up some extra cash to cover these fees since they’re non-negotiable. While you’re getting your down payment together, take steps to research what these expenses will be so you can better plan for the total cost of a car.

Lastly, make sure you can handle the monthly payment. While I saved enough for a hefty down payment, I did have to take out a small loan to cover the rest. I automated my car payments through my bank once my regular paychecks started rolling in so I would never risk jeopardizing my credit score with late payments.

4. My First Student Loan Payment Shocked Me

The amount I had to take out in student loans wasn’t nearly as drastic as what some of my friends had to sign for—proud state school grad here—but there are ways those loans can pull you into paying more than you originally borrowed. For starters, I had no idea what capitalizing interest was. Basically, it’s interest that’s triggered by specific events and causes your monthly payment to not even make a dent in your overall debt. The debt increases while your payments stay the same.
I also began to panic when the loan bills came in. I hadn’t even earned my first paycheck with my new job yet, so how was I supposed to pay $350 a month after already paying for moving and buying a car?

That’s when I started to research how to consolidate my loans, and it really saved me. The Department of Education can consolidate multiple federal loans with one fixed interest rate, which streamlines the process and extends your repayment period. Rather than juggling multiple payments, I just had to worry about one.

You may also consider private refinancing if you’ve landed a steady job and worked to build a credit score of at least 690. This can both consolidate your loans and lower your interest rate — but isn’t necessarily always the best choice for recent grads. Do your research! 

(So I Learned a Budgeting Trick)

Sure, I’d managed my own bills in college, but between forthcoming loan payments and the costs of moving and a higher rent, I saw my expenses skyrocket. 

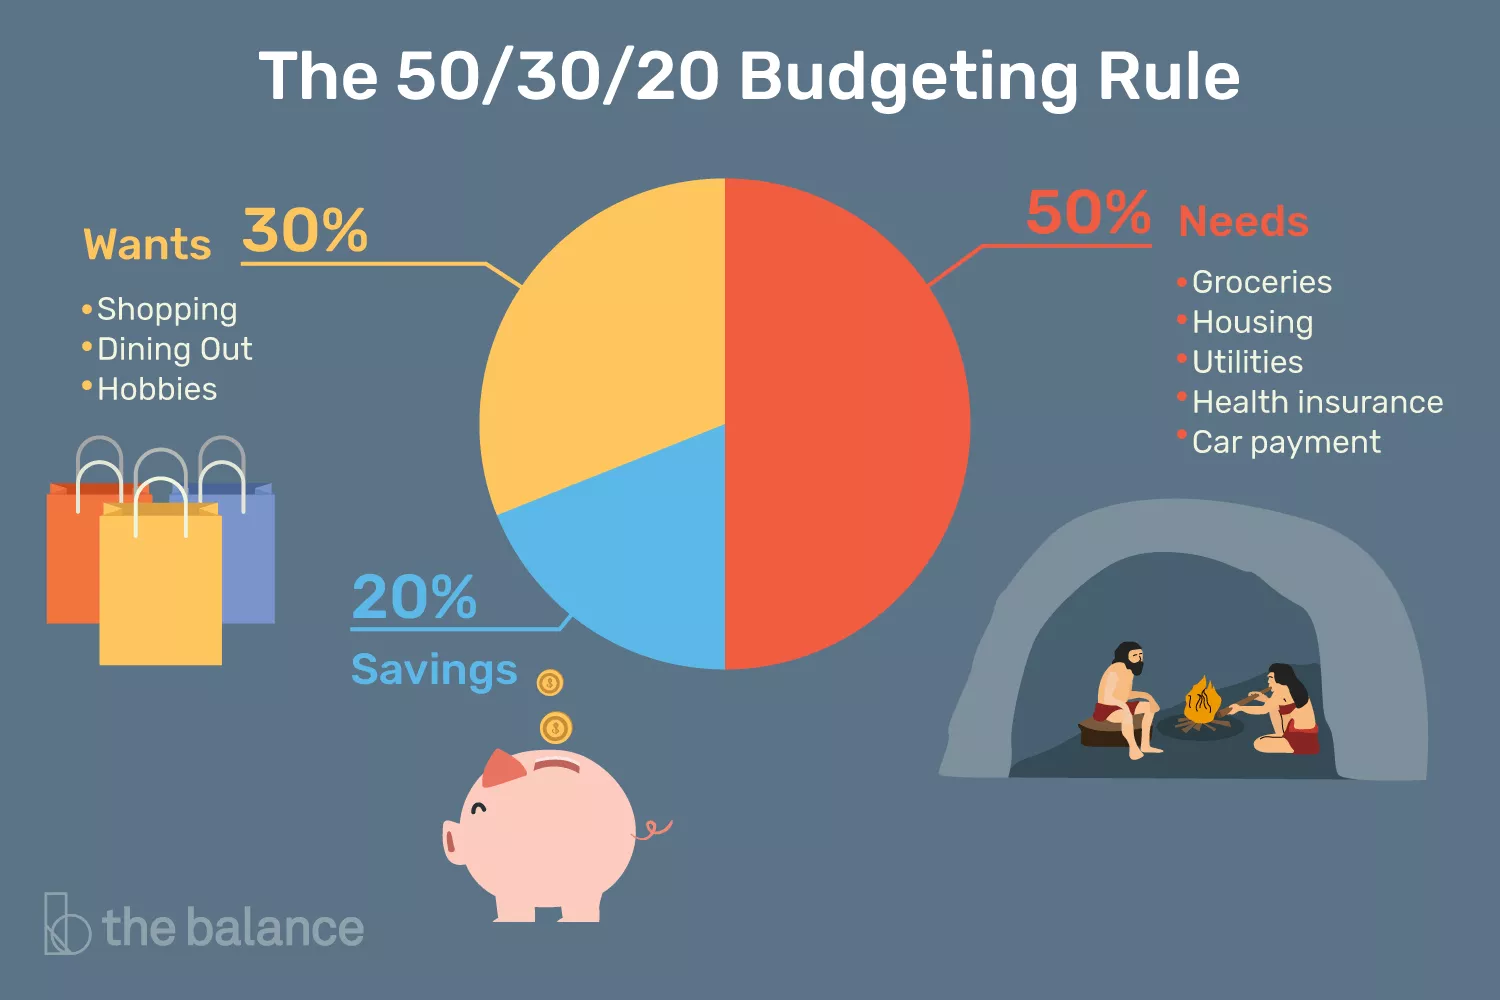
So I did some research online and began militantly tracking all of my income and expenses with a Google spreadsheet. I vowed to follow the 50/30/20 budget, which stipulates that half of my earnings pay fixed expenses, 20 percent goes to debts and savings, and 30 percent is reserved for variable expenses like groceries and light spending.

50 30 20 rule of thumb

It’s tempting to have your paychecks come in and put all your extra cash toward one big thing like a savings account or credit card debt, but metering it out will help you tackle everything at once. Building my savings while decreasing my debt has helped me more in the long run than just choosing one over the other.

Now, my healthy savings account means a minor emergency like a car repair doesn’t trigger any anxiety. After upending my meager college savings to move, a steady and dependable tracking system soothed my nerves and helped me navigate this whole new world.

5. Filling Up a New Apartment Drains Your Wallet

The process of finding my apartment was easy since everything is online now. I could map out how far each apartment complex was from my work and not have to worry about it being too far away. Actually getting settled was a whole different story.

I had to buy all my own furniture, and you can bet that I didn’t have the money to do it all at once! For a little bit, my apartment décor consisted of a mattress on the floor and the most basic kitchen supplies. A good list of basic apartment supplies you’ll need will consist of:

  • Plates and bowls
  • At least two or three of each type of silverware
  • A trashcan
  • Dish soap and a sponge
  • Toilet paper
  • Basic cleaning supplies (e.g., broom, cleaning solution)

Don’t panic if your apartment doesn’t feel like home for a little while. Getting more than the basics will take time, but eventually, your new fancy budget will help you get everything on your list, and your apartment will gradually feel more like a home and less like a living space. 

Plus, if you have a roommate, that makes your quest to fill the space of essentials even easier! Me? I bought myself a couch from a killer Amazon Prime Day deal—and I’ve been treating myself with one apartment item a month since.


Some of the above surprise costs were never mentioned to me because I didn’t know to ask about them.

Give your post-college world about six to eight months to settle down. Now, I’m much more financially secure and living in a home that feels cozy and welcoming. I’m finally ready to put some money into my travel fund and I don’t sweat the occasional sushi dinner. For now, you just have to buckle in and prepare for a crazy ride after that diploma lands in your hand.


Holly Welles is a millennial-focused real estate writer and the editor behind The Estate Update. For more home tips and financial advice, subscribe to her blog for even more financial advice.

Showing Your Home? These Are the First Impressions That Matter

Author:

Publish Date:

Last Modified Date:

Category: Buying & Selling a Home

Tags: Tags: , , , , , , , , , , , , , , , , , , , , , , , , ,

To us, staging your home to sell is similar to going on a first date.

You set up this date in hopes to meet your future spouse. You don’t know if that’ll be the case but there’s always the hope, right? If you’re hoping to land “the one”, chances are you’re going to put some effort into prepping for this first date. We feel the same is true when it comes to staging your home to sell.

(more…)

Movehack: How to Perfectly Wrap an Office Chair in Under 3 Minutes

Author:

Publish Date:

Last Modified Date:

Category: How To Pack, Pro Packing Guides

Tags: Tags: , , , , , , , , , , , , , , , , , , , , , ,

When you move, protecting your furniture is a huge part of the deal. And for most people who move, we’ve noticed the hardest piece of furniture to truly protect is none other than the common chair.

(more…)

The Pros Pack Entire Homes With Just 5 Things

Author:

Publish Date:

Last Modified Date:

Category: How To Pack, Moving Boxes & Supplies

Tags: Tags: , , , , , , , , , , , , , , , , , , , , , , , , ,

We are sorry to report – in case you didn’t already know – that packing your entire home into moving boxes is no small task. You’ll be happy to hear, however, that the list of packing supplies you need is short.

But while the list is short, there’s a catch; You’ll need a lot more of each thing than you think.

(more…)

×

I'm Moving

Moving? Thinking about moving? Whether your move is off in the distance or you already have one foot out the door, you'll learn about everything you should expect through our useful how-to's, cool articles and much more. It's all specially curated for you in our "I'm Moving" section.
Explore
×

I'm a Mover

For rookies or veterans alike, our "I'm a Mover" section is filled with extensive industry news, crucial protips and in-depth guides written by industry professionals. Sharing our decade of moving knowledge is just one way we help keep our professional movers at the top of their game.
Explore