The 5 Best Free Apps for Virtually Designing Your Room

Author:

Publish Date:

Last Modified Date:

Category: Buying & Selling a Home, Home Decorating

Tags: Tags: , , , , , , , , , , , , , , , , , , , , , ,

Designing a room isn’t rocket science, right?

That is, until you realize your brand new couch is too big and you need to return it. Or all your new paint colors end up clashing. Or heck, maybe you put all your new furniture down and suddenly realize you needed a rug to tie everything together.

Lucky for you, as usual, there’s an app for that. Virtual room designer apps let you set up and measure any kind of room ahead of time, so you can see what your imagination actually looks like (plus figure out what it might cost to make it).

And if you’re planning to relocate, they’re super handy for bringing your designs with you to your home inspection or walkthrough, so you can accurately design even before you move!

In This Article

Because there are dozens of virtual room design apps, we did the hard part and tried them all to see which ones actually get the job done.

Our research mostly focused on free virtual room designer tools (because remodeling and moving can be expensive enough as it is). Each app was used to create the same downstairs basement room to more objectively compare user experience. We separated our findings by smart device and desktop experiences, as we realize that not all people are comfortable with or have access to both. Some apps appear on both lists because they’re available for smartphones and desktops. We intentionally treated them as separate options because the functionality and UX can be incredibly different between platforms.

5 Best Free Virtual Room Designer Apps for Smartphones and Tablets

  1. Planner 5D | ⭐⭐⭐⭐

App Store Rating: 4.3
Google Play Rating: 3.5
Pricing: 3-day free trial if you preapprove the $59.99 annual subscription, or $9.99 30-day subscription.

At the top of our list, Planner 5D is one of the best apps to design a floorplan, place furniture, and experiment with a new aesthetic. A necessary note is that it’s not the most straightforward home design app in the world, but can still be hobby-level simple once you get the basics down.
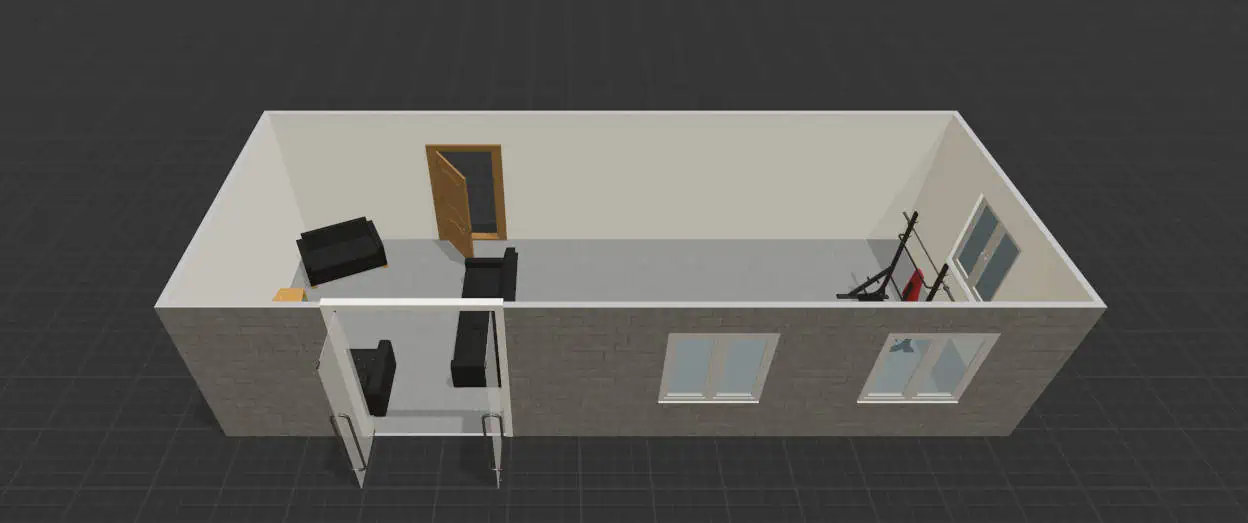
2D and 3D mockups are fast and easy in Planner 5D

Why it’s good: Those willing to potentially spend a little money for an app that truly is a one-stop shop for floor plans, design options, and visual “inspo” (spoilers: most apps don’t do all three well).

What it’s not good for: Those who are short on cash or aren’t looking for the complexity of a fully-loaded app experience.

User-friendliness: Difficulty-wise, Planner 5D is on par with the other apps – a bit confusing, but doable. We found its room scanner function to be inaccurate and difficult to edit. Of all apps reviewed, this one was hardest on phone storage, requiring a photo dump before it could be downloaded. Lastly, a credit card is required to use the free trial, so it’s not totally free.

  1. Room Planner | ⭐⭐⭐⭐

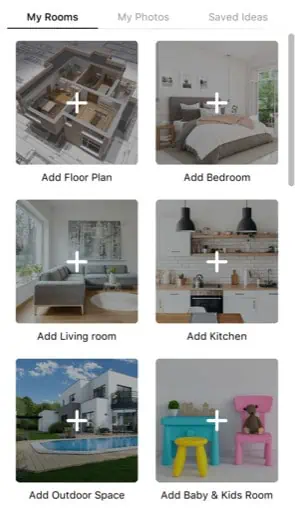
Room Planner comes with a variety of quick-start options
App Store Rating: 4.6
Google Play Rating: 4.2
Pricing: Free, $5.99/week for the PRO version to gain access to more items and functionality.

This is the best option if you want to draw your floorplan and design a room all in one app without putting in your credit card info. Room Planner has much of what you get from Planner 5D listed above, minus the more extensive catalog of furniture and 3D viewing options.

Why it’s good: Most users will find Room Planner a great fit for their needs, especially given that it’s free and your floor plans are saved in the account you create.

What it’s not good for: Those wanting more furniture options to cultivate a more unique look may not love it. Generally, while it’s a great planning tool, it does fall a bit short of what most users are looking for in the design department.

User-friendliness: Room Planner could do with fewer interruptions asking you to upgrade to the PRO version and to rate the app. Additionally, the tool layout is very detailed for the limited room smartphones generally have on a small screen, so placing and turning furniture is a bit difficult.

  1. Home Design 3D | ⭐⭐⭐⭐

App Store Rating: 4.3
Google Play Rating: 3.5
Pricing: Free with in-app upgrades and purchases

The free version gives you the tools you need to draw a room to scale, although you’ll ultimately choose from a fairly limited furniture library to decorate.

Why it’s good: People who are mostly looking for floor planning with only some light interior design abilities.

What it’s not good for: Those who want a single app to make all of their design dreams come true. Home Design does an okay job, but you won’t be able to easily change colors and designs to achieve a specific aesthetic unless you choose the paid version.

User-friendliness: Home Design is surprisingly intuitive. You’ll use drag-and-drop motions to draw rooms, place furniture, and arrange items. Those familiar with other basic design tools like Canva would likely be able to use this. However, it is difficult to scale items up or down, meaning you won’t be able to perfectly mock up your existing furniture. Lastly, the free version of this app doesn’t allow you to save your designs, so plan ahead if you want to keep your project.

See prices for movers by the hour – instantly.

Read real customer reviews.

Easily book your help online.


  1. Homestyler | ⭐⭐⭐

App Store Rating: 4.5
Google Play Rating: 3.6
Pricing: Free with in-app upgrades and purchases

This is one of few design apps that allow users to really explore more specific design styles and trends. The free version allows you to design blank rooms for fun, or take a photo of your space to place virtual decor in for inspiration. 
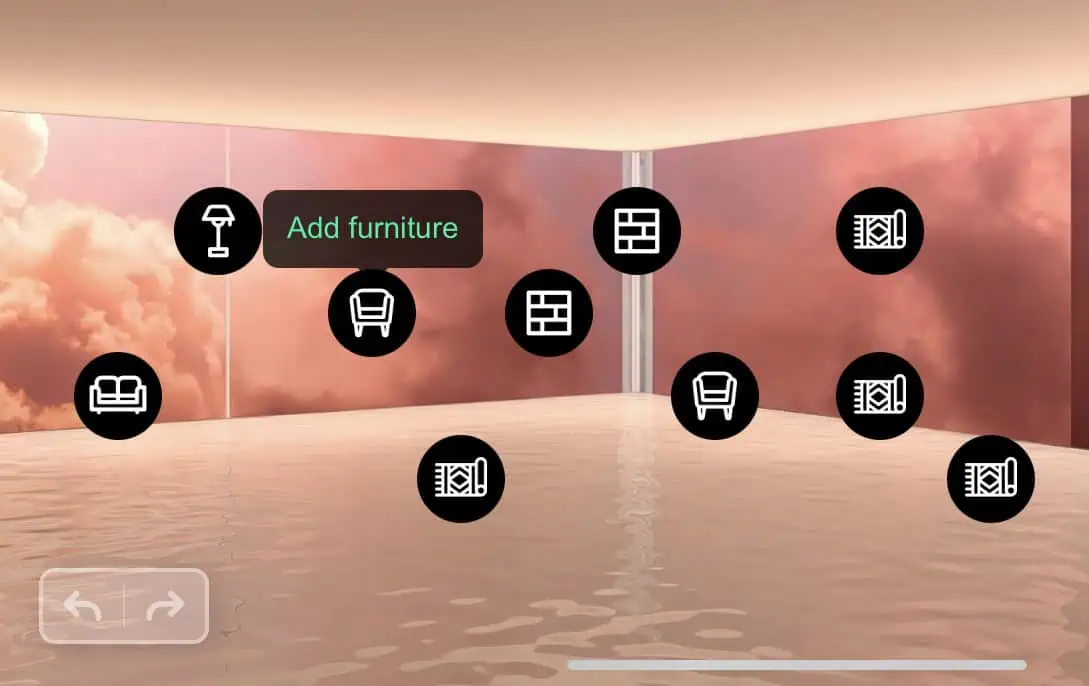
Homestyler has built-in templates if you like to design for practice or fun

Why it’s good: Those looking to test-drive cool new aesthetics in their current space layout (or those who just like to design just to pass the time).

What it’s not good for: Planning where your current furniture will go in your new space, or anything that requires size and space coordination. The app simply doesn’t have these capabilities.

User-friendliness: It couldn’t be easier to drag and drop furniture into your space on the app. However,  advanced functions like turning an item were very difficult to get the hang of. This app works best if you have an empty space to place virtual furniture in; otherwise, it’s challenging to work around your existing furniture.

  1. MagicPlan | ⭐⭐

App Store Rating: 4.7
Google Play Rating: 4.1
Pricing: Free trial, then $9.99 for additional projects

Lower on our list is Magicplan. The app was made to create floorplans, reports, and estimates, so expect it to be geared more toward home professionals than DIY designers. That said, it’s still on this list because it’s a  pretty powerful program if you only need floorplanning.
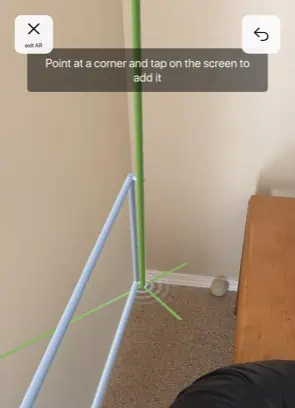
MagicPlan uses VR to scan the dimensions of your room, detecting the corners as you go

Why it’s good: Virtually planning where your furniture will go in 3D space. Think planning for a medium- or long-distance move, or even just furniture shopping.

What it’s not good for: Those looking to flex their design muscles. Its design capabilities are almost nil compared to other apps, meaning that you’ll only be able to add placeholder furniture to your room. You won’t be able to design colors, patterns, or add specific furniture models.

User-friendliness: MagicPlan is relatively easy to get started with, especially with the on-screen prompts and its ability to scan through items on the floor. That said, it can be hard to understand when the room scan should end and the planning phase begins.

5 Best Free Virtual Room Designer Apps for Computers

  1. Sweet Home 3D | ⭐⭐⭐⭐⭐

(Web access or download for Windows/macOS/Linux)
Pricing: Free

At the top of our list is Sweet Home 3D, a free and fairly easy-to-use platform that allows you to customize virtually everything about your hopeful designs. Beginners often love this app enough to spring for the premium version, thanks to how easy it is to use and the ability to import from photos.
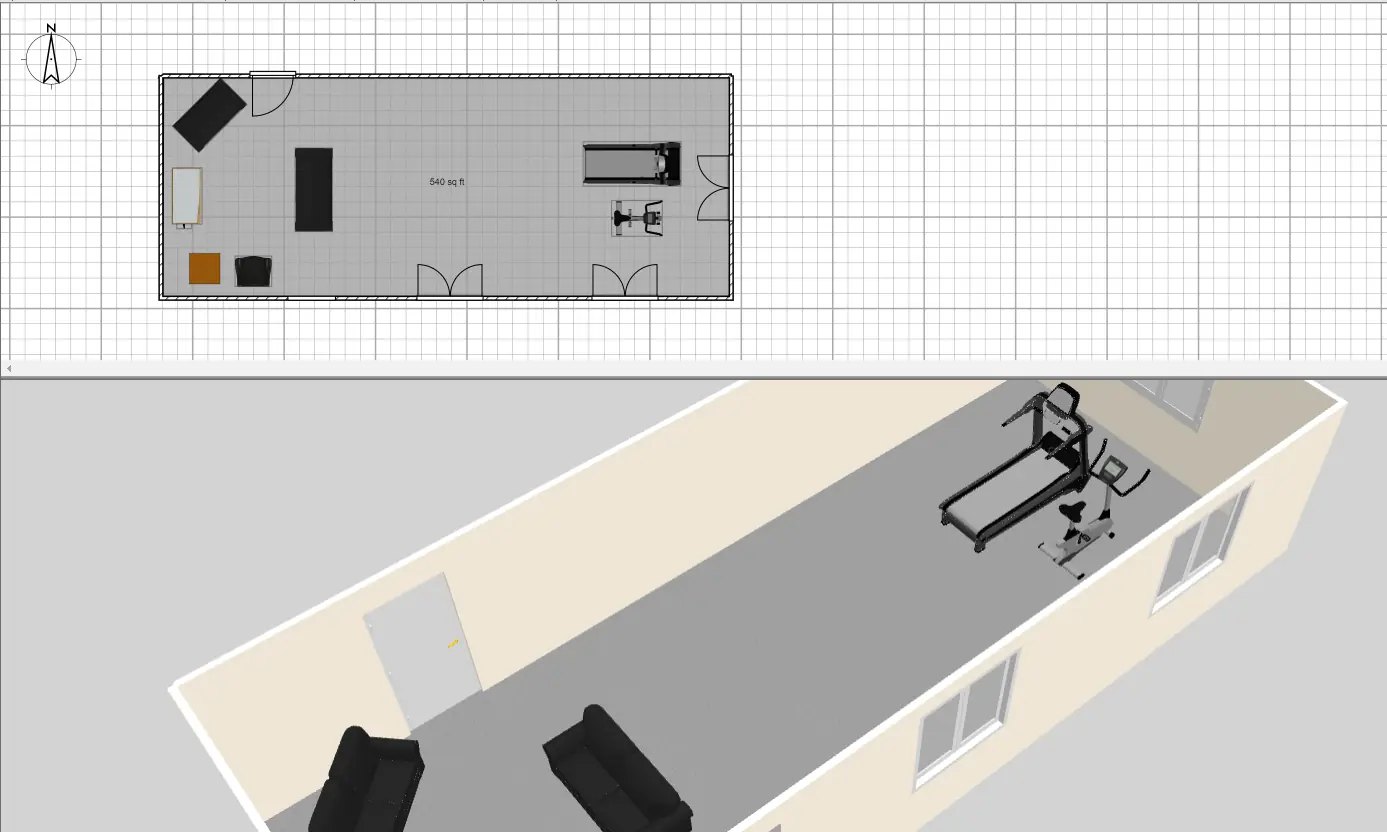
Sweet Home 3D provides both floorplan and 3D rendering views at the same time, unlike other tools

Why it’s good: Those with highly specific space and detail needs who are comfortable with a powerful tool that provides lots of options and customization.

What it’s not good for: Someone looking for a quickstart tool that provides lots of design aesthetic inspo. Sweet Home 3D doesn’t provide that for you.

User-friendliness: Sweet Home 3D isn’t as intuitive as other options… however, it is still fairly easy to use, as long as you’re comfortable with design programs. (And if not, you can easily Google help if you get stuck.) This app earns bonus points for having one of the only user-friendly search functions in its furniture library, meaning more time designing and less time scrolling.

  1. Homestyler | ⭐⭐⭐⭐⭐

(Web access only)
Pricing: Free with account creation

An excellent professional quality app with an easy-to-learn and use interface for people just starting out. Homestyler currently boasts the design genre’s biggest catalog of design aesthetic furniture in its free category, which makes it especially good for those doing renovations.
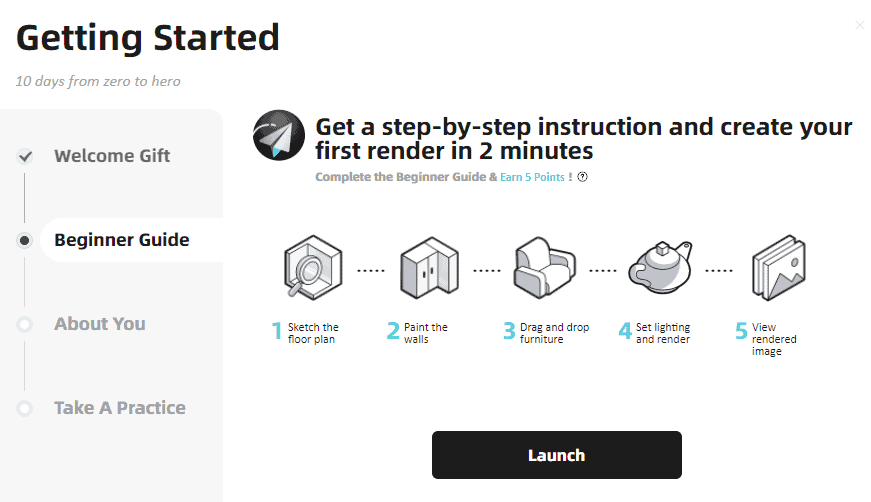
Homestyler is one of the only computer apps to provide a tutorial

Why it’s good: It’s a free and fully-loaded design experience that can easily transition onto the app version. Also great for those planning renovations who want a large catalog of trendy furniture and accessories.

What it’s not good for: There aren’t many drawbacks to Homestyler, except for its inability to fully customize doors and windows. If for whatever reason those are an important part of your design plan, this may not be the tool for you.

User-friendliness: For most features, Homestyler is a big thumbs up. It’s easy to draw your room and place openings and furniture in it. However, the tool for adjusting flooring does needs some work. Getting started may take you some extra time because you do have to create an account and click through tutorial prompts before you can design.

With that said, having the option to use the paired app is a big plus if you’re on the go, or house-hunting in a different city or state.

  1. Roomstyler | ⭐⭐⭐⭐

(Web access only)
Pricing: Free with account creation

Another PC app with a smartphone version, Roomstyler is also high on our list because of its relative ease of use and decently extensive library of free furniture and accessories. Users have reported that the import option is a breeze to use on your computer, plus you can access your finished designs on the smartphone app to reference away from your computer.
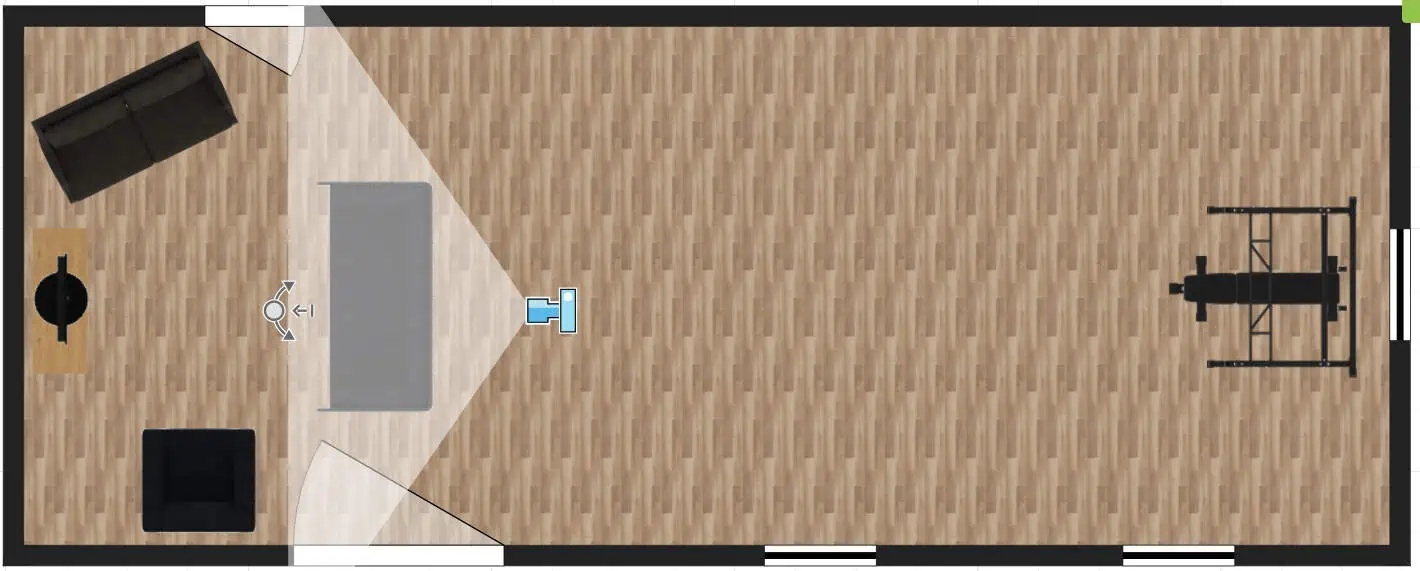
Pan the camera tool in Roomstyler to capture different 3D angles

Why it’s good: Most basic design needs are met, including just placing furniture in a room to check for fit. The Roomstyler site also provides plenty of design inspo.

What it’s not good for: This is another slightly complex tool. Those who aren’t tech-savvy may have some difficulty (though all design tools seemingly share this critique to a certain extent).

User-friendliness: Generally this is a very intuitive platform with the only downside being that the search function for different types of furniture doesn’t operate that well. Also, options for window and door styles are limited.

  1. Planner 5D | ⭐⭐⭐

(Web or download for macOS)
Pricing: Free with account creation

Planner 5D’s desktop tool is also a fairly solid option if you’re not loving the others for whatever reason. This program toes the line between serving hobbyists versus professionals, so it can be a little complicated, but it’s plently learnable for most tech-savvy people. (Users have reported that larger files can be slow to load on phones supporting lower RAM, so keep that in mind.)

Why it’s good: Those looking for a tool with a ton of design capability.

What it’s not good for: Those who need maximum customizability for their designs should look elsewhere. Planner 5D comes with a lot of furniture and design options, but most of them are only available in the paid version… and even then, it’s not a full assortment.

User-friendliness: The free web version of Planner 5D is seriously limited in terms of doors, windows, and furniture you can add to your design. The free option simply won’t work if you’re really looking to design your home. 

When we tested it, we found the web version of Planner 5D to be a little slow. Pro tip: don’t use the smart wizard to start if you know your room dimensions, as it’s easier to just dive right in by drawing your room.

  1. Ikea Home Planner | ⭐⭐

ikea app(Web only)
Pricing: Free

Arguably the most straightforward design app out there, Ikea has made its own program available on its website so you can test out its products before you buy. Unfortunately, you can only use Ikea items, earning this a lower spot on our list.

Why it’s good: People who exclusively want to design their home with Ikea furniture. (Look, we know that’s a lot of you, so here we are.) It’s worth a spin when you’re IKEA shopping.

What it’s not good for: Literally any other use-case is non-existent. You won’t find design inspo in this web app, nor will you be able to resize items, change their colors, or take creative liberties in your room design.

User-friendliness: Of all of the apps and tools, Ikea home planner was the easiest to customize my doors and windows and to make sure they were centered/in the right place. Ultimately, anyone serious about designing will be disappointed with the lack of carpet and furniture options.

See prices for movers by the hour – instantly.

Read real customer reviews.

Easily book your help online.


Tips for Newbies Using Design Apps

design apps moving

Smartphone vs. computer: honestly, use whichever you’re most comfortable with. If you’re a professional, chances are you already know what your needs are. For amateur designers, you’ll get the most out of your design experience on the tech you’re most proficient at. Keep in mind though that benefits of a computer include more space and freeing up your phone from having to run sometimes heavy software.

Make sure your phone has enough storage to save your pictures. Your phone needs room for the app and any saved photos and designs. I started my reviews with a pretty full phone, so I couldn’t download more than one app a time. I had to do an impromptu app and video purge when some of the downloads stalled.


“…decide if you’re capable of painting, coordinating new flooring, and finding and transporting décor. If you’re extremely not confident, it’s actually not that hard to hire an interior decorator.”


You don’t necessarily need a new smartphone to use a virtual design app, but your old phone might have problems. A newer smartphone is likely to be most compatible with the complexity of virtual design. The Apple iPhone 13 has up to 256 GB of storage for iOS users, or maybe opt for the Samsung Galaxy Note 20 Ultra.

Similarly, computers are only really better if they’re new enough. Of course, compared to phones, computers can show higher-quality mockups, render images instantly and load multiple files at a time. But this all relies on the ability of your laptop’s CPU and RAM (without sufficient RAM, your computer won’t be able to run the app while doing anything else). I recommended that you use a Macbook Pro on the newer side, or for PC users, something in the neighborhood of the Acer Nitro 5, both with at least 16 GB of RAM.

How To Actually Finish Your Room Design Projectdesign apps

Just getting started on your design project? A little prep can really upgrade your chances of success.

  1. Start with one room, not the whole house. It can be tempting to renovate the entire house at once. For most of us, this is a huge financial and logistical feat. Consider trying to fit your designing into a day or two, instead of starting a huge project that may take weeks or months to complete.
  2. Agree on a budget and stick to it! Your costs will vary depending on your personal style, quality preferences, and whether or not you hire professional help. (For context, a basic bedroom costs between $880 and $2,300 to furnish, while a living room will run you $2,050 – $3,150.)
  3. Capture design inspo from everyday life. Great design inspiration can come from anywhere. That said, it’s usually easiest to use sites like Pinterest, Modsy, or Havenly that let yoy save your inspiration (don’t forget to screenshot photos from your Instagram and TikTok feeds).
  4. Pick your color scheme BEFORE you start buying. Color scheme is a highly personal choice, so talk with those you live with ahead of time before picking paint colors and upholstery. When it comes to mood, bright, energetic colors stimulate energy, so choose oranges and yellows for exercise rooms or play areas, not bedrooms. Conversely, cool colors are typically calming and great for bedrooms and bathrooms (plus great for resale value).
  5. Incorporate your personality. It’s surprisingly easy to lose your personal touch when redecorating. To avoid this, design around your values by opting for décor that aligns with causes you agree with, like unique taste, sustainability, or even businesses led by minorities. You can also try centering the room around a sentimental piece of furniture or décor.
  6. Think about future needs. Your design requirements should take into account your style inspiration and any future needs (think: pets, children, future moves). 
  7. Decide on DIY or hiring a pro. Now that you know what you want, decide if you’re capable of painting, coordinating new flooring, and finding and transporting décor. If you’re extremely not confident, it’s actually not that hard to hire an interior decorator.

The Moving Checklist: Everything You Need to Know to Move

Author:

Publish Date:

Last Modified Date:

Category: Moving Checklists & Planning

Tags: Tags: , , , , , , , , , , , , , , , , , ,

Updated: New info for 2021

The moment you know for sure that you’re about to move, life seems to turn on its head.

You instantly have a million questions on what to do next, but often feel like you have no place to turn for those important answers. That’s where we come in! This moving checklist will ensure that you get all of the essentials done so you stay on track for a stress-free move.

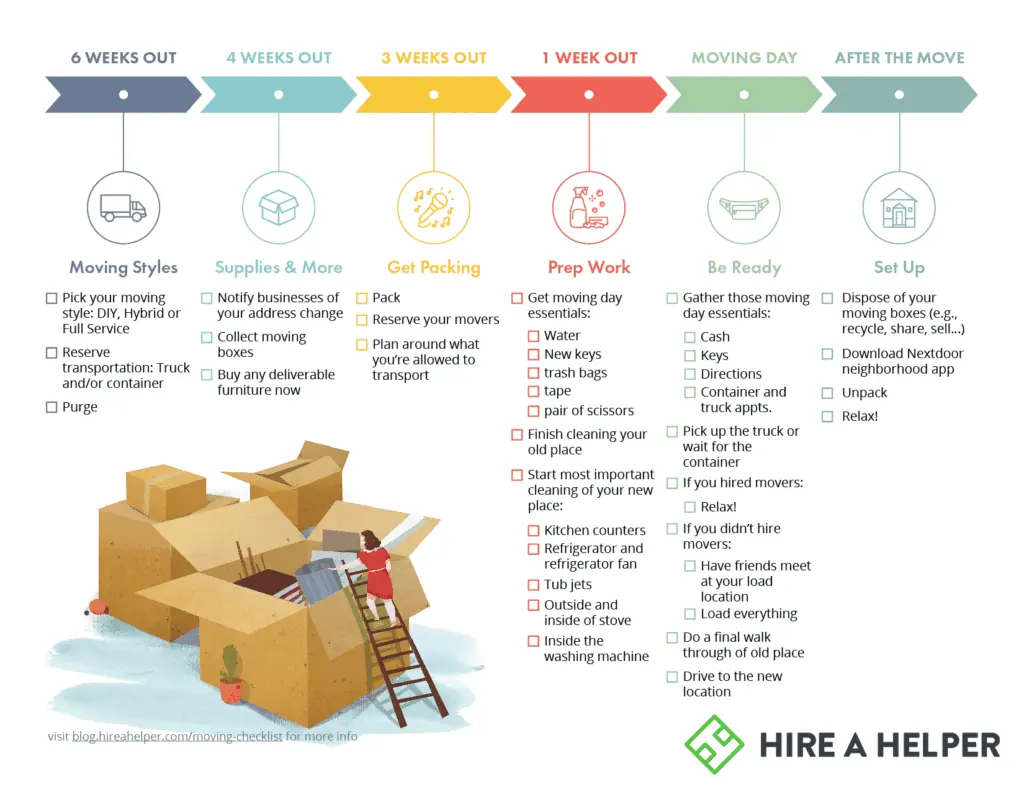
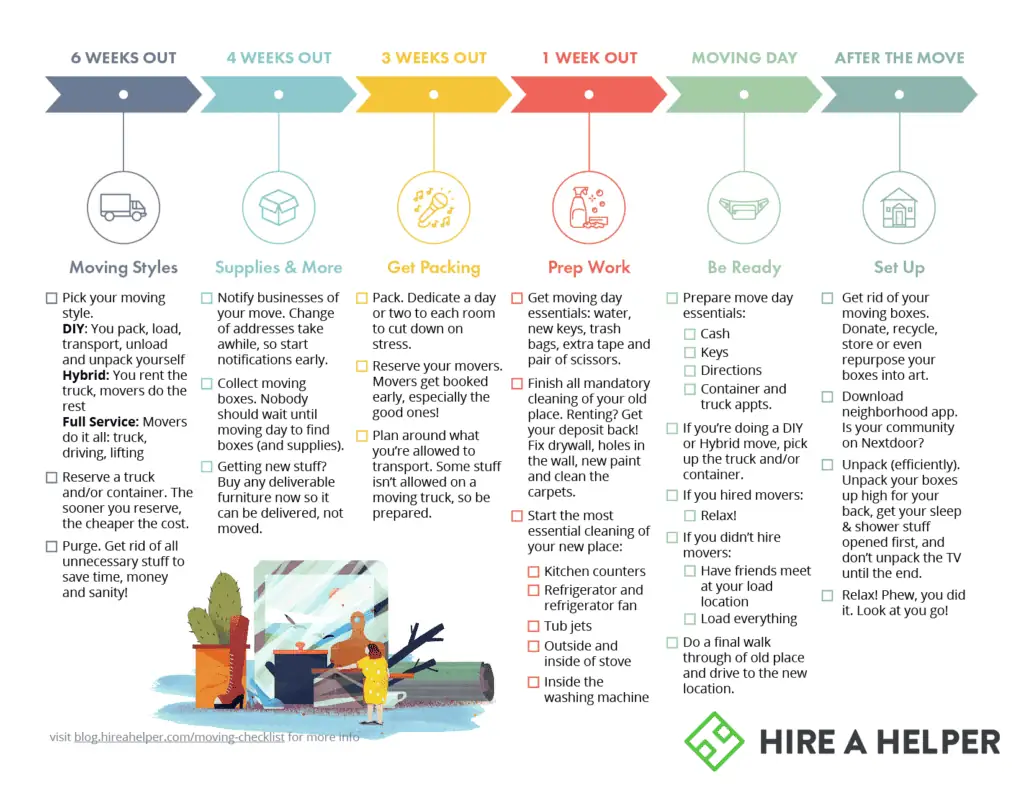
Create a Timeline to Tackle Your Move Using Our Moving Checklist

Moving is a process. It shouldn’t (and can’t) happen overnight. Our checklist provides a detailed and resourceful step-by-step guide as you start your journey to a new place, big or small. What should you be doing now? What should you be doing the month, week, or even day of the move? Heck, is there anything extra to do after the move, besides unpacking? We’re here to answer all of those questions for you!


6 Weeks Before the Big Move

Moving Checklist: 6 Weeks Out

How do I plan to move out? And what are my moving options?

Before you begin this moving checklist, we highly suggest you read this Moving 101 guide to get all of the details on your moving options. Essentially, moves fall into one of these three categories:

  • Do-It-Yourself Move: You rent the truck (or find a friend’s truck), load it up, then drive it all to the next location by yourself or with friends.
  • The Hybrid Move: You hire help to load and/or unload the truck, you drive and rent the truck.
  • Full-Service Move: You can relax while the movers take care of loading and driving. The movers you choose will depend on a number of factors, including budget and timeline. Our sister company Moving Place can be a great alternative to traditional full-service moving companies, because they take care of every detail of your move at reasonable prices.
  • Moving101 has charts and up-to-the-day costs to help you find the right move for your situation. Plus, you can use the Moving Cost Calculator to get your budget in order from the very start.

When should you schedule movers?

For the absolute best prices and flexibility, start perusing available movers and trucks now, at roughly six weeks out.

If you are renting a truck for your move, make sure to compare your options. U-Haul isn’t the only option anymore. Budget and Penske are just two of the rental truck competitors that have their own fleets available all over the country.

Now, you don’t necessarily have to stress about actually booking movers just yet … you have until about three weeks before the move to do it comfortably. And if you’re just booking labor-only move helpers from HireAHelper, you also have plenty of time to secure them – you don’t necessarily have to start worrying until two weeks before the move. After that, though, movers and trucks become harder to come by.

See prices for movers by the hour – instantly.

Read real customer reviews.

Easily book your help online.


How do I prepare to move to another state?

However, if you are booking a Full-Service Move, complete with movers, a truck and even a container, then booking now at six weeks out will keep you right on track. This is especially true if you are moving to another state, where things like state laws and paperwork for movers going across state lines come into play. This month-and-a-half timeline is more likely to ensure the things you need on moving day are available and reserved just for you!

Consider renting a container for your things.

Container moves are a perfect way to move in some situations, especially ones where your new property is not ready yet. This container guide lays out the pros and cons to help answer whether or not a container move is a good fit for you. Did you know most moving companies will store your container for one month for free? Yes, this guide has the scoop to help you decide what’s the best plan for your situation.

Get rid of the stuff you don’t need now before you think about packing.

Purging before a move is a great idea for a number of reasons. Not only will you have less to pack up and move, but you’ll also have less to unpack and organize in your new place. The easiest way to slowly purge is to keep a small box or bag in every room of your house (especially in the closets). Items you find that are broken, missing or just never used should be added to these boxes and eventually donated or thrown away. You can also have a garage sale or sell your old items online, which will help you make some last-minute cash right before your move. For items you end up donating, be sure to save the documentation from the donation center so you can use it as a tax write-off at the end of the year.

What exactly can I do with my old stuff?

When it’s time to finally sort through the items in those donation boxes, here is a list of items you can donate to particular spots in your city. And if you have any random items to get rid of (a mattress, outdated appliances), we’ve got you covered too. Read up at those links!

4 Weeks Before the Big Move

Moving Checklist: 4 Weeks Out

Start notifying businesses about your upcoming move.

Four weeks before your move is a good time to start notifying the necessary people or companies about your relocation. These parties include:

  • Utility companies
  • Local schools
  • Homeowner’s insurance company
  • Current landlord
  • Bank/credit card companies
  • Government agencies
  • Anywhere you hold subscriptions
  • Anyone else who may be sending you important documents over the next few months

Not only do you want to notify them of your move, but of course you will need to give them your new address to them if you will still be using their services. When it comes time to change your mailing address, this step-by-step guide was extremely helpful for us.

Start collecting moving boxes now.

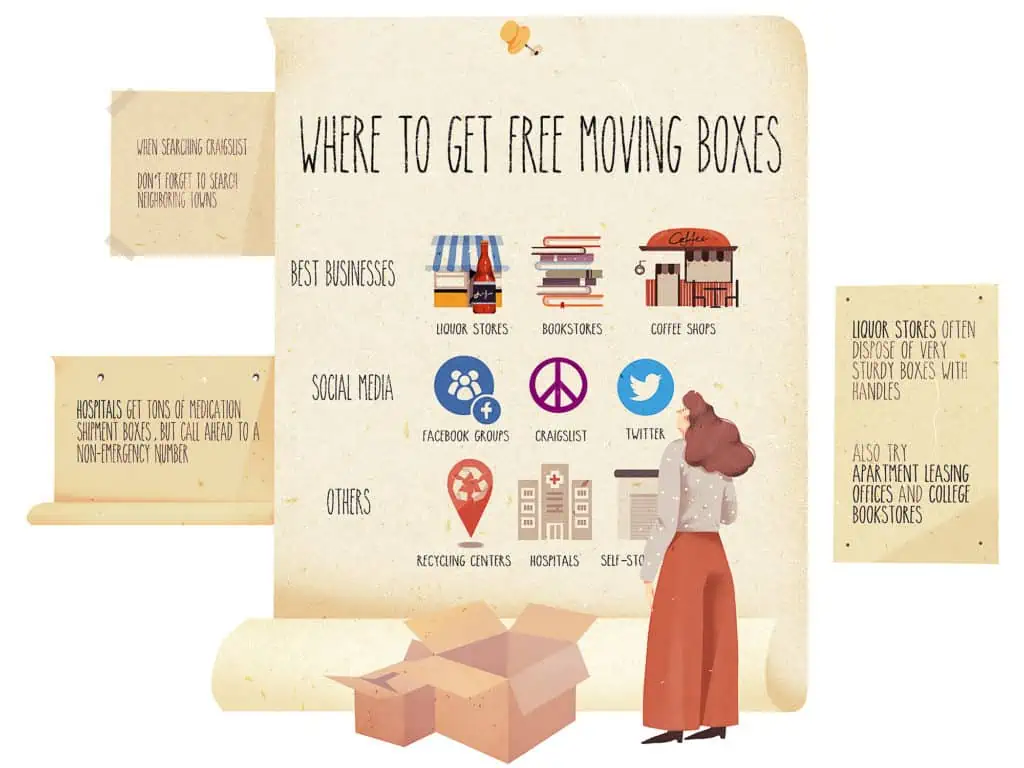
No moving checklist is complete without helping you figure out what kind of moving boxes you want. And there are plenty of ways to get them on the cheap … or even FREE if you do a little research. This checklist outlines all of the places you can score free boxes, and here’s a list of places you can try to at least get a deal on the ones you do purchase. But always remember that wherever and however you get your boxes, be sure they are clean and in good shape. No matter how cheap they are, there’s no value in getting your stuff dirty or crushed.

HireAHelper Free Moving Box Checklist (click to expand)

Since you still have plenty of time before the move, you don’t need to be frantically throwing items into boxes. Four weeks is plenty of time to start packing your stuff with an organized game plan. Will you pack items from one room together? Will you pack items of the same size together? Whatever method works for you is great, just be sure you are labeling your boxes as clearly and as detailed as possible so the unpacking process is even easier! If you’re not sure what labeling system is best for you, we really love this trick because it makes moving day efficient.

Purchase furniture to be built or delivered. 

Buying furniture now is a great idea so it can be ordered and delivered to your new home just as you’re about ready to set things up. Instead of lugging over that king-sized bed or oversized buffet, sell those items on Craigslist and look for new items that will fit. If they’re back-ordered or will take time to ship, that’s perfect because you still have a month to go!

Remember: if you have them shipped to your new address, you won’t have to worry about moving them. For items you end up buying on Craigslist, be sure to set up the pickup date on your moving day so that you can utilize the truck you have already rented! You can use this same trick at stores like IKEA. You can do all of your shopping and arrange to pick up these large pieces on your moving day so you can get the most bang for your buck for your moving truck rental.

3 Weeks Before the Big Move

If you decided to rent a truck, figure out which one and how big it needs to be about now.

Now that we’re three weeks out, it’s time to book your truck. The kind of truck you rent will be different for each move, but it will mostly depend on how much stuff you’re moving from point A to point B. You may want to shop around to find the best deal and see which day will be the least expensive. This post guides you through all of these important truck rental factors.

Okay, who exactly should I hire to move my stuff?

That’s the easiest question on this list! Just check out HireAHelper for all of your heavy-lifting needs. You can find local movers to help you on moving day so you won’t have to lift a finger. It’s suggested that you book your Helpers about 2-3 weeks in advance, so now is the time to get this checked off your to-do list.

It’s (officially) time to start packing.

It’s finally time to start packing up. And since you already figured out where to get boxes on the cheap, you can go ahead and pick up all of your moving supplies. Don’t forget to consult this post for a list of all of the supplies you will need for packing (plus tips to pack them up efficiently).

Make sure you know what you’re not allowed to transport on moving trucks.

Yep, you can’t bring it all! Here’s an entire list of things you should keep off the truck come moving day. Be sure to have a game plan to get these items to your new place.

How do I pack strange objects?

Moving Checklist: 3 Weeks Out

Let’s face it, not everything you own is going to fit nicely into a cardboard box. But we’ve got you covered with step-by-step instructions to pack up even the most unusual objects, such as these: 

1 Week Before the Big Move – What should I do a week before moving?

Do the mandatory cleanups of your old place.

It’s always nice to leave your old property in good shape for the new homeowners, but for renters, it’s imperative to do a few things before you leave in order to increase the chances of getting your security deposit back. After your place is emptied, make sure to patch and paint any holes in the walls so you don’t get charged for this simple repair. If there is anything else your landlord requires (like getting the carpets professionally cleaned), be sure to coordinate this before you head out.

What else should I pick up at the store?

Call us crazy, but we think a fanny pack, now fashionably called a “sling bag,” may be the best thing to wear come moving day … and here’s why! Now’s the time to find a sweet one so you’re all prepped and ready.

Also, consult this list so you have the seven items you absolutely need for moving day.

Prioritize the right cleanups for your new place.

Cleaning is the next big one on our moving checklist. If you can get into your new house, we highly suggest you head over there before you actually move everything in to give the new space a good, deep clean. Here are five areas that need some TLC right away. You can also setup time for a locksmith to come over to your new place to re-key the locks shortly after your move.

A Successful Moving Day

Moving Checklist: Moving Day

Be fully prepped with all the right stuff.

  • Put on your handy dandy moving day fanny pack and make sure you have these moving day essentials all ready to go.
  • If you booked a container, it should be fully loaded before moving day … especially if you have a morning pickup for your container.
  • If you rented a truck, make sure you get to the rental place early to avoid a line. Start your day on the right foot and totally on time! Also, if you hired Helpers, make sure you allow yourself at least an hour for picking up the truck so you can get back in time. You don’t want to waste any valuable time with your hired help!
  • The best thing you can do is to have a talk with you and your moving team at the beginning of the day. Go over all of the key pieces of information so everyone is on the same page from the start. You need to be a confident leader!

If I hired movers what should I do?

Sit back, be a manager, and watch them do the heavy lifting. Yes, this may feel a little awkward, but it’s what they’re there for! (Plus, for insurance reasons, you’re usually not allowed to help anyway.) Don’t be afraid to speak up if you want them to do something differently, like wrap the piece of furniture with one more pad for safety!

If I didn’t hire movers what should I do?

Get ready to hope your friends show up! Maybe do some stretches so you can avoid injury and mentally prepare yourself for being on the downside of a couch in a stairwell praying your friend holding the top doesn’t let go! At the very least, it’s going to be a long day, so stay hydrated and nimble. You’ll be extra excited to check this off the moving checklist.

Unload and label your stuff in the most efficient way.

If you used our labeling tips to make a game plan for which room each box should be delivered, then you’ll want to label the doors in the new place based on the key. This will keep things organized and will ensure that your Helpers get the right boxes in the right rooms of your new pad.

Should I tip my movers? If so … how much?

There’s a lot of debate on whether you should tip your movers or not, and if you do tip…how much should you cough up? For more clarification, check out this post and then make your call.

Following Up After the Big Move

Moving Checklist: Hiring Movers

Get rid of or utilize all your moving boxes correctly.

Chances are you’ll have a lot of leftover boxes. Here are some ideas to make the most of all of that cardboard:

If you can keep those boxes around for your next move, your future self will thank you. But if you don’t want to repurpose or don’t have the room to save them, please, don’t forget to recycle them! Here’s a searchable database that’ll let you know the closest place to recycle anything of yours that can be reused, including those moving boxes!

Meet your neighbors online!

Nothing like starting off on the right foot with the people you’ll be living next to for quite some time. Check out this post on neighbor etiquette, download the Nextdoor app (must have!), and then muster up the courage to head next door and say, “hello.”

Unpack (efficiently). 

Of course! We’ve got industry tips to make your unpacking party more manageable and more enjoyable. (Yes, it can be fun, but make sure you don’t hurt your back!).

Can I finally relax?

Yes, it’s time to celebrate! You definitely deserve to focus on this celebration step before moving on to the few remaining steps! After your move, we think it’s important to take a deep breath and celebrate in your new home. You’ve earned it!

What’s next?

Now the fun finally begins … getting settled into your new home! Consider painting the walls one of our favorite neutral colors, adding some smart home accessories, and even try tackling some of these DIY projects to transform your new home into home, sweet home. 

Two Ways to Take This Moving Checklist With You

    1. Tried and True Printer Friendly PDF – A ready-for-paper checklist. Pencil sold separately.
    2. Digital Friendly *Expanded* Version – Download/screenshot/save to your camera roll.

Illustrations by Dola Sun

How to Decorate Your Home for the Holidays on a Budget

Author:

Publish Date:

Last Modified Date:

Category: Money Saving

Tags: Tags: , , , , , , , , , , , , , , , , , ,

As home decor enthusiasts, the holidays are an opportunity to swap out our everyday decor for pieces that add some magic of the season to our homes. You could even say that decorating for the holidays is kinda like our Super Bowl!

New to holiday decorating? Go to the store and it might seem intimidating and kind of expensive to transform your space from top to bottom. But we are here to reassure you that you don’t have to go out and buy tons of new decorations to give your space that extra sparkle. Instead, there are plenty of budget-friendly (and free!) ways to deck the halls.

First, Choose a Color Scheme

If you want to make a big impact without buying tons of new items, we recommend starting with a color scheme. It can be gold and red, blue and silver, or honestly any color palette that you personally like. Choosing a few key colors/metallics will make decorating a lot easier.

Stick with your color scheme and we promise you’ll end up buying fewer items to decorate your home for the holidays. You can leave a lot of your everyday decor up in your space, but add these key colors for a pop of holiday glam that will really make your space look different from the everyday.

Wrap Faux Gifts

This tip may seem a little silly, but it’s actually a great one! If you’re an Amazon Prime enthusiast like us, then you probably get packages on the reg. Save a few of these shipping boxes, then use them as holiday decor.

It’s as simple as it sounds. Wrap the empty boxes with pretty wrapping paper and ribbon – in your color scheme, don’t forget – and use them throughout your home.

We both use these “gifts” as bookends on our built-ins, and place them strategically throughout our homes for a budget-friendly holiday touch! It doesn’t get much cheaper than that!

Use Grocery Store Finds (Food!)

One of our favorite holiday crafts is using fresh cranberries in glass hurricanes with candles throughout your home.

Cranberries are inexpensive and they add a colorful touch to your space. We especially love this idea, where you use water, faux greenery, cranberries, and floating candles to make a gorgeous centerpiece for your dining room table.

While you’re at the store, grab some cinnamon sticks too. You can group a few of these together in a mug and display on a shelf for a decoration that looks and smells good! You can also pick up some branches from the grocery store (or even better, your backyard!) to place in a tall vase in your home. This brings a winter touch to your home’s decor.

Get Cheap Faux Greenery From the Craft Store

During the holiday season, we’re at the craft store just about every weekend. (Seriously.)  And the one thing we recommend everyone picks up is some faux greenery. You can buy a bunch of small pieces for a steal and this greenery can be used all over your home.

Drape it on your mantle, put it on your dining room table, and add small pieces to your bookshelves. While you’re at it, pick up a few scented evergreen sticks. We love sticking these in the faux greenery to add a fresh winter scent to our spaces. Nothing says the holidays like the smell of fresh evergreen!

Gather Up and Display Your Holiday Cards

One of our favorite parts of the holiday season is all of the snail mail we receive. Instead of just throwing your holiday cards in a pile on your kitchen counter, get creative!

In the past, we’ve used a big chicken wire frame to display all of the cards we receive and we hang them up with clothespins. This acts as wall art and it’s fun for guests to see all of the cards from loved ones everywhere.

Another cool thing we do is save our holiday cards every year to make a little booklet of the many cards we receive. We display these booklets on our coffee tables so guests can flip through them when they visit. Plus, it’s a fun way to look back and see how families have changed over the years as this booklet gets bigger and bigger!

Go Crazy With Glass Ornaments

Glass ornaments are a major protip. You can buy a giant pack of ornaments for a few bucks. These always come in handy when we decorate our homes because they’re so versatile. Add some to a festive bowl, place some in a clear vase, and place a few next to holiday items on your shelves to add a sparkly touch!

Frame Special Holiday Moments

Don’t forget to change up your picture frames for the holidays!

We love the idea of framing special holiday moments and places that matter to you during the season. Want to save the most money? We channel our inner photographer and head around town to snap photos of favorite winter spots. The local ice skating rink, the big Christmas tree in town, a snowy tree … there are so many photo ops you can use to fill those frames! Or to make it easier, start a tradition now to take a special photo every year that you can use to display when you get out all of your holiday decorations.

We hope you feel inspired after reading this list to get in the spirit of the season. We promise you don’t have to spend big bucks to make your space feel special during the holidays. Turn on some holiday music, heat up some hot cocoa, and enjoy yourself as you deck your halls!

Your Kitchen Remodel: Cost Factors, Layout Ideas and How to Renovate

Author:

Publish Date:

Last Modified Date:

Category: Home Improvement

Tags: Tags: , , , , , , , , , , , , , ,

Going into a kitchen remodel is a very intimidating task, especially if you are not very familiar with the process. In spite of this, there are a lot of people blindly diving into this large-scale project every year … including me!

How many? According to the National Kitchen and Bath Association, over ten million Americans had their kitchens remodeled in 2015. And the numbers have only risen in the years since.

If you are one of those more than 10 million people tackling a kitchen remodel this year, this post is for you.

Everything To Expect When Remodeling A Kitchen

Kitchen Remodel

When I set out to get my kitchen remodeled, I honestly had no clue where to start. I had such a hard time finding info online that could map out the process for a rookie like me.

I vowed right then and there I would offer the internet everything I learned after I lived through that experience!

Take it from me, seeing the whole picture from the start is extremely helpful.

Most of the hard work (for anyone not physically putting together their kitchen infrastructure themselves) is at the front end of the process. Renovation is a lot like cooking: there’s a lot of prep.

Read over the complete process someone goes through before any work actually happens on a kitchen space:

  • Establish a budget
  • Find a designer to confirm new layout and provide accurate blueprints
  • Find and hire a contractor you trust and can afford
  • Identify where you want to buy cabinets and countertops
  • Research colors, textures, trends, materials, etc.
  • Order your cabinet and countertop and triple check to confirm your kitchen’s specs
  • Order anything else you may need (appliances, backsplash, light fixtures, faucets, sink, range hood, etc.)
  • Work with your contractor to establish a timeline
  • Keep track of all of all materials as they arrive
  • Clean out all of your old kitchen cabinets
  • Set up a temporary kitchen somewhere else in the house
  • Allow the contractors to do the heavy lifting, but be prepared to live in total chaos

Seems like a lot, huh? Don’t worry, here’s the step-by-step process.

Get Help Loading Your Container

See prices for movers by the hour – instantly.

Read real customer reviews.

Easily book your help online.


The first step is to create a layout, with or without a designer

Kitchen Remodel

If you plan on changing the layout your kitchen, the first thing you should do is hire a designer to work with you in identifying the best layout. Believe it or not, there’s a website for that. Head to ASID (the American Society of Interior Designers) to find one for hire near you!

From there, the designer will provide scaled blueprints that you will need to move onto the next steps. This step is technically optional, but it turned out to be the best thing I did during my remodel process!

Collect bids from contractorsKitchen Remodel

The next step in the process is collecting bids from contractors you are interested in hiring to complete your project.

Usually, bids come at no cost, so I encourage you to get several bids so you have a more accurate idea of what the project will cost you in the end. Before you decide on the contractor you wish to work with, be sure to check out this contract hiring guide and make sure you outline all of the details before you commit (and pay!).

What Specific Decisions Will I Have To Make?

To be perfectly honest, the amount of decisions you need to make as you prep for a kitchen renovation is overwhelming. But preparing for them in advance makes each task a lot more manageable.

Outside of the obvious questions regarding color and style, there are a lot of other things you will need to consider and purchase. Here is a list to keep handy:

  • Cabinet hardware
  • Cabinet door design
  • The material of the cabinet (which impacts cost)
  • The material of the countertop (which, again, impacts cost)
  • Box cabinets or special order cabinetry
  • Backsplash style, size, material
  • Appliances (style, brand, cost, color, “extras”)
  • Open shelving or closed cabinetry
  • Flooring materials and costs
  • Window treatments
  • Light fixtures
  • Extra organization (there are options built-into your cabinetry)
  • Installation of the cabinetry
  • Size of the cabinets (depth, width, and height)
  • Drawers vs. cabinets
  • Timeline
  • Can lights or fan
  • Material of sink
  • Plumping changes
  • Electrical changes

Be smart when shopping for materials

Kitchen Remodel

Once you hire the contractor, they will be a great resource for pointing you in the right directions for your materials, specifically for cabinets and countertops.

Sometimes contractors can get these products at a discounted rate if you shop at the retailers they recommend. Talk to them about this option before you decide on where you want to purchase your big-ticket items.

And if they don’t have any recommendations, you can always shop at big box hardware stores.

Protip: You will need to bring your exact measurements from your designer (or contractor) when you go out to physically shop, as well as have an idea of what design you want the kitchen to have. Of course, the salesperson can also help you make these decisions, but this is your kitchen, after all!

Finished buying? Your timeline begins now

Kitchen Remodel

After you make the cabinet and countertop order, your contractor will work with you to create a timeline of the projects that need to be done before the cabinets arrive, which will include:

  • Demolition
  • Electrical work
  • Plumbing work

Remember, cabinets can take up to eight weeks to arrive, and possibly longer if they are custom. Getting to work before the cabinets arrive will ensure they are ready to install quickly after they get to your front door.

Your contractor (or you) will get to work

Kitchen Remodel

It’s time to get to work! If you have contractors, they will work to demo your current kitchen, then work even harder to put the new and improved one back together. If you did get a contractor, this is the easy part for you because, at this point, the work is out of your hands. Most all of your hard work should have already occurred during the front end of this project.

Hope you don’t mind living without a proper kitchen for a while. Be patient and your new kitchen will be ready soon enough for you to enjoy!

How long will a kitchen renovation take?

Kitchen Remodel

Every kitchen renovation will vary in terms of timing, depending on the scope of work and the size of the space. But traditionally, a kitchen renovation can run on average 4-8 weeks. Living without a kitchen for that long can be a large inconvenience, but I am here to reassure you that if we can manage it, so can you!

Kitchen Remodel

My best advice to handle this chaos is to set up a temporary kitchen prior to demoing your current kitchen. We have our fridge, microwave, and crockpot working overtime! Plus, we meal prep at our parent’s house to make healthy food for the week (so you don’t have months and months of takeout).

Is It All Really Worth It?

Kitchen Remodel

Now being on the other side of it, it was absolutely worth it!

According to HGTV, a kitchen remodel is projected to give you a 70% return on your investment, while statistics from Today’s Homeowner reports that this number could be as high as 91% of a return on this investment! So as much as this intimidating task may seem overwhelming at first and chaotic to live through, coming out the other side will be worth it in the long run. You are adding significant value to your home by making these updates now and getting a gorgeous kitchen to enjoy at the same time.

Of course, there is a lot more information you can devour as you prepare for your upcoming kitchen remodel, but I hope this beginner’s guide gave you an overview of what to expect. Seeing the bigger picture from the start will provide you peace of mind to tackle each step with confidence, and maybe even a little bit of excitement!

We Try out the App That Digitally Arranges Your Furniture With Just a Picture

Author:

Publish Date:

Last Modified Date:

Category: Home Decorating

Tags: Tags: , , , , , , , , , , , , , , , , , ,

As DIY’ers and decorators, there’s nothing we love more than an empty room just begging to be styled and filled with beautiful pieces. But some rooms can be a little tricky. Do you put the couch over here? Or maybe you need a small table over there? It can be hard to visualize how pieces will work in a space, especially when you’re starting with a blank canvas. Plus, if you’re buying a few new pieces of furniture, it can be difficult to tell if they’ll really fit and work well in the space. No one wants to purchase a dresser only to find out that it’s actually way too big or small.

An Online Tool to Help You Arrange Furniture

Luckily, there’s a new tool out there that takes all of the guesswork out of the arranging furniture process. It’s called Modsy, and this growing service is changing the game for decorators… but also for new homeowners trying to decide on new furniture or anyone else who has a room that needs some TLC.

Techcrunch.com

Essentially, you can “try on” certain layouts in your specific space in order to visualize how it will work in that room before you move things around, or before you buy anything new. The service costs about $70 (which isn’t exactly free), but in the long run, it may help you avoid design regret (like when you buy a piece that simply doesn’t work for the room), leaving you with a space that is much more functional for your home.

Here’s how it works: You send over photos of your space, some measurements and details on both your vision and style. They then send over a professional 3D rendering with a 360-degree visualization tool.

Real Life Spaces Using Modsy

When we first heard of Modsy, we weren’t quite sold. How could it actually work? But then we saw that a few of our friends in the blogosphere used this service when working on room makeovers. We could hardly believe these photos…

Photo by Bower Power Blog; 3D Rendering of Bedroom via Modsy

Above is the 3D rendering of our friend Katie Bower’s bedroom. She used Modsy to visualize the furniture setup in her bedroom before buying all of the pieces.

Here’s what that space now looks like in real life…

Photo by Bower Power Blog

Pretty crazy, right?! Here’s another one.

Photo by Chris Loves Julia; 3D Rendering of Room via Modsy

Above is the 3D rendering from Chris Loves Julia’s nursery. Below is how the actual room turned out.

Photo by Chris Loves Julia

Let’s Give It a Try

We’re currently working on a living room makeover for a friend, and their tricky living room layout had us questioning where exactly we should place all of the furniture in the space. So we figured this was the perfect time to give Modsy a try and find the most functional livingroom layout. Here is how the website lays out their service:

After setting up an account on our phones, we sent in photos and measurements and they then gave us a blank room to review. 

Because we weren’t totally sure on the style we wanted for the space, we had them give us two design options. One was a bit more glam and feminine, the other a bit more contemporary. This was their interpretations:

We ended up loving the second design, and realized how easily a sectional could fit in the space! We also didn’t realize we would have enough room to add a bookshelf next to the couch, and this helped us view the space in a whole new light. 

This was another rendering from a different angle. We were able to plug-in a few pieces that the homeowners already own to make sure they could continue to work in the room. 

In the end, we were left with a functional layout that we’re confident will work as we help to design this room. It actually worked! While we still have a-ways to go with their space, we are both so excited to get to work and bring this vision board to life.

You Too Can Master the Art of Arranging Furniture

As two gals who can’t seem to get enough of home design and decor, we were incredibly impressed with this visualization tool. Here are our takeaways:

Pros:

  • Surprisingly easy to use
  • Slick, modern app design
  • 3D renderings are professionally done and easy to grasp (and amazing to look at!)

Cons:

  • It ain’t cheap. $70 per rendering (and $199 to include an adviser!)
  • It takes a little over a week to get renders and operates within business hours, so plan ahead
  • Recommended furniture through Modsy store can be great, but also a bit sales-y

If you’re struggling to decorate your new home, we hope you’ll give this tool a try. Hopefully, it will help you determine the best layout for the rooms throughout your home while providing you with design inspiration that is specific to your taste. Plus, you may even gain some confidence when it comes time to buy new pieces of furniture in your space, because you can try before you buy! Happy decorating!

The 5 (Surprising) Things I Learned About Fireplace Doors After Installing Them for a Living

Author:

Publish Date:

Last Modified Date:

Category: Home Improvement

Tags: Tags: , , , , , , , , , , ,

Your fireplace is the focal point of your room. As Director of Sales and Marketing for BrickAnew, I tell people this all the time. Stockings are hung from the mantle and graduation pictures are taken in front of it. But it’s also the dirtiest place in your house. One of the easiest ways to hide that mess is by adding glass doors to your fireplace.

(more…)

Showing Your Home? These Are the First Impressions That Matter

Author:

Publish Date:

Last Modified Date:

Category: Buying & Selling a Home

Tags: Tags: , , , , , , , , , , , , , , , , , , , , , , , , ,

To us, staging your home to sell is similar to going on a first date.

You set up this date in hopes to meet your future spouse. You don’t know if that’ll be the case but there’s always the hope, right? If you’re hoping to land “the one”, chances are you’re going to put some effort into prepping for this first date. We feel the same is true when it comes to staging your home to sell.

(more…)

Updated Garages Add Massive Value to Homes, so Here Are 5 Sweet Upgrades

Author:

Publish Date:

Last Modified Date:

Category: Buying & Selling a Home, Home Improvement

Tags: Tags: , , , , , , , , , , , , , , , , , , , ,

Your garage could be much more than a catch-all for excess junk accumulated over the years. It has the potential to be an aesthetic and functional extension of your home. That is if you’ve done the work to make it a usable space.

(more…)

5 Hidden Benefits to Decorating With Mirrors

Author:

Publish Date:

Last Modified Date:

Category: Home Decorating

Tags: Tags: , , , , , , , , , , , , , , , , , , , , ,

If you’re itching to decorate your rental or your new home, then we urge you to consider using mirrors as your figurative paint brush. Mirrors: they’re not just for the bathroom anymore! As long as you restrain yourself from lining them across every last surface, supplementing mirrors in your living space is a key way to make your place feeling super open.

Knowing that, here are five things that a mirror can do super easily for you!

(more…)

×

I'm Moving

Moving? Thinking about moving? Whether your move is off in the distance or you already have one foot out the door, you'll learn about everything you should expect through our useful how-to's, cool articles and much more. It's all specially curated for you in our "I'm Moving" section.
Explore
×

I'm a Mover

For rookies or veterans alike, our "I'm a Mover" section is filled with extensive industry news, crucial protips and in-depth guides written by industry professionals. Sharing our decade of moving knowledge is just one way we help keep our professional movers at the top of their game.
Explore